Step one, Step three, Step four – Rough Country 43102-00 User Manual
Page 2: Tools needed
43101-01/43102-00 pg 2
0704 Rev. A
Parts List and Hardware Identification
Installation
Step Two
R
EMOVE
THE
F
UEL
D
OOR
FROM
THE
R
EPLACEMENT
F
UEL
C
UP
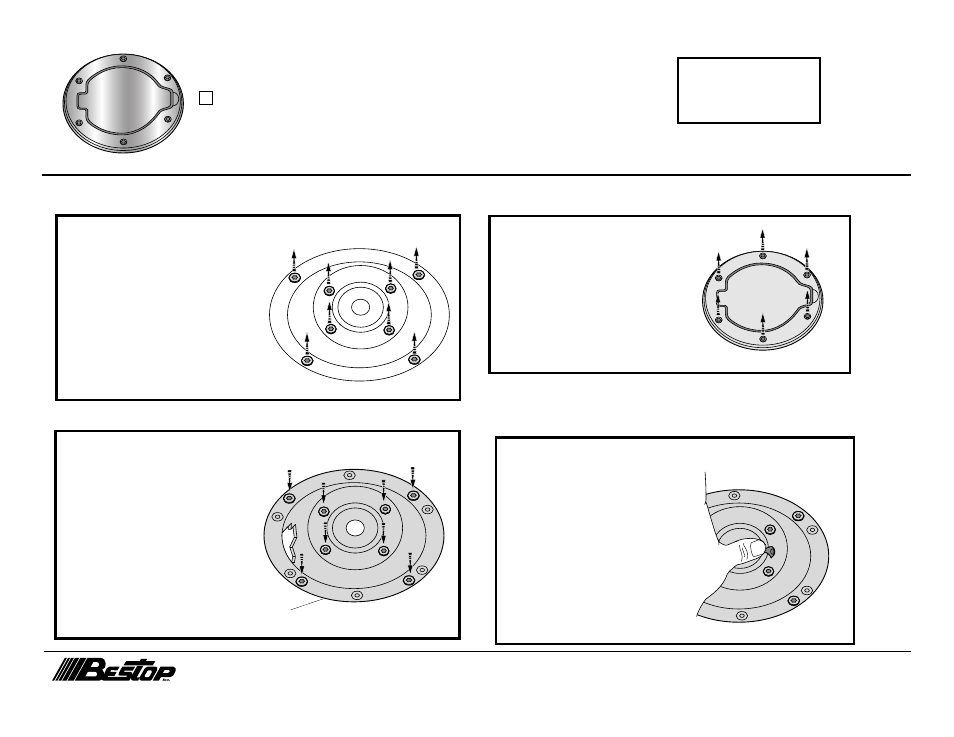
Use a 4mm Allen Wrench to remove the
six (6) bolts that attach the Fuel Door to
the replacement plastic cup. Make sure
that the six (6) hex nuts on the back of
the assembly remain in place. Set the
bolts aside to be used later.
Tools Needed
4mm Allen Wrench
T-25 Torx Wrench
Safety Glasses
Fuel Door Assembly, Qty - 1
Step One
R
EMOVE
O
RIGINAL
F
UEL
C
UP
Unscrew the gas cap from the fuel filler neck.
Use a T-25 Torx Wrench to remove the four
screws around the filler neck and the four
screws around the outside of the cup. Set
these screws aside to be used to install the
new fuel cup.
Remove the fuel cup from the vehicle.
Step Three
I
NSTALL
THE
R
EPLACEMENT
F
UEL
C
UP
Slide the filler neck on the Replacement Fuel
Cup into the filler hole. Reinstall the eight (8)
screws that were removed in Step One ( four
(4) around the filler neck and four (4) around
the outside of the cup).
Step Four
I
NSTALL
G
AS
C
AP
T
ETHER
Remove the gas cap tether from the old
fuel cup. Push your thumb between the
tether and the cup until it comes free.
Then push the tether into the mounting
hole in the new fuel cap. Screw the gas
cap onto the filler neck.
Remove T-25 Torx Screws
Replacement Fuel Cup