Rough Country 87349 User Manual
Page 2
DUAL STABILIZER INSTALLATION INSTRUCTIONS
1. Jack up the front of the Jeep and lower onto jack stands to allow the front wheels to turn.
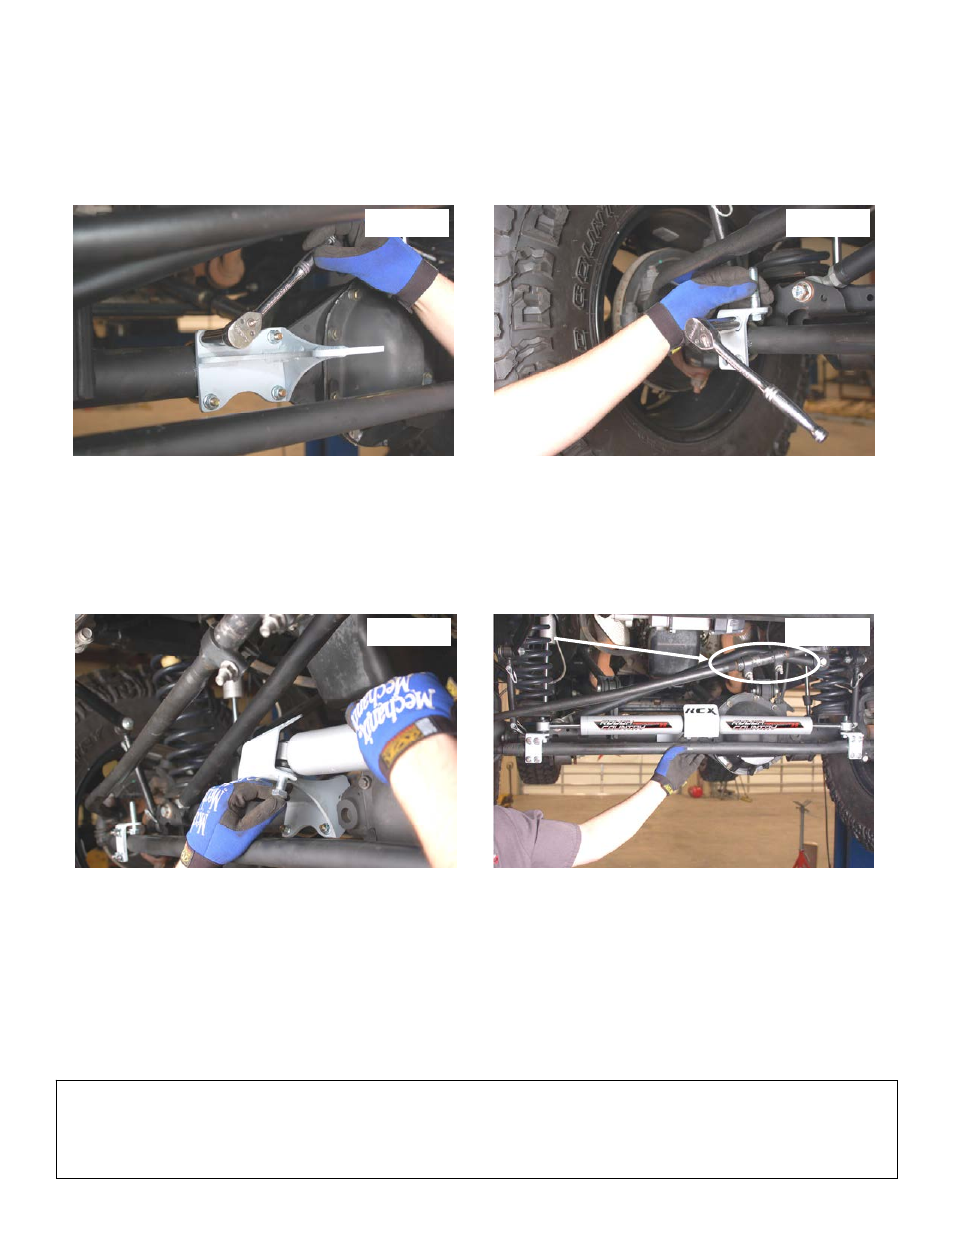
2. Install the dual center bracket with the supplied u-bolts as shown in Photo 1 with the edge of the bracket against the
differential housing. Do not fully tighten at this time.
3. Install the ½” X 2½” bolt/ washer on the bracket and install on the tie rod as shown in Photo 2 (bolt can not be
installed after installing bracket) with the offset on the bracket to the inside. The offset must be to the inside to
ensure the stabilizers do not bottom-out when turning.
4. Install the cover plate as shown with the ½” X 2½” bolts/washers and stabilizers. See Photo 3. Level the center
bracket horizontally and tighten hardware using a 3/4” wrench on the stabilizers and 9/16” on the axle bracket.
5. Install the opposite ends of the stabilizer cylinders on the tie rod bracket bolts installed in Step 2. See Photo 4.
6. On vehicles equipped with 2 1/2” kits, it may be necessary to adjust the drag link collar to move the pinch bolts away
from the stabilizer cylinders. See Photo 4.
7. Slightly snug all brackets and turn the steering from side to side. Make adjustments to the tie rod brackets to allow
the full stroke of the stabilizer cylinders. This is done by moving the tie rod mounts in or out. After the brackets are
centered. Tighten with a 9/16” wrench.
PHOTO 3
PHOTO 4
CAUTION: Any and all warranties including but not limited to any express warranties, implied warranty of merchant-
ability, or implied warranty of fitness for a particular purpose shall not apply to any product altered in any way outside
the premises of the manufacturer or to any product which is not installed in accordance with the written instructions
provided by the manufacturer for installation of the product.
PHOTO 1
PHOTO 2