Mounting to ceiling – Uncle Milton Solar System In My Room User Manual
Page 3
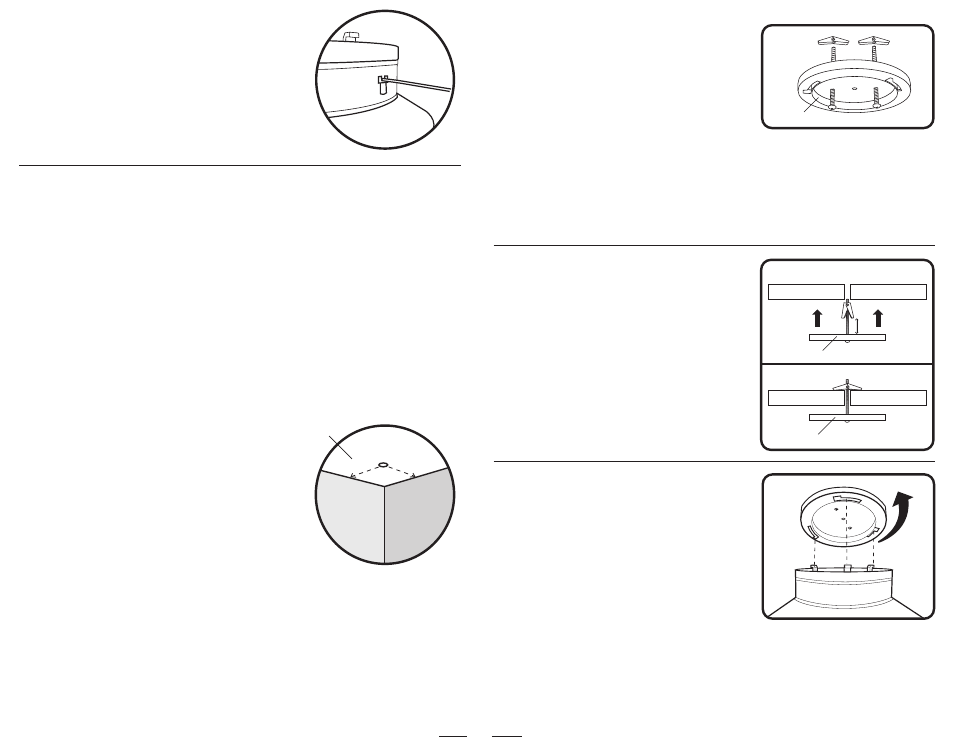
2. Using the mounting plate as a template, place
the mounting plate against the ceiling with the
side marked “THIS SIDE DOWN” facing you. Using
a pencil, mark the two outer holes.
3. With the markings you have made, drill two
7/16 inch holes all the way through the dry wall.
4. Insert the two bolts through the side labeled
“THIS SIDE DOWN.” Then, screw on the butterfly
anchors. IMPORTANT: ALLOW AT LEAST 1 inch
BETWEEN THE BUTTERFLY ANCHOR AND THE
MOUNTING PLATE. This will allow the butterfly
anchor’s wings to open when passed through the
drywall ceiling.
5. Insert screws through ceiling with butterfly
anchors folded.
6. Gently maintain a downward pressure on solar
system ceiling plate while screwing bolts
clockwise until plate is firmly snug and level
against ceiling. Do not over tighten.
7. Guide the three legs on the top of the hub into
the corresponding holes on the solar system
mounting plate.
8. Rotate the hub clockwise 30 degrees until you
feel it click into place.
9. The remote control works best with line of site
toward the Sun.
Mounting Plate
Mounting Plate
Mounting Plate
Ceiling
Ceiling
1"
Ceiling
Ceiling
MER
CUR
Y
2. Connect Mercury’s wire to the Lower Rotation Ring
by inserting the end of the wire, tip point down.
3. Continuing with Venus and ending with Neptune,
insert the remaining seven planets by repeating
steps 1 and 2.
Mounting to Ceiling
Tools required - Drill, 7/16” drill bit, small screwdriver
NOTE: THIS STEP SHOULD BE DONE BY AN ADULT.
NOTE: THE MOBILE IS ONLY INTENDED TO BE INSTALLED TO A HORIZONTAL DRYWALL CEILING.
BECAUSE OF VARIATIONS BETWEEN BUILDING MATERIALS AND CONSTRUCTION METHODS, THE
INCLUDED MOUNTING HARDWARE MAY NOT BE SUITABLE FOR ALL INSTALLATIONS.
1. Determine the hanging location.
IMPORTANT! Make sure there is a minimum of 22 inches of clearance on all sides, measuring
from the mount point. The mobile needs this clearance to allow unobstructed rotation of the
planets.
22"
22"
Ceiling