Altronix HubWay LDH8 Installation Instructions User Manual
Page 8
- 8 -
HubWayLDH Active Hub Unit
Altronix is not responsible for any typographical errors.
140 58th Street, Brooklyn, New York 11220 USA, 718-567-8181, fax: 718-567-9056
website: www.altronix.com, e-mail: [email protected], Lifetime Warranty, Made in U.S.A.
IIHubWayLDH8/HubWayLDH16
H22M
MEMBER
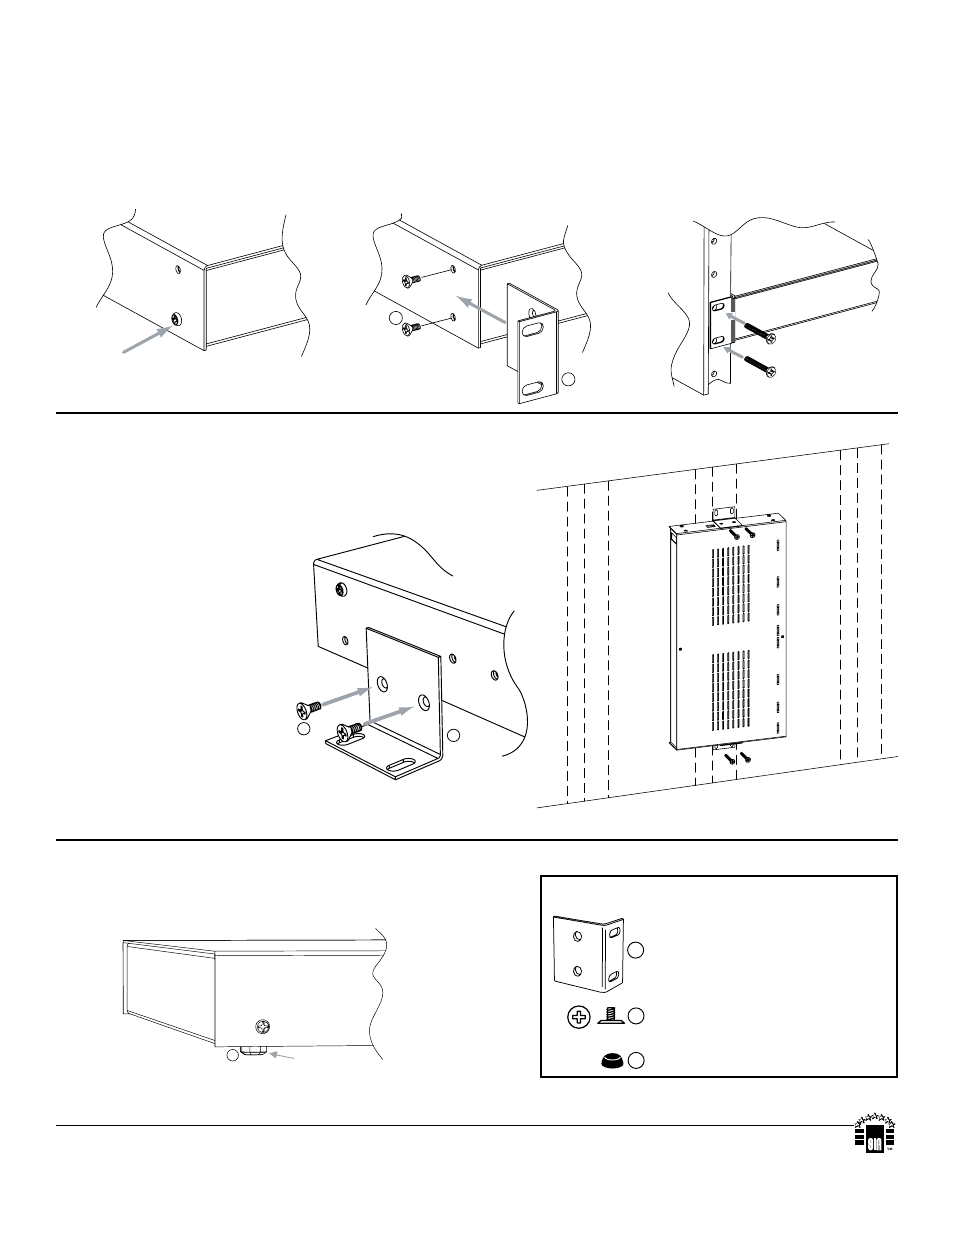
Mounting Options:
Fig. 5
Wall Mount Installation
1- Install mounting brackets (A) on the left and right side of rack chassis using
four (4) flat head screws (B) (included) (Fig. 6a).
2- Place unit at desired location and secure with mounting screws
(not included) (Fig. 6b).
Caution: It is necessary to
make sure mounting screws
are securely fastened to a
beam when installing the
unit vertically.
Rack Mount Installation
1- Remove and discard factory installed screws from both sides of rack chassis (Fig. 5a).
2- Install mounting brackets (A) on the left and right side of rack chassis using the
four (4) flat head screws (B) (included) (Fig. 5b).
3- Place unit into desired EIA 19” rack position and secure with mounting screws (not included) (Fig. 5c).
Fig. 7
Fig. 6
Shelf Installation
1- Position and affix rubber pads (C) (included) at each
corner on the bottom of the unit (Fig. 7).
2- Place unit in desired location.
B
A
C
Mounting Hardware
(Included):
B
A
Fig. 6b
Fig. 6a
C
A
B
Fig. 5b
Fig. 5a
Fig. 5c
Top
Top
Top
Front
Left
Front
Left
Front Left
Left Side
Rubber Pad
Two (2) mounting brackets
Six (6) flat head screws
for mounting brackets.
Four (4) rubber pads.
Remove
Dotted lines indicate studs
behind sheetrock.