Acroprint timeQplus Biometric (V2) Installation User Manual
Page 14
timeQplus BIOMETRIC™ Installation Guide
10
13
timeQplus BIOMETRIC™ Installation Guide
Step 1: TQ100 Terminal Configuration and Setup
The Fingerprint Identification Unit (FIU) Optical Overlay which is taped
to the front page enhances the ability of the FIU to read fingerprints
where the skin is very dry or for employees with fingerprints that are
marginal. Please note that the overlay is optional and not required.
If you choose to use the overlay, remove it from the plastic bag.
Remove the protective paper covers from the front and back side of
the Overlay, and press the Overlay onto the glass cover of the
fingerprint reader. Care should be taken to cover only the glass,
and remove any air bubbles from underneath the Overlay.
NOTE: The overlay can be removed and cleaned with a wet wipe as
necessary and reapplied to the glass. The sensitivity of the FIU can
also be adjusted at the employee level if necessary.
Connect the power cord to the TQ100 and to the electrical outlet.
DO NOT
connect the TQ100 terminal to the computer at this time.
Ethernet TQ100 Terminal Configuration
From your Network Administrator obtain an IP address to be used
for the terminal.
To use the Ethernet connection, follow these instructions:
Press the Power On button
Press ‘Menu’
Using the “Down” scroll button, highlight –Setup-, then press ‘OK’
Scroll and highlight –Communication-, then press ‘OK’
Press ‘OK’ again and using the 0 thru 9 buttons on the keypad,
enter the -Device ID- number (must be a value from 1 to 10),
then press ‘OK’.
NOTE: The factory default is set to 1. If you plan to use only one
terminal, leave it at 1. If you will have more than one terminal,
each will need a unique ID number.
Scroll and highlight -Port No-, press ‘OK’ to change the number if
required, then press ‘OK’ again.
NOTE: The factory default is set to 5005 which is normally safe to
use. It is best to confirm this setting with your network
administrator who will provide you with another number if
necessary.
Step 2: Software Installation and Terminal Connection
•
Insert the timeQplus Biometric CD into the CD-ROM drive and the
Attendance Rx install program should automatically start. Input the
appropriate information when requested. You will be asked to verify
the directory [location] for storing the application files; it is highly
recommended that you accept the default locations.
•
After all the files are loaded onto your computer, choose to ‘Restart’
your computer.
On restart, the Setup Wizard will automatically start and lead you through
entering the setup parameters you recorded in the pre-install document.
If you exit the Setup Wizard prior to completion, none of your data will
be saved.
NOTE: You will have the option to change the setup parameters later
if necessary. You also have the option to Initialize the Database which
will reset all of the parameters to the default values and restart the
Setup Wizard from the beginning. Instructions for this operation are
in the online Help.
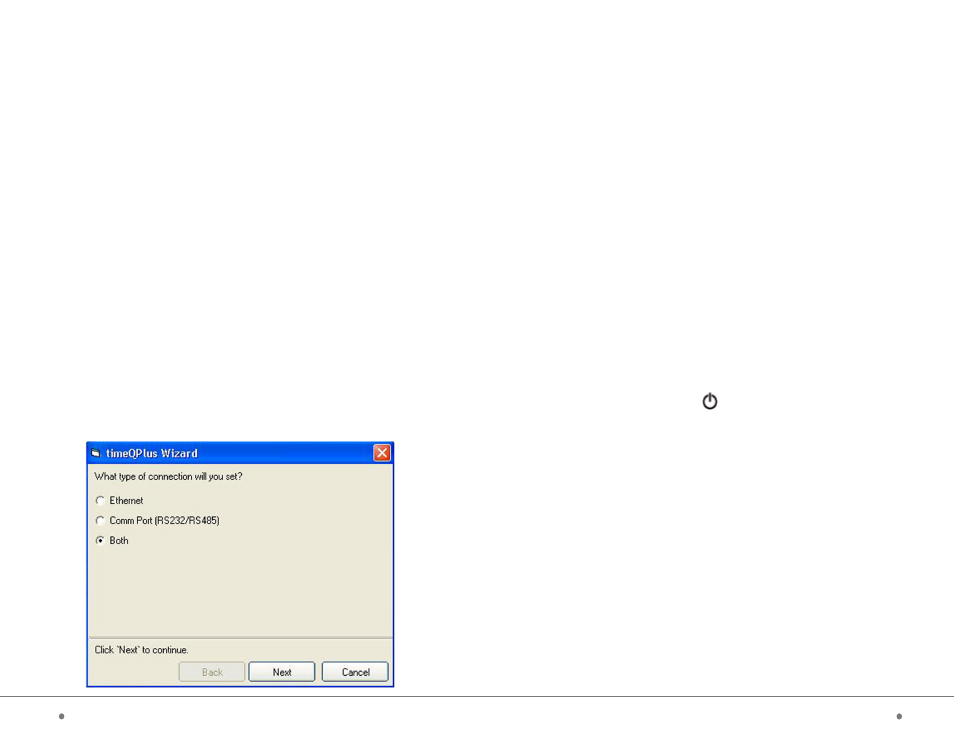
When you get to the timeQplus Settings screen, press timeQplus
Settings button to get the screen below:
Then check the appropriate box (es) to enable timeQplus Biometric
Ethernet, Comm Port or both types of communication (terminals)
according to your network configuration on this computer.
Then click Next.