Drawings, Cahier, Miniplan 1 verso – Petzl VERTEX ST User Manual
Page 2: Field of application, Nomenclature of parts, Inspection, points to verify, Instructions for use
2
A12_VERTEX_ST_A125060D (040211)
75 mm
76 mm
77 mm
78 mm
80 mm
VERTEX ST
DRAFT 1 - 27.01.11
Miniplan 1 verso
CAHIER
CAHIER
A125060D (040211)
miniplan 1 verso
Instructions for use / Mode d’emploi
Accessories / Accessoires
Spare parts / Pièces détachées
3. Test / test
Mounting the headlamp / Fixation de la lampe frontale
PIXA 1: E78AHB
PIXA 2: E78BHB
PIXA 3: E78CHB
Attaching hearing protection / Fixation des protections antibruit
Attaching
Clippage
Removing
Déclippage
Replacement foam for VERTEX
Mousse de rechange pour VERTEX
A10210
Absorbent foam for VERTEX
Mousse absorbante pour VERTEX
A10200
Standard stickers for VERTEX
Autocollants standards pour VERTEX
A10100
Reflective stickers for VERTEX
Autocollants réfléchissants pour VERTEX
A10110
VIZIR face shield / Visière VIZIR
A15
1
(EN) ENGLISH
Helmet for industry
Field of application
This helmet is designed only for
industrial use.
The chinstrap has a strength
of between 15 daN and 25 daN
(requirement of the EN 397
standard).
The VERTEX ST meets optional
requirements of EN 397: Protection
against impacts down to -30 °C,
resistance to lateral deformation,
protection against accidental contact
with live conductors up to 440 V AC
and protection against molten metal
splash.
Electrical standards:
- EN 50365 (class 0): this helmet is
electrically insulated for use near low
voltage installations, not exceeding
1500 V DC (or 1000 V AC).
It is the responsibility of the user to
check that the nominal voltage likely
to be encountered does not exceed
the above limits.
- ANSI Z89.1-2009 class E: The
helmet was tested at a voltage of
20000 V, but this does not in any
way guarantee protection against
electric shocks at this voltage. The
standard guarantees protection
against electric shocks resulting
from accidental contact between the
helmet and a live electric device.
Helmets offering electrical
insulation can not be used alone: it
is necessary to use additional
equipment with insulation
protection.
Insulating helmets must not be used
in situations where there is a risk
which could partially reduce their
insulating properties.
This helmet greatly reduces the risk
of injuries due to falling objects.
In a major impact, the helmet
deforms to absorb the maximum
amount of energy possible,
sometimes to the point of destroying
the helmet.
WARNING
Activities involving the use of
this equipment are inherently
dangerous.
You are responsible for your own
actions and decisions.
Before using this product, you must:
- Read and understand all
instructions for use.
- Get specific training in its proper
use.
- Become acquainted with its
capabilities and limitations.
- Understand and accept the risks
involved.
Failure to heed any of these
warnings may result in severe
injury or death.
A125060D (040211)
2
Responsibility
WARNING, specific
training in the activities
defined in the field of
application is essential before use.
This product must only be used by
competent and responsible persons,
or those placed under the direct and
visual control of a competent and
responsible person.
Gaining an adequate apprenticeship
in appropriate techniques and
methods of protection is your own
responsibility.
You personally assume all risks
and responsibilities for all damage,
injury or death which may occur
during or following incorrect use
of our products in any manner
whatsoever. If you are not able, or
not in a position to assume this
responsibility or to take this risk, do
not use this equipment.
Nomenclature of parts
(1) Shell, (2) Headband,
(3) Headband adjustment wheels,
(4) Chin strap positioning buckles,
(5) Chin strap fastening and
adjustment buckle, (6) Side slots
for mounting hearing protection,
(7) Headlamp clips, (8) Front
headlamp mounting slot, (9) Face
shield mounting hole.
Principal materials: Acrylonitrile
Butadiene Styrene (ABS) shell,
polyester straps.
Inspection, points to
verify
Before each use, check the condition
of the shell and the headband
attachment system (verify there
are no cracks or deformation on
the outside or the inside...). Check
the condition of the webbing and
stitching. Verify that the headband
adjustment system and chinstrap
buckle are functioning properly.
WARNING, a major impact to the
helmet can significantly reduce its
protective properties without leaving
visible signs of damage. Retire your
helmet after a major impact.
Consult the details of the inspection
procedure to be carried out for each
item of PPE on the Web at www.
petzl.com/ppe
Contact PETZL if there is any doubt
about the condition of this product.
Instructions for use
1. Preparation
Use only the smooth areas for
stickers and other markings. PETZL
stickers are approved. Do not
apply paint, solvents, adhesives
or self-adhesive labels, except
those recommended by PETZL
instructions.
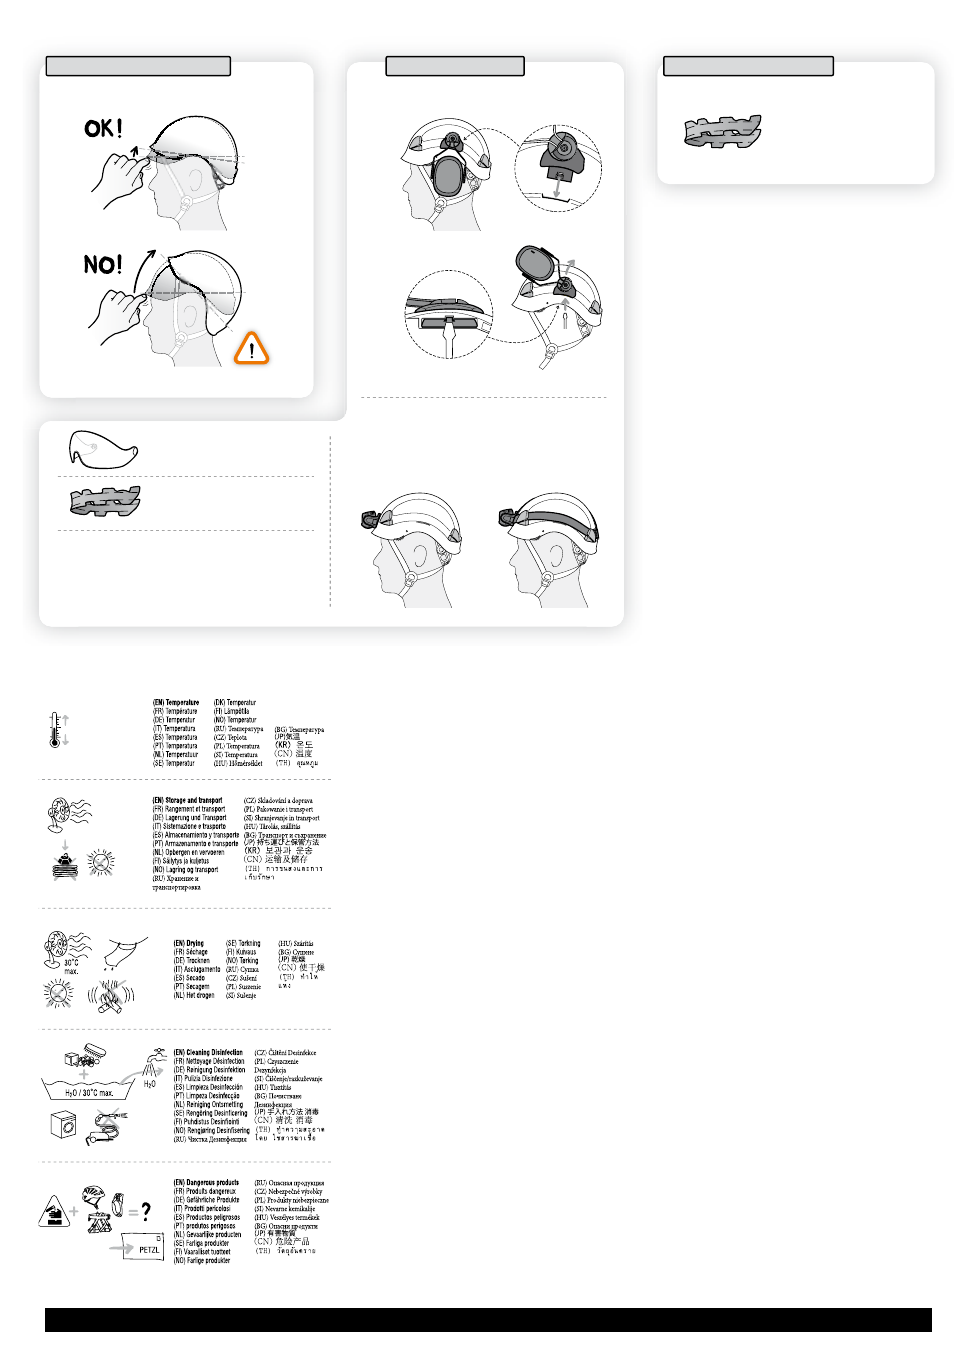
2. Adjustments
2a. Adjust the headband to
maximum size using the adjustment
wheels and place the helmet on
your head.
2b. Position the adjusters under
the ears. To adjust the chinstrap
backwards or forwards, slide the
webbing through the chinstrap
positioning buckles.
2c. Use the adjustment wheels to
increase or decrease the size of the
headband. You can adjust the height
of the headband on your forehead
(two adjustment holes for the
vertical position of the headband).
2d. Fasten the chinstrap using the
buckle. You must hear the buckle
“click” to ensure proper fastening.
Tighten the chinstrap, it should be
snug, but comfortable. A correctly
adjusted chinstrap reduces the
risk of the helmet coming off
accidentally.
You must pull on the chinstrap to
verify that the buckle is properly
fastened.
To open the buckle, press the button
on the chinstrap fastening buckle.
+ 50°C / + 122°F
- 30°C / - 22°F
75 mm
76 mm
77 mm
78 mm
80 mm
VERTEX ST
DRAFT 1 - 27.01.11
Miniplan 1 verso
CAHIER
CAHIER
A125060D (040211)
miniplan 1 verso
Instructions for use / Mode d’emploi
Accessories / Accessoires
Spare parts / Pièces détachées
3. Test / test
Mounting the headlamp / Fixation de la lampe frontale
PIXA 1: E78AHB
PIXA 2: E78BHB
PIXA 3: E78CHB
Attaching hearing protection / Fixation des protections antibruit
Attaching
Clippage
Removing
Déclippage
Replacement foam for VERTEX
Mousse de rechange pour VERTEX
A10210
Absorbent foam for VERTEX
Mousse absorbante pour VERTEX
A10200
Standard stickers for VERTEX
Autocollants standards pour VERTEX
A10100
Reflective stickers for VERTEX
Autocollants réfléchissants pour VERTEX
A10110
VIZIR face shield / Visière VIZIR
A15
1
(EN) ENGLISH
Helmet for industry
Field of application
This helmet is designed only for
industrial use.
The chinstrap has a strength
of between 15 daN and 25 daN
(requirement of the EN 397
standard).
The VERTEX ST meets optional
requirements of EN 397: Protection
against impacts down to -30 °C,
resistance to lateral deformation,
protection against accidental contact
with live conductors up to 440 V AC
and protection against molten metal
splash.
Electrical standards:
- EN 50365 (class 0): this helmet is
electrically insulated for use near low
voltage installations, not exceeding
1500 V DC (or 1000 V AC).
It is the responsibility of the user to
check that the nominal voltage likely
to be encountered does not exceed
the above limits.
- ANSI Z89.1-2009 class E: The
helmet was tested at a voltage of
20000 V, but this does not in any
way guarantee protection against
electric shocks at this voltage. The
standard guarantees protection
against electric shocks resulting
from accidental contact between the
helmet and a live electric device.
Helmets offering electrical
insulation can not be used alone: it
is necessary to use additional
equipment with insulation
protection.
Insulating helmets must not be used
in situations where there is a risk
which could partially reduce their
insulating properties.
This helmet greatly reduces the risk
of injuries due to falling objects.
In a major impact, the helmet
deforms to absorb the maximum
amount of energy possible,
sometimes to the point of destroying
the helmet.
WARNING
Activities involving the use of
this equipment are inherently
dangerous.
You are responsible for your own
actions and decisions.
Before using this product, you must:
- Read and understand all
instructions for use.
- Get specific training in its proper
use.
- Become acquainted with its
capabilities and limitations.
- Understand and accept the risks
involved.
Failure to heed any of these
warnings may result in severe
injury or death.
A125060D (040211)
2
Responsibility
WARNING, specific
training in the activities
defined in the field of
application is essential before use.
This product must only be used by
competent and responsible persons,
or those placed under the direct and
visual control of a competent and
responsible person.
Gaining an adequate apprenticeship
in appropriate techniques and
methods of protection is your own
responsibility.
You personally assume all risks
and responsibilities for all damage,
injury or death which may occur
during or following incorrect use
of our products in any manner
whatsoever. If you are not able, or
not in a position to assume this
responsibility or to take this risk, do
not use this equipment.
Nomenclature of parts
(1) Shell, (2) Headband,
(3) Headband adjustment wheels,
(4) Chin strap positioning buckles,
(5) Chin strap fastening and
adjustment buckle, (6) Side slots
for mounting hearing protection,
(7) Headlamp clips, (8) Front
headlamp mounting slot, (9) Face
shield mounting hole.
Principal materials: Acrylonitrile
Butadiene Styrene (ABS) shell,
polyester straps.
Inspection, points to
verify
Before each use, check the condition
of the shell and the headband
attachment system (verify there
are no cracks or deformation on
the outside or the inside...). Check
the condition of the webbing and
stitching. Verify that the headband
adjustment system and chinstrap
buckle are functioning properly.
WARNING, a major impact to the
helmet can significantly reduce its
protective properties without leaving
visible signs of damage. Retire your
helmet after a major impact.
Consult the details of the inspection
procedure to be carried out for each
item of PPE on the Web at www.
petzl.com/ppe
Contact PETZL if there is any doubt
about the condition of this product.
Instructions for use
1. Preparation
Use only the smooth areas for
stickers and other markings. PETZL
stickers are approved. Do not
apply paint, solvents, adhesives
or self-adhesive labels, except
those recommended by PETZL
instructions.
2. Adjustments
2a. Adjust the headband to
maximum size using the adjustment
wheels and place the helmet on
your head.
2b. Position the adjusters under
the ears. To adjust the chinstrap
backwards or forwards, slide the
webbing through the chinstrap
positioning buckles.
2c. Use the adjustment wheels to
increase or decrease the size of the
headband. You can adjust the height
of the headband on your forehead
(two adjustment holes for the
vertical position of the headband).
2d. Fasten the chinstrap using the
buckle. You must hear the buckle
“click” to ensure proper fastening.
Tighten the chinstrap, it should be
snug, but comfortable. A correctly
adjusted chinstrap reduces the
risk of the helmet coming off
accidentally.
You must pull on the chinstrap to
verify that the buckle is properly
fastened.
To open the buckle, press the button
on the chinstrap fastening buckle.
+ 50°C / + 122°F
- 30°C / - 22°F