Quick guide 1 – Zoom G7.1ut User Manual
Page 6
ZOOM G7.1ut
10
Quick Guide 1
(Play Mode/Manual Mode Operation)
This section explains various basic steps, allowing you to use the G7.1ut right away.
ÉBpmTp
BpmTp
AmpDrive
AmpDrive ™LVL100
LVL100
U0
U0
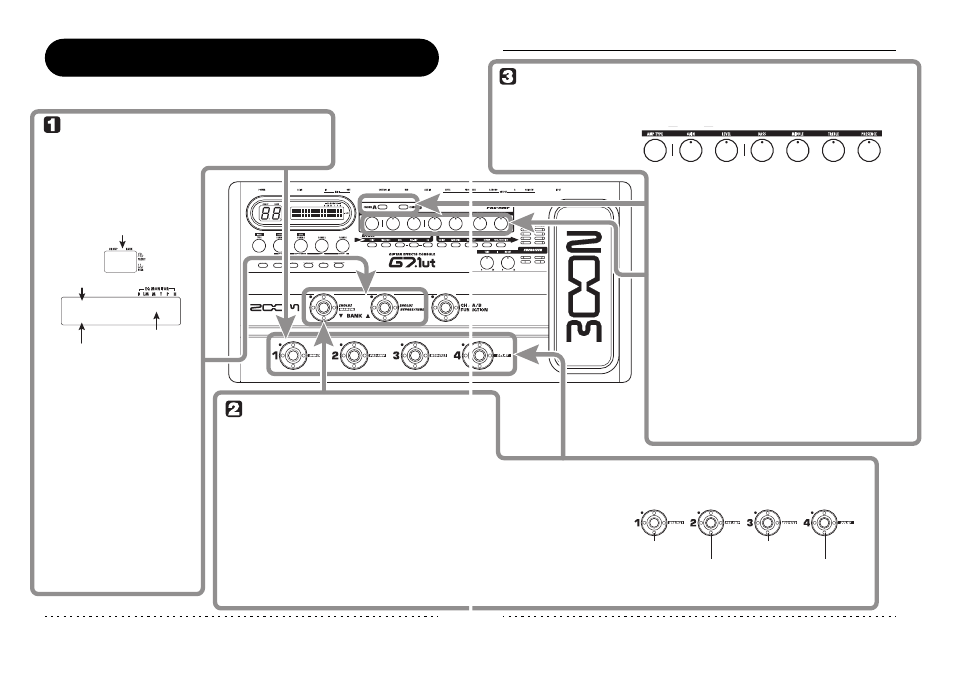
Selecting a patch (play mode)
HINT
You can switch the
group/bank by turning the
[TYPE] knob.
NOTE
In manual mode, the foot switches do not select
patches. However, the [TYPE] knob (group/bank
selection) and parameter knob 1 (patch selection)
function the same as in play mode. Please note that
you go back to "play mode" when you change
patches.
HINT
Group name/Bank number
[Indication in play mode]
Patch name
Patch level
Immediately after power-on, the unit will be in play mode,
which is for playing your instrument while selecting patches.
In manual mode, you can use foot switches 1 – 4 to
switch a module on and off.
Turning a module on and off
with your foot (manual mode)
Function foot switch assignment
• You can switch patches within
the same group/bank by turning
parameter knob 1.
• You can adjust the patch level
(output level of the individual
patch) by turning parameter
knob 2.
The G7.1ut switches to manual mode.
2.
To select a patch from
another group/bank, use
the BANK [
W]/[Q] foot
switches to select the
group/bank and then use
foot switches 1 – 4.
1.
To select a patch, use foot
switches 1 – 4.
1.
In play mode, keep the BANK [
W] foot
switch depressed for more than one
second.
Quick Guide 1 (Play Mode/Manual Mode Operation)
ZOOM G7.1ut
11
ÉBpmTp
AmpDrive ™LVL100
U0
Pre-amp operation
HINT
NOTE
2.
Press the foot switch for the module to be switched on and off.
3.
To return to play mode, press the BANK [
W] foot switch.
[Foot switch and corresponding modules]
WAH/EFX1 module
DELAY module
PRE-AMP module
MOD/EFX2 module
The changes that you have made to a patch will
be lost when you select another patch. To keep
the changes, store the patch first (→ p. 13).
You can switch between channel A and B with
the [FUNCTION] (CH A/B) foot switch (→ p. 34).
2.
Turn the knobs of the pre-amp section to
make adjustments.
The sound of the channel selected in step 1 changes.
When you operate a knob, the name of the parameter
and the current setting value appear on the display.
To return to play mode (or manual mode), press the
[EXIT] key.
1.
Select the channel for which to make a
setting with the [PRE-AMP A/B] keys.
The pre-amp section
allows you to adjust
distortion type,
intensity, and EQ for
two channels (A/B)
separately.
The key light shows which channel is currently selected.
[Pre-amp section]
[GAIN] knob
[BASS] knob
[TREBLE] knob
[AMP TYPE] knob
Distortion type
[LEVEL] knob
[MIDDLE] knob [PRESENCE] knob
Pre-amp
module
output level
Mid range
boost/cut
High range
boost/cut
Low range
boost/cut
Distortion
intensity
Ultra-high
range boost/cut