5 converters and adapters, 6 operating systems, 4 components – Tripp Lite 932845 User Manual
Page 6: 1 front view, 2 keyboard module, Introduction
6
4.3.5 Converters and Adapters
4.3.6 Operating Systems
Operating System
Versions Supported
Windows
2000 and higher
Linux RedHat
6.0 and higher
Linux SuSE
8.2 and higher
Linux Mandriva (Mandrake)
9.0 and higher
UNIX AIX
4.3 and higher
UNIX Free BSD
3.51 and higher
Operating System
Versions Supported
UNIX Sun
Solaris 8 and higher
Novell Netware
5.0 and higher
Mac
8.6 and higher
OS/2
Warp and higher
DOS
6.2 and higher
Use a B015-000 PS/2 to USB Adapter to convert any P774-Series PS/2 KVM Cable Kit for use with a USB computer/server.
Supported operating systems are shown in the table, below:
4.3 System Requirements
(continued)
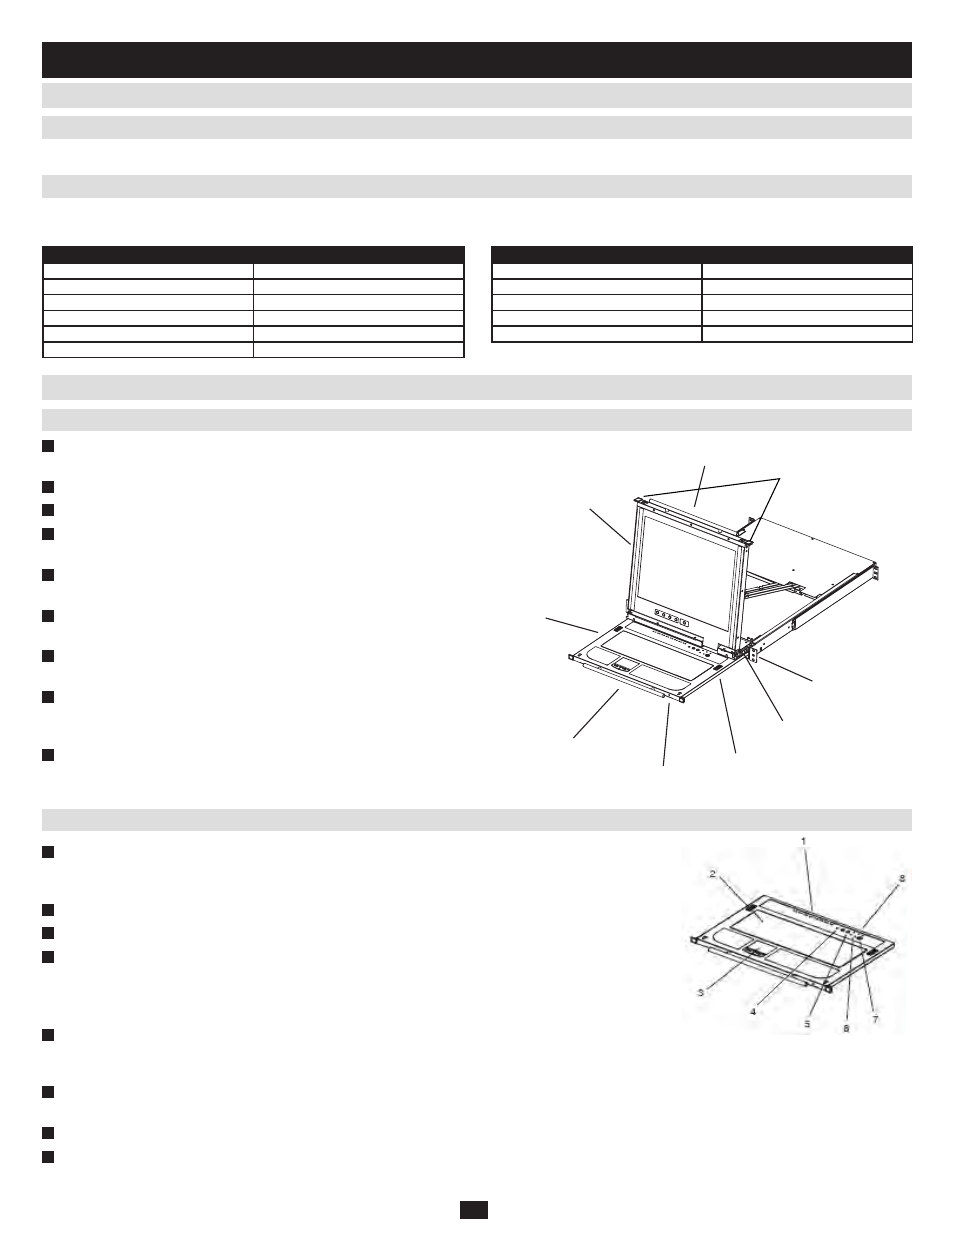
4. Introduction
(continued)
4.4 Components
1
Upper Handle:
Pull to slide the LCD module out; push to slide the
module in.
2
LCD Module:
See LCD Module, section 4.4.3
3
Keyboard Module: See Keyboard Module
, section 4.4.2
4
Lower Handle:
Pull to slide the keyboard module out; push to slide
the module in.
5
Power LED: Lights (blue) to indicate that the unit is receiving
power.
6
Keyboard Release Catch: These catches (one on each side) release
the keyboard module so you can slide it away.
7
LCD Release Catch: These catches (one on each side) release the
LCD module so you can slide it away.
8
Rack Mounting Tabs: The rack mounting tabs located at each
corner of the unit secure the chassis to a system rack. See section 5.2,
Standard Rack Mounting, for details.
9
Console Release Tabs: These tabs (one on each side) must be
pressed inward to release the LCD and keyboard module, allowing
them to be pulled out of the rack.
1
Port LEDs
: An On Line LED lights (amber) to indicate that the device attached to its corresponding port is
up and running. A Selected LED lights (green) to indicate that the computer attached to its corresponding
port has the KVM focus.
2
Keyboard:
99-key keyboard.
3
Touchpad: Standard mouse touchpad.
4
Reset Switch:
Pressing and holding this switch in while powering on the unit causes the KVM switch to
revert to the original factory installed firmware version – allowing you to recover from a failed firmware
upgrade. Pressing and holding this switch in for more than three seconds performs a system reset.
Note: The switch is recessed and must be pushed with a thin object – such as the end of a paper clip or a ballpoint pen.
5
Port Selection Switches:
The left button (DOWN), shifts the KVM focus down through the ports (port 7
→
port 6, etc.). After port 1, it cycles back to the last port. The right button (UP), shifts the KVM focus up
through the ports. After the last port, it cycles to port 1.
6
Connection LEDs:
The Link LED flashes (green) when a remote client connects to the KVM switch. The 10/100 Mbps LED lights (orange) to
indicate 10 Mbps data transmission speed. It lights (green) for 100 Mbps.
7
External Mouse Port:
This PS/2-type mouse port is provided for users who prefer to use an external mouse.
8
Lock LEDs:
The Num Lock, Caps Lock, Scroll Lock LEDs are located here.
4.4.1 Front View
4.4.2 Keyboard Module
8
6
7
1
9
5
4
2
3