Windows client, 1 activating the osd – Tripp Lite 932845 User Manual
Page 24
24
9.1 Activating the OSD
9. Windows Client
After you have successfully logged in (section 8.1), activate the browser-
based Windows Client OSD by doing the following:
Click the
1.
button at the left of the Webpage.
Note: You must have DirectX 7.0 or higher installed on your computer. If not, the Windows
Client will not load. If you don’t already have it, DirectX is available for free download
from Microsoft’s Website: http://www.microsoft.com/downloads.
When the file download security warning dialog box appears, click
2.
Run.
If a second security warning dialog box appears, click
3.
Run again.
Note: If the browser cannot run the file, save it to disk, instead. Then, with your browser still
open to the KVM switch Webpage, run the file from your disk. If you use the save to disk
method, for security purposes, you cannot simply run a previously downloaded version
of the program. Each time you want to access the KVM switch, you must log in to the
Webpage with a valid username and password to download a fresh copy of the program.
When a connection to the KVM switch has been established, the screen
4.
opens to the Windows Client OSD with the Main page and Windows
Client Control Panel displayed:
Before you Begin
The first time you run the program, you may want to make some display
configuration changes. To do so, click the curved Arrow icon on the
Control Panel at the lower right of the remote display. A screen similar to
the one below appears:
There are three buttons: Config, Switch, and Exit. Their actions are
described in the table below:
Button
Action
Config
Brings up the Graphics Configuration dialog box, which
allows you to set up the graphical environment. The Graphics
Configuration dialog box is discussed in the next section.
Switch
Switches you to the Windows Client OSD. The Windows
Client OSD is discussed in section 9.2.
Exit
Ends the program and closes the application.
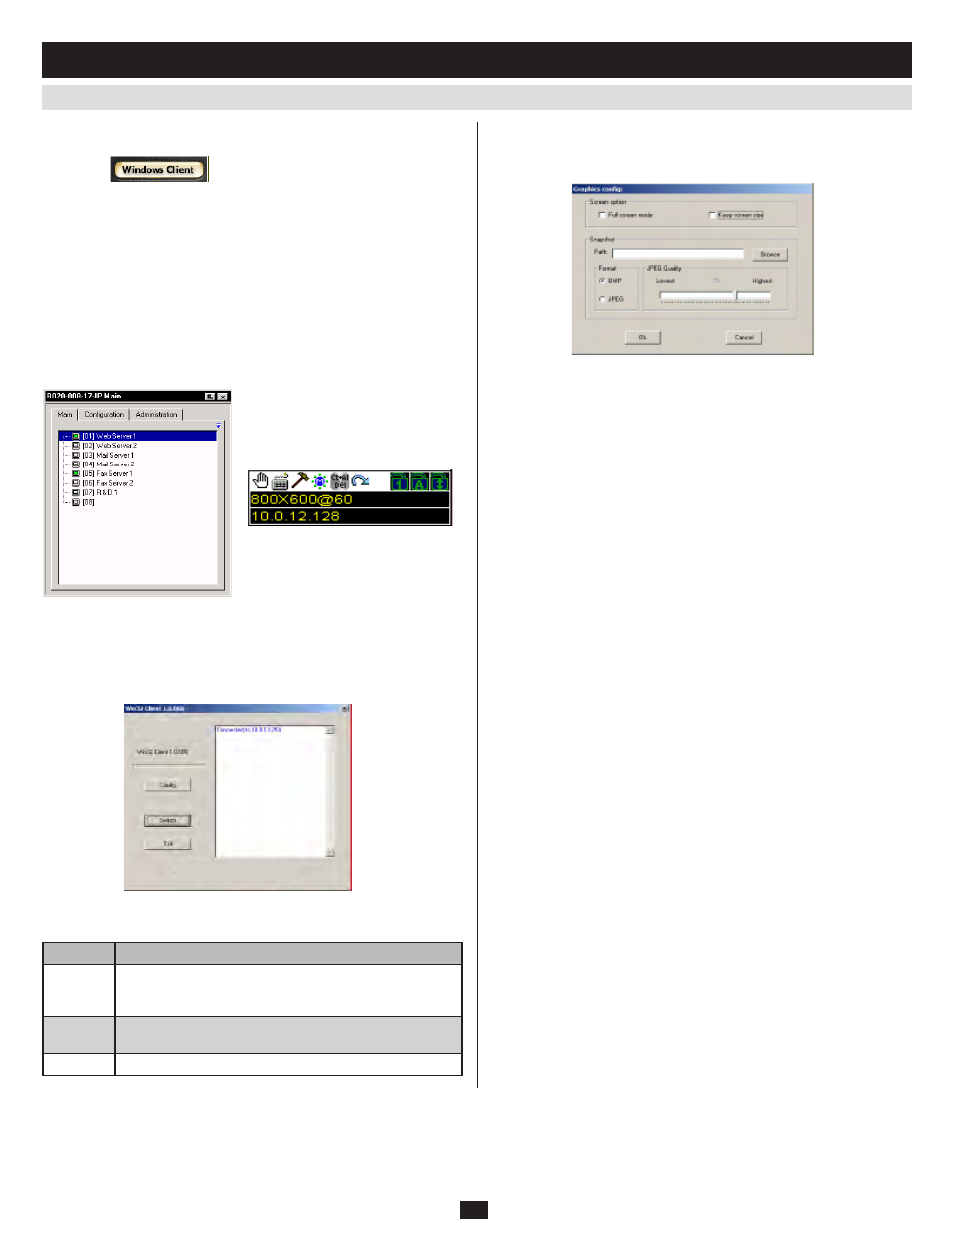
Graphics Configuration Dialog Box
The dialog box is organized into two main parts: Screen Option and
Snapshot.
Screen Options
Screen Options lets you set up the way the remote display appears on the
local monitor:
If
•
Full Screen Mode is enabled (the box is checked), the remote display
fills the entire screen.
If
•
Full Screen Mode is not enabled (the box is not checked), the remote
display appears as a window on the local desktop. If the remote screen
is larger than what is able to fit in the window, move the mouse pointer
to the screen border that is closest to the area you want to view and the
screen will scroll.
If
•
Keep Screen Size is enabled (the box is checked), the remote screen is
not resized.
If
•
Keep Screen Size is not enabled (the box is not checked), the remote
screen is resized to fit the local monitor’s resolution.
If the remote resolution is smaller than that of the local monitor, its
•
display appears like a window centered on the screen.
If the remote resolution is larger than that of the local monitor, its
•
display is centered on the screen. To access the areas that are off screen,
move the mouse to the corner of the screen that is closest to the area you
want to view and the screen will scroll.
Snapshot
These settings let the user configure the KVM switch’s screen capture
parameters (see section 9.3, Windows Client Control Panel).
Path lets you select a directory that the captured screens automatically
•
get saved to. Click Browse
; navigate to the directory of your choice;
then click OK. By default, the captured screens get saved to your
desktop.
Click a button to choose whether you want the captured screen to be
•
saved as a BMP or a JPEG (JPG) file.
If you choose JPEG, you can select the quality of the captured file with
•
the slider bar. The higher the quality, the better looking the image, but
the larger the file size.
Finishing Up
After you have finished making your configuration settings:
Click
1.
OK to close the dialog box.
Click
2.
Switch
to go back to the Windows Client OSD Main page.