2 video adjustment, Windows client – Tripp Lite 932845 User Manual
Page 27
27
9.3.2 Video Adjustment
9.3 Windows Client Control Panel
(continued)
9. Windows Client
(continued)
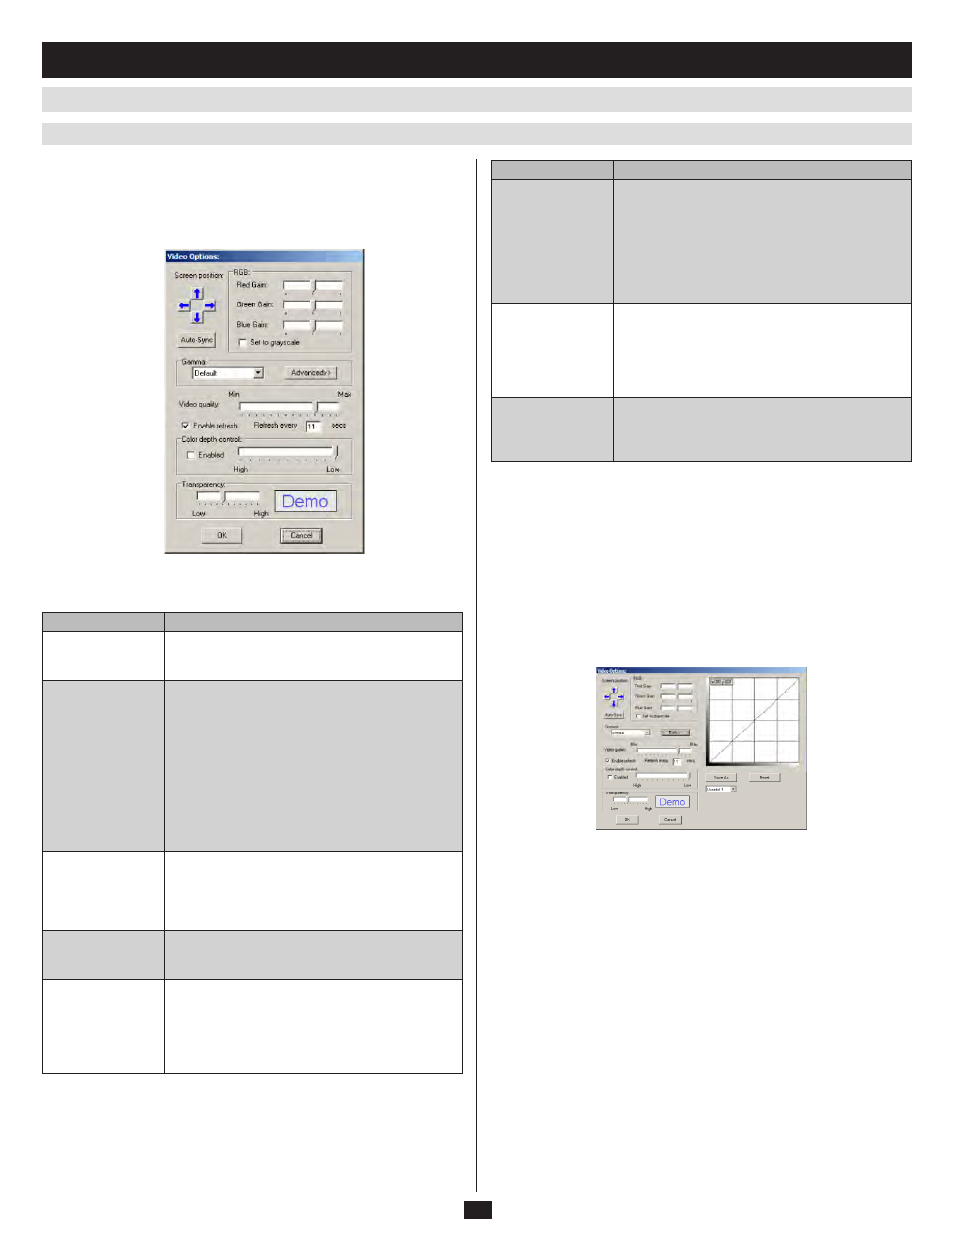
You can adjust the placement and the picture quality of the remote screen
(as displayed on your local monitor) with the Video Options function. To
do so, either click on the Hammer icon on the Control Panel, or use the
Adjust Video
hotkeys (see section 9.3.1, Hotkey Setup). The following
screen appears:
Gamma Adjustment
If it is necessary to correct the gamma level for the remote video display,
use the Gamma function of the Video Adjustment dialog box.
Under Basic
configuration, there are ten preset and four user-defined levels
to choose from. Drop down the list box and choose the most suitable one.
For greater control, clicking the Advanced button brings up the following
dialog box:
Click and drag the diagonal line at as many points as you wish to
•
achieve the display output you desire.
Click
•
Save As
to save up to four user-defined configurations derived
from this method. Saved configurations can be recalled from the list box
at a future time.
Click
•
Reset to abandon any changes and return the gamma line to its
original diagonal position.
Click
•
OK to save your changes and close the dialog box.
Click
•
Cancel to abandon your changes and close the dialog box.
Note: For best results, change the gamma while viewing a remote computer.
The meanings of the adjustment options are given in the table below:
Option
Usage
Screen Position
Adjust the horizontal and vertical position of the
remote computer window by Clicking the Arrow
buttons.
Auto-Sync
Click Auto-Sync to detect the vertical and horizontal
offset values of the remote screen and automatically
synchronize it with the local screen.
If the local and remote mouse pointers are out of
sync, in most cases, performing this function will
bring them back into sync.
Note: This function works best with a bright screen.
If you are not satisfied with the results, use the
Screen Position arrows to position the remote
display manually.
RGB
Drag the slider bars to adjust the RGB (Red, Green,
Blue) values. When an RGB value is increased, the
RGB component of the image is correspondingly
increased. If you enable Set to Grayscale, the
remote video display is changed to grayscale.
Gamma
This section allows you to adjust the video display’s
gamma level. This function is discussed in detail in
the next section, Gamma Adjustment.
Video Quality
Drag the slider bar to adjust the overall Video
Quality. Values can be from 20 to 100. The larger
the value, the clearer the picture and the more video
data goes through the network. Depending on the
network bandwidth, a high value may adversely
effect response time.
Option
Usage
Enable Refresh
The NetDirector Console KVM Switch with IP
Access can redraw the screen every 1 to 99
seconds, eliminating unwanted artifacts from the
screen. Select Enable Refresh and enter a number
from 1 through 97. The KVM switch will redraw the
screen at the interval you specify. This feature is
disabled by default. Click to put a check mark in the
box next to
Enable Refresh
to enable this feature.
Color Depth Control
This setting adjusts the amount of color information
for the video data sent over the network. The higher
the color setting, the greater the data. For slow data
connections, drag the slider bar to a lower setting to
decrease the amount of video data transferred. This
ensures screen refresh at workable speeds.
Transparency
Adjusts the transparency of the toolbars displayed
by the Windows and Java Client applications. Slide
the bar until the display in the
Demo
window is to
your liking.