Adding or replacing internal batteries – Tripp Lite 3-Phase 20kVA User Manual
Page 14
14
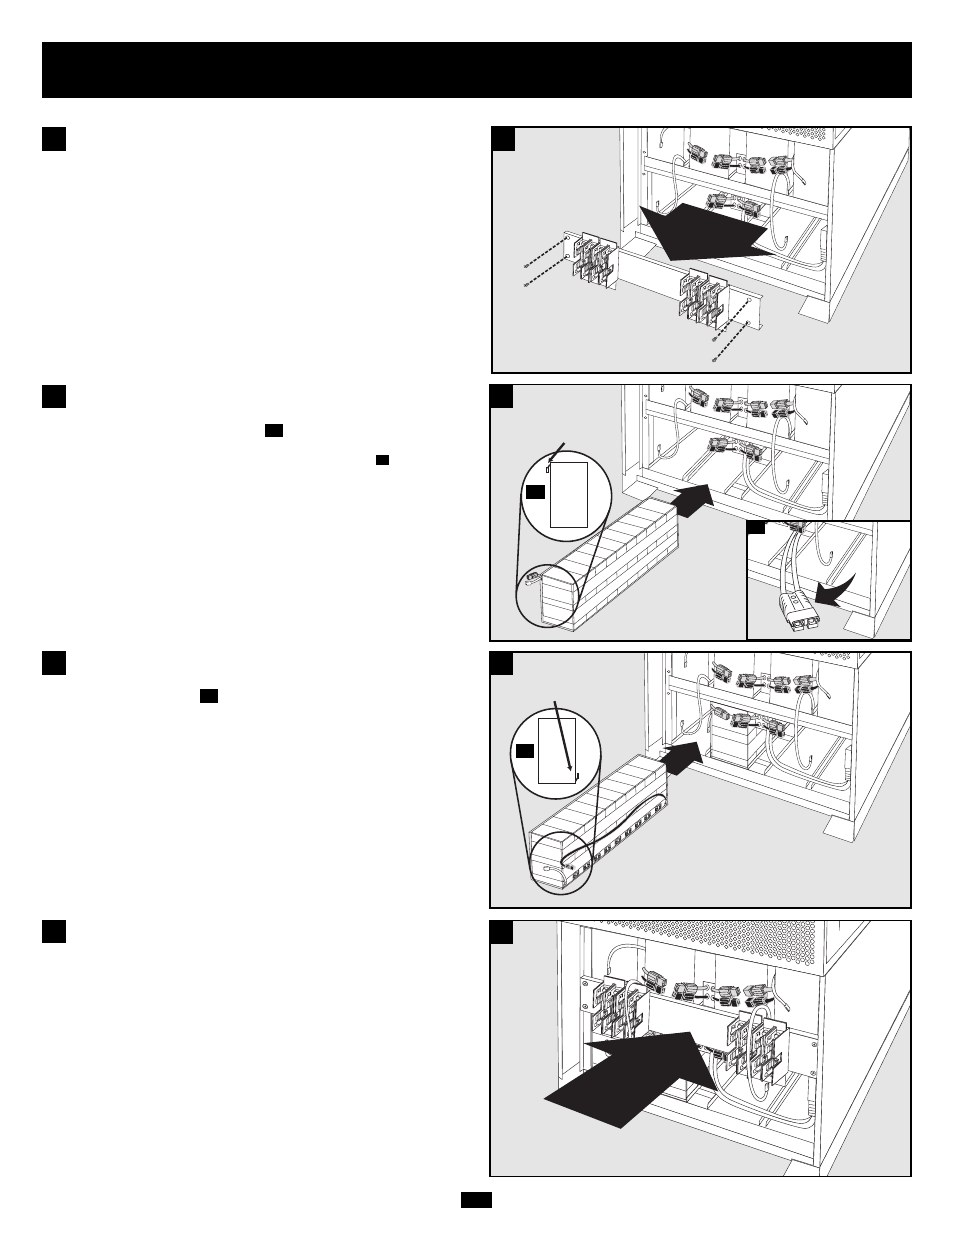
Adding or Replacing Internal Batteries
(continued)
Slide the battery string with the RED cable into an empty slot within
the battery compartment as shown. Make sure that the string is
oriented as shown in the diagram
.
NOTE: If the auxiliary battery connector is in the way, remove its mounting screw and
position the cable to allow adequate room to add the battery strings
.
7B
7A
7
7
Slide the battery string with the BLACK cable next to it (on the left)
in the empty slot as shown. Make sure that the string is oriented as
shown in the diagram
.
8A
8
8
7A
8A
7B
Remove the fuse block bracket.
6
6
Replace the fuse block bracket. Make sure printing on bracket is
oriented so it is readable.
9
9
TERMINALS
TERMINALS
See also other documents in the category Tripp Lite Tools:
- Line Conditioner 230V (12 pages)
- Line Conditioner 230V (6 pages)
- TM500 (4 pages)
- BP480V140 (2 pages)
- OMNI1500XLNAFTA (5 pages)
- BP36V42-3U (2 pages)
- APSX750F (4 pages)
- Omnismart OMNIVS500 (2 pages)
- INTERNETX525 (1 page)
- HCRK-36 (3 pages)
- P004-002-5 (2 pages)
- BP240V120 (2 pages)
- Switched Rack PDU (10 pages)
- OMNIVSINT500 (24 pages)
- OmniPro 675 (20 pages)
- OMNISMART 1050M (1 page)
- BP48V212U (12 pages)
- BCPRO600 (1 page)
- ECO Series (2 pages)
- BP36VXR (3 pages)
- OMNI750ISO (5 pages)
- External Battery Pack BP240V557C-1PH (2 pages)
- 93-2007 (200106010) (22 pages)
- Omni VS UPS Systems OMNIVS800 (24 pages)
- 1500RMXL2UA (6 pages)
- BC350 (1 page)
- UPS System AVRX550U (2 pages)
- TE600 (1 page)
- BP192V18-4U (3 pages)
- HCRK-3 (12 pages)
- XL (36 pages)
- 93-2024 (7 pages)
- DCOW 2 (1 page)
- HT1500UPS (2 pages)
- 2U Tower Stand (1 page)
- P007-002 (2 pages)
- LS606M (2 pages)
- 120 (2 pages)
- HDMI ACTIVE EXTENDER B122-000 (2 pages)
- P047-006 (2 pages)
- BP48V242U (16 pages)
- UT3012UL (1 page)
- BP240V787C-1PH (2 pages)
- P005-010 (2 pages)
- B116-002 (4 pages)