Temco Tool 41DVN User Manual
Page 34
34
41DVN / DVSN Direct Vent Gas Fireplace
20009999
Fuel Conversion Instructions - 41DVN
WARNING: This HI/LO conversion kit must ONLY be
applied as part of a conversion kit supplied by the
appliance manufacturer for the specific appliance
and type of gas being converted.
The conversion shall be carried out in accordance
with the requirements of the provincial authori-
ties having jurisdiction and in accordance with the
requirements of the CSA B149.2 Installation Code
(Canada) and with the requirements of the National
Fuel Gas Code Z223.1/NFPA 54 (United States).
WARNING: This conversion kit shall be installed
by a qualified service agency in accordance with
the manufacturer’s instructions and all applicable
codes and requirements of the authority having
jurisdiction. If the information in this instruction is
not followed exactly, a fire, explosion or production
of carbon monoxide may result causing property
damage, personal injury or loss of life. The qualified
service agency is responsible for the proper instal-
lation of this kit. The installation is not proper and
complete until the operation of the converted appli-
ance is checked as specified in the manufacturer’s
instructions supplied with the kit.
Installer Notice: Using an ink pen, fill out the re-
quired information on the conversion label. Remove
the backing from label and stick label in a visible
position on bottom of fireplace close to gas valve.
Installer Notice: These instructions must be left
with the appliance.
Instructions for converting your fireplace from Natural
gas to Propane/LP gas.
All fireplaces are shipped from the factory equipped to
operate on Natural gas. To convert the fireplace to oper-
ate on Propane/LP gas, follow the instructions below.
Please see the appropriate parts list for your model for
parts included with the fireplace.
Check the items in the kit with the parts list. Notify the
supplier of any items that are missing before installing
the conversion kit.
1. Turn off gas supply.
2. Turn off the electrical supply to the appliance if so
equipped.
Replace Burner Orifice
1. Remove the two (2) screws holding the pilot to the
burner bracket.
2. With suitable tool, remove screws holding left flame
shield. Remove flame shield. DO NOT discard. (Fig.
52)
3. Remove flame deflector bracket form burner shield
(one screw) and remove burner shield. (Fig. 52)
NOTE: Removing front grate assembly (remove lava
rock to expose fasteners) improves access to burner
orifice area.
4. Remove air shutter screw and slide burner tube to
the right.
5. Loosen split nut assembly from air shutter. (Fig. 52)
6. With suitable tool, replace natural orifice with correct
propane/LP gas orifice furnished with conversion kit.
Tighten orifice with suitable tool until gas tight. (Fig.
52)
7. Move burner tube back to original position, tighten
split nut assembly and bend tabs back. Replace
flame shield.
8. Set the air shutter opening for propane/LP gas. (Fig.
53) Tighten air shutter screw. Replace burner shield
making sure all four (4) tabs hook over side log/
burner brackets. Replace flame deflector bracket.
Replace left flame shield. (Fig. 52)
NOTE: Failure to adjust air shutter to proper setting will
produce sooting.
T207
air shutter
setting
1/8/04 djt
Fully Open
T207
Fig. 53 Air shutter setting for propane/LP gas.
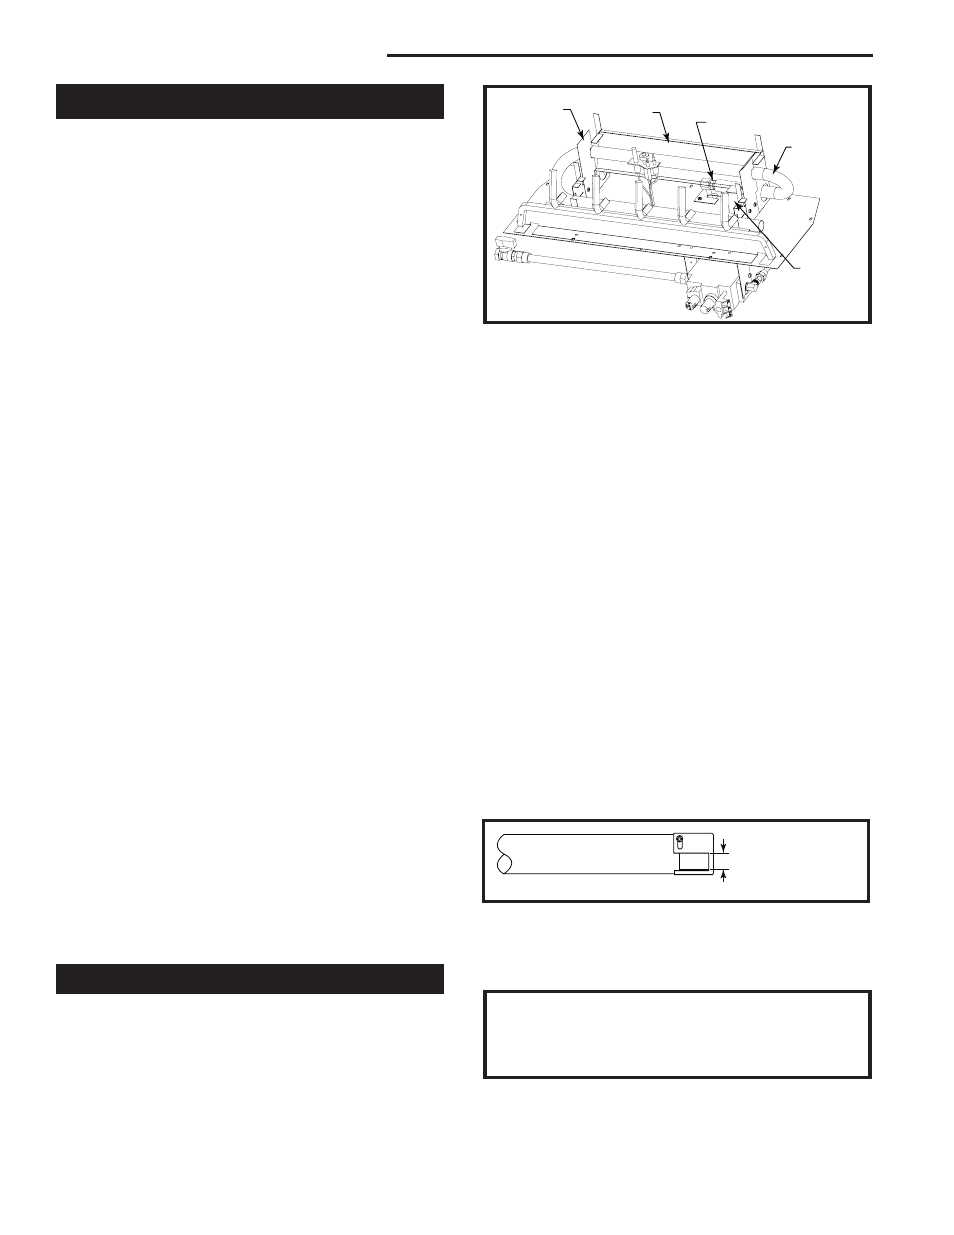
FC110
41DVN
burner asey
8/04
Left Flame
Shield
Split Nut Assembly
Burner
Tube
FC110
Fig. 52 Remove flame shield, flame deflector bracket and
burner shield. Remove air shutter and slide burner tube to the
right.
Burner
Shield
Flame
Deflector
Bracket
NOTE: These are minimum settings. Air shutter open-
ings may be increased to prevent flame sooting.
9. Fasten pilot to burner bracket with two (2) screws.
WARNING: Failure to position the parts in accor-
dance with these diagrams or failure to use only
parts specifically approved with this heater may
result in property damage or personal injury.