Maintenance, Removing valve assembly, Removing the fan – Regency E21-LP1 User Manual
Page 23: Door glass replacement
23
Regency E21 Gas Fireplace Insert
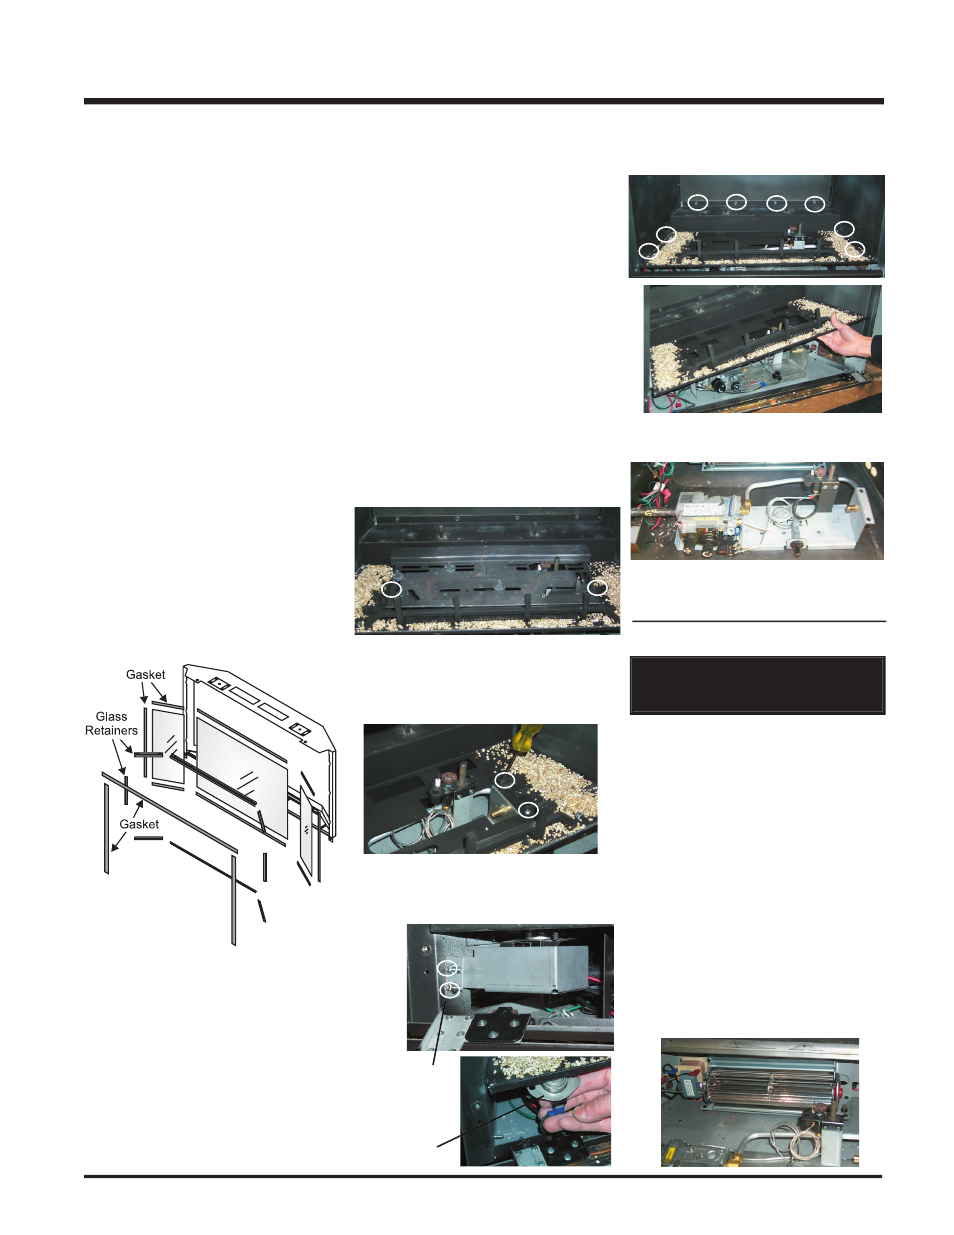
REMOVING VALVE
ASSEMBLY
1) Disconnect the power.
2) Shut off the gas.
3) Remove top and bottom louvers.
4) Remove top and bottom trim.
5) Remove glass.
6) Remove log set & embers, and brick
panels.
7) Disconnect the gas line.
8) Remove wires from valve (top and bottom
terminals).
9) Remove the burner tray by removing the 1
screw on each side, then slide the tray to
the left and lift out.
MAINTENANCE
IMPORTANT
Disconnect power supply
before servicing
REMOVING THE FAN
1) Disconnect the power.
2) Shut off the gas.
3) Remove top and bottom louvers.
4) Remove top and bottom trim.
5) Remove glass.
6) Remove logs, embers, and brick panels.
7) Remove Burner Tray and Firebox bottom
- see steps 9) to 12) in "Removing Valve
Assembly.
8) Remove wires from fan.
9) Lift fan off of the two pins.
10) Reverse steps to install fan.
Remove 2 screws, then push burner tray to
left and lift out.
10) Remove the 2 screws to the right of the
cutout on the fi rebox bottom.
11) Remove the switch cover from the left side
of the body base and pull the thermodisc
out of the bracket under the left side of the
fi rebox bottom.
13) Remove valve assembly from stove body
by removing 3 phillips screws.
14) Remove the valve from the bracket and
replace. Reverse steps to install valve.
DOOR GLASS
REPLACEMENT
Your Regency stove is supplied with high
temperature, 5 mm Neoceram ceramic glass that
will withstand the highest heat that your unit will
produce. In the event that you break your glass
by impact, purchase your replacement from an
authorized Regency dealer only, and follow our
step-by-step instructions for replacement.
Bay Glass Removal
1) Remove the door from the unit and place
on a soft surface to prevent scratching.
2) Remove the nuts holding the glass retainers
in place.
3) Remove the glass retainers (sides, top and
bottom).
4) Replace the glass. The glass must have
gasketing around it.
5) Reverse the previous steps, replace the
retainers and fasten with the nuts but do not
over tighten, as this can break the glass.
6) Replace door on the stove and check the
seal.
Flush Glass Replacement
Replace with new fl ush front as on page 13.
Remove the 2 nuts
holding the switch
box in place,
then pull the
thermosdisc out of
the bracket.
12) Remove the 2 screws on each side of the
fi rebox bottom and 4 screws on the rear
wall., and lift out.