Nti nodemux multi-user universal kvm switch 9, Figure 4- connect ps/2 cpu to nodemux, Vext- xx -mm – Network Technologies ST-nXm-U User Manual
Page 13: Rear view of ps/2 cpu, Vktint- xx -mm
NTI NODEMUX MULTI-USER UNIVERSAL KVM SWITCH
9
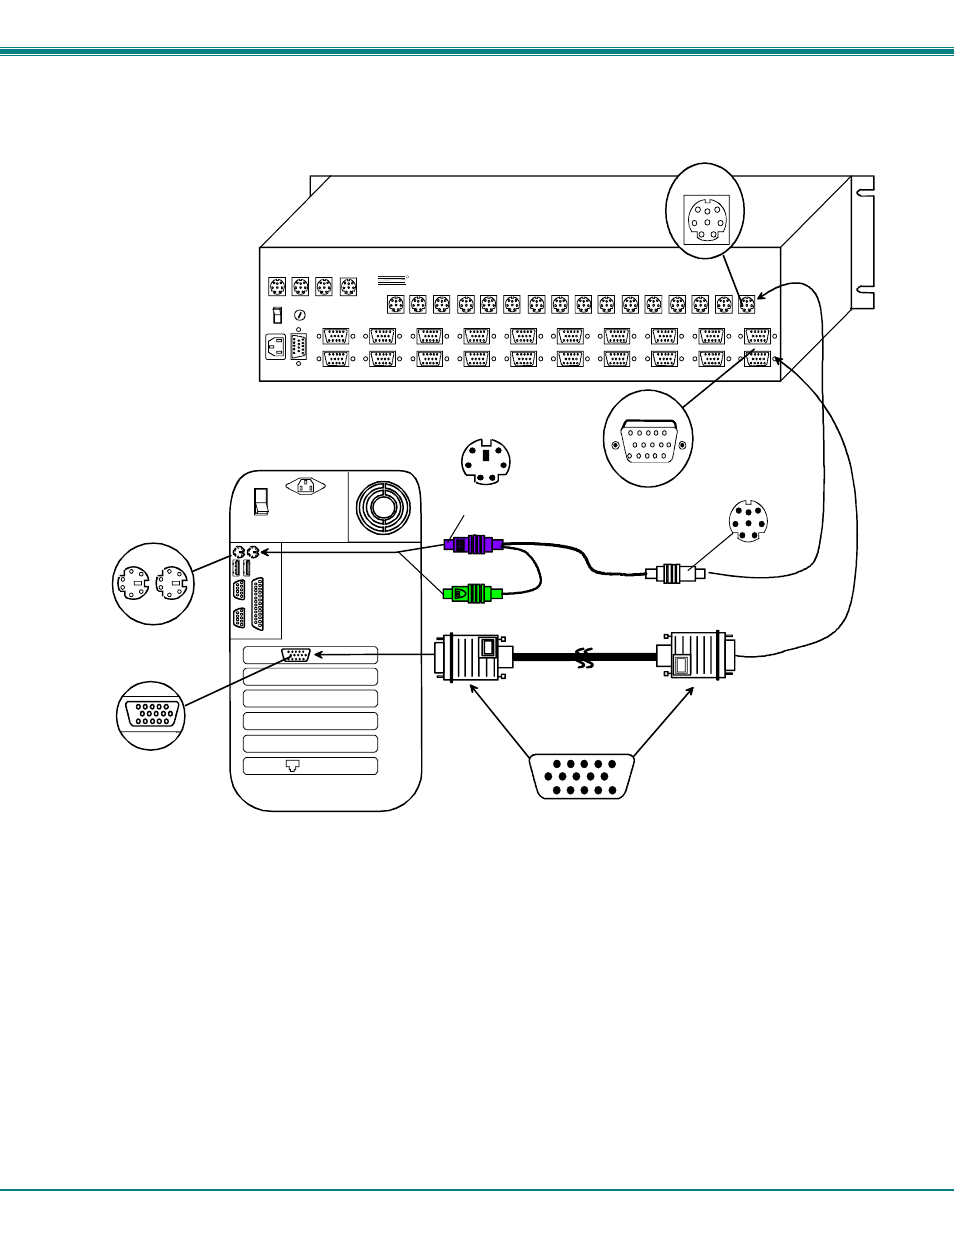
4. Connect a VEXT-xx-MM (and adapter if needed) from the video port of the CPU to a port labeled "VIDEO x" on the
NODEMUX with the same port number as the keyboard. Make sure the CPU is connected to a "CPU x" port and a "VIDEO x"
port with the same number. Otherwise the user's typing may be going to one CPU, but the user will be viewing a different
CPU on the monitor.
Figure 4- Connect PS/2 CPU to NODEMUX
5. Plug the NTI Switch into an AC power outlet.
6. Turn ON power to the NTI Switch, the LCD should illuminate.
7. Turn ON power to any or all CPUs connected to the NTI Switch.
FYI: The order in which the CPUs and switch are turned ON does not matter. A power strip can be used.
Rear View of NODEMUX
MONITOR 1
MONITOR 2
MONITOR 3
MONITOR 4
VIDEO 1
VIDEO 2
VIDEO 3
VIDEO 4
VIDEO 5
VIDEO 6
VIDEO 7
VIDEO 8
VIDEO 9
VIDEO 10
VIDEO 11
VIDEO 12
VIDEO 13
VIDEO 14
VIDEO 15
VIDEO 16
USER 1
USER 2
USER 3
USER 4
R
S
2
3
2
NTI
NETWORK
TECHNOLOGIES
INCORPORATED
Tel:330-562-7070
Fax:330-562-1999
1275 Danner Dr
Aurora, OH 44202
www.nti1.com
R
CPU 1
CPU 2
CPU 3
CPU 4
CPU 5
CPU 6
CPU 7
CPU 8
CPU 9
CPU 10
CPU 11
CPU 12
CPU 13
CPU 14
CPU 15
CPU 16
6 miniDIN Female
VEXT-xx-MM
15HD Male
Video Connector
15HD Female
Video Connector
8 miniDIN
Female Connector
15HD Female
Video Connector
Rear View of PS/2 CPU
Video Port
Input Device Ports
CPU 1
VIDEO 1
VKTINT-xx-MM
6mD Male
Connectors
Purple- Keyboard
Green- Mouse
8 miniDIN
Male Connector
Beige