Awning and casement only, Awning/casement shim and fastener placement guide – Pella Impervia 80YW0102 User Manual
Page 7
Interior
4H
Double-Hung & Single-Hung -
If additional installation
KROHVDUHQHHGHGGULOODŔLQVWDOODWLRQKROH
through both the interior and exterior walls of the
IUDPH&RXQWHUGULOODŔKROHWKURXJKWKHLQWHULRU
wall only of the frame. DO NOT penetrate the exterior
ZDOOZLWKWKHŔELW
AWNING AND CASEMENT ONLY
+ From the exterior, continue placing shims at each
pre-drilled hole as needed
to plum and square the
window. Check window for squareness by making sure
the diagonal measurements from corner to corner of the
UHSODFHPHQWZLQGRZLVZLWKLQLQERWKGLUHFWLRQV
,QVHUWDZRRGVFUHZLQWRHDFKSUHGULOOHGKROHLQ
the frame. Screws are installed from the interior. Finish
inserting the top screw in each jamb.
For Awning and Casement:
See Awning/Casement Shim
and Fastener Guide.
Note: DO NOT shim above the window. DO NOT
over shim!
I. Check operation before applying the insulating foam
sealant in case adjustments need to be made.
Drive screws per the Awning/Casement Shim and Fastener Guide.
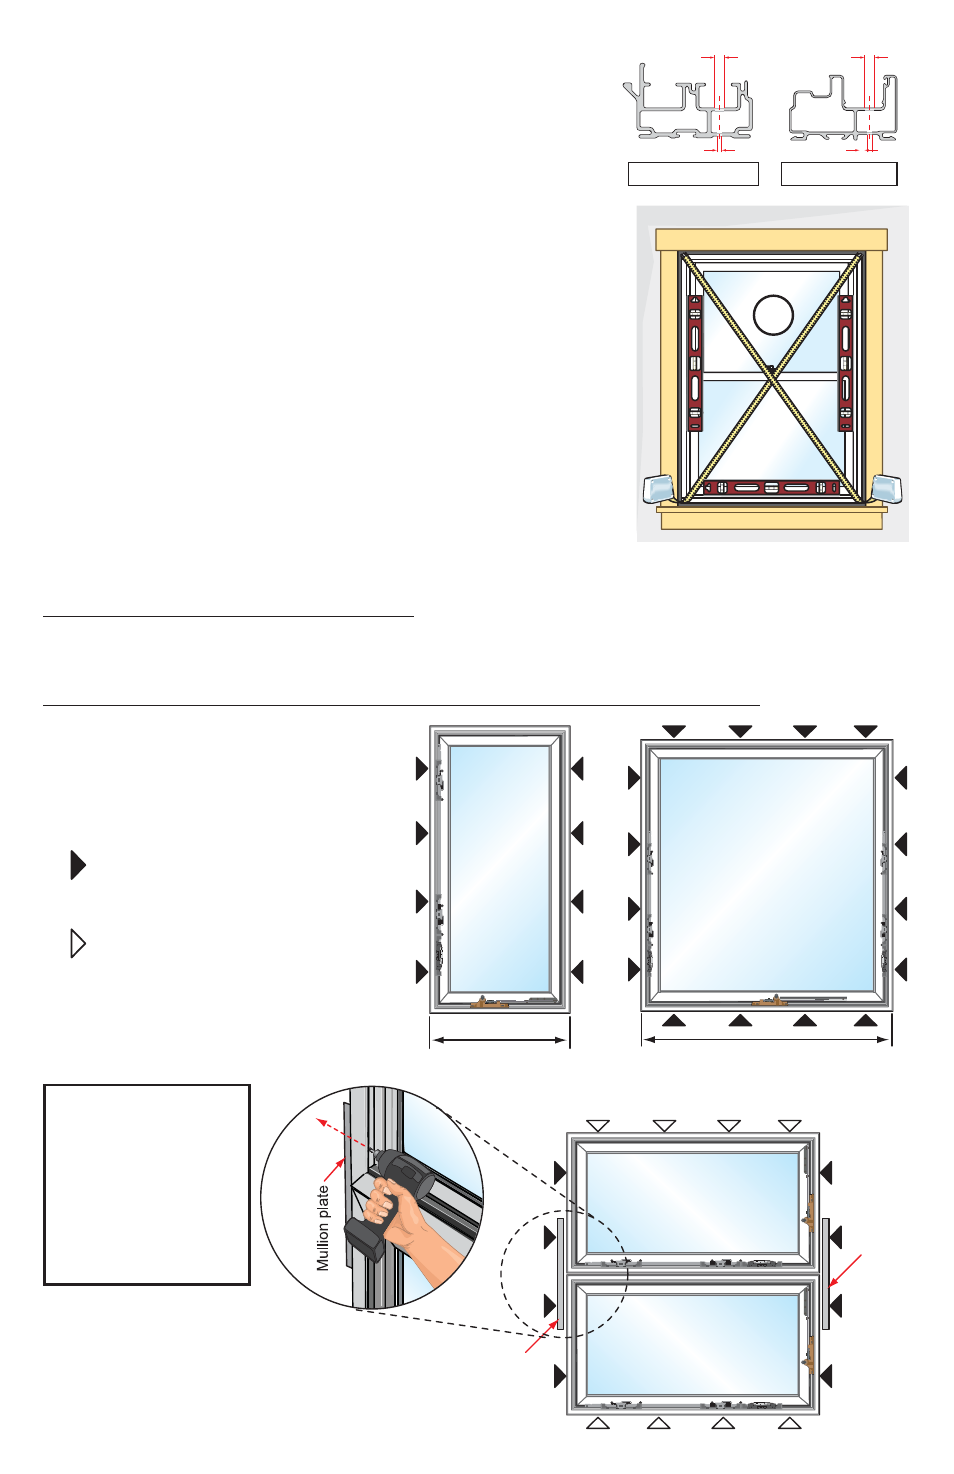
AWNING/CASEMENT SHIM and FASTENER PLACEMENT GUIDE
Number of factory drilled fastener
locations may vary depending on
size of unit(s).
= Indicates typical locations of
factory drilled anchor holes where
screws and shims are required.
= Indicates location where
installation screws are optional.
At combination
mullion joints:
'ULOODSLORW
hole through the
mullion plates at
the factory drilled
anchor holes prior
to inserting screws.
<42" Frame Width
7FOU'JYFE
$BTFNFOU
-BSHF"XOJOH
>42" Frame Width
7FOU'JYFE
$BTFNFOU
-BSHF"XOJOH
.VMMJPOQMBUF
*G'SBNF8JEUIw UPQBOECPUUPNTDSFXTBSFPQUJPOBM
.VMMJPOQMBUF
)JHI
7FOU'JYFE
$BTFNFOU 4UBOEBSE"XOJOH
-BSHF"XOJOH
Exterior
Exterior
Double-Hung
Single-Hung
3/8”
3/8”
5/32”
5/32”