Installation, Installation location, Select the mounting angle – Panasonic CX-DH801U User Manual
Page 31: Installation hardware, Pow er, English, Continued)
61
CX-DH801U
34
English
60
CX-DH801U
33
English
Installation
(Continued)
Qty
Diagram
Item
No.
H
A
B
C
V
H A B
C
V
Installation Location
Avoid installing the unit in the following locations.
¡In areas hit by direct sunlight, hot air from the heater, or any other high-temperature location.
¡In an area where you cannot firmly secure the unit, or in high-vibration areas.
¡In areas with high humidity or high dirt and dust levels.
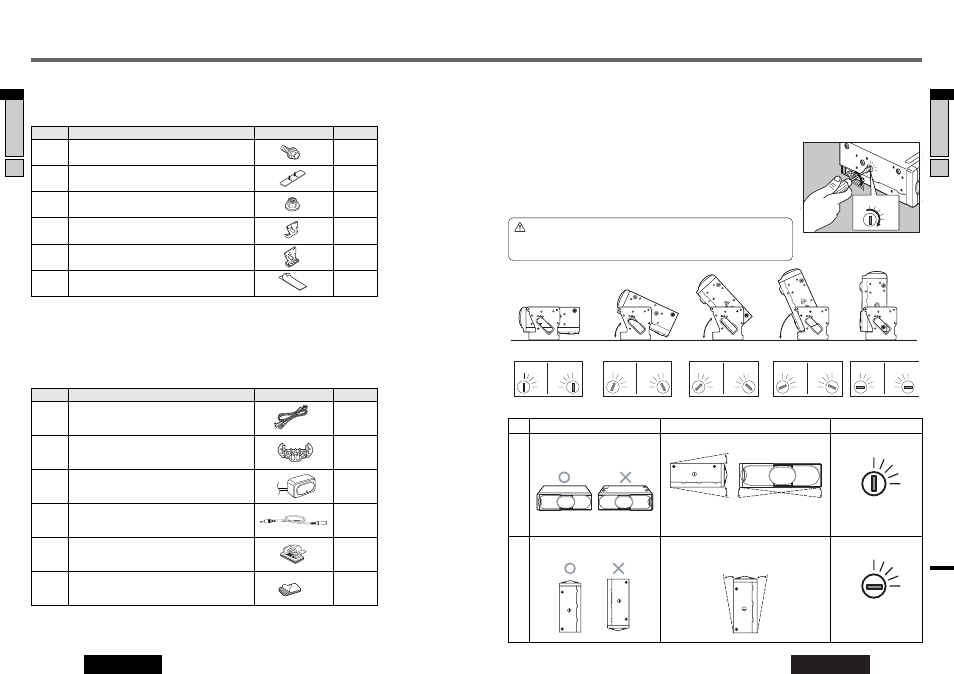
Use a screwdriver to set the angle-adjusting screw to the position “V” or “H”, depend-
ing on the mounting angle selected.
This unit can be set in the five directions: horizontal, vertical, and the positions A
(22.5°), B (45°), and C (67.5°). Mount the unit by referring to the figures below.
Select the mounting angle
Default: H
Adjust the angle with a screw driver
H A B
C
V
H
C
B
A
V
H A B
C
V
H
C
B
A
V
H A B
C
V
H
C
B
A
V
H A B
C
V
V
H
C
B
A
H A B
C
V
H
C
B
A
V
A (22.5
°)
A (22.5
°)
B (45
°)
B (45
°)
C (67.5
°)
H (0
°)
V (90
°)
(L)
(R)
(L)
(R)
(L)
(R)
(L)
(R)
(L)
(R)
Please check that all installation hardware listed below are included.
❑ Installation Hardware
(For Mounting)
q
w
e
r
t
y
4
2
4
1
1
2
Hex. Bolt with Double Washers (4 mm
x 8 mm)
YJT034C707ZA
Base Bracket
YFG014C920ZC
Hex. Nut (5 mm
)
YJN014C703ZA
Mounting Bracket (L)
YFX214C387ZA
Mounting Bracket (R)
YFX214C386ZA
Double-Faced Adhesive Tape
YFX9994C725ZA
Qty
Diagram
Item
No.
❑ Installation Hardware
(For wiring)
u
i
o
!0
!1
!2
1
1
1 set
1
2
1
POW
ER
Extension Cord (5 m)
(BRAKE / VIDEO-CONT / ACC / BATT/ DIN / RCA / GND)
YAJ024C107ZA
Clip Connector
YEAT034C012
Remote Control Sensor (cable length 3 m)
YEFX9991540
Note:
¡The number in parenthesis underneath each accessory part name is the part number for maintenance and service.
¡Accessories and their parts numbers are subject to modification without prior notice due to improvements.
Remote Control Sensor Extension Cord (3 m)
YAJ074C024ZA
Cord Clamp
(for Remote Control Sensor)
YEFX007570
Double-Faced Adhesive Tape
(for Remote Control Sensor)
YFX994C124ZA
Cautions:
¡Set the angle-adjusting screw to the same angle as the unit is installed.
¡Set the holes to the same positions for both left and right.
Note: For installation, use the screws shorter than 5 mm if you should use the screw other than above Hex. Bolt with Double
Washers q.
Installation
Horizontal:
Ve
rtical:
Installation
Angle
Selecting a mounting angle
(Normal)
(Up-side down)
H A B
C
V
(Normal)
(Up-side down)
H A B
C
V
Typical horizontal installation
Typical vertical installation
Set the screw to the
same positions for
both left and right.
Set the screw to the
same positions for
both left and right.
Do not tilt in this
direction.
Limit to less than
10 degrees.
Limit to less than 10 degrees.
Limit to less
than 10
degrees.
(90˚)
(0˚)