Control buttons used in setups, Basic operations in setup screen, Settings – Kenwood DV-4070 User Manual
Page 15
Settings
15
Chapter 2: Various Setups
Basic Operations in Setup Screen
The "SET UP MENU" includes the "MAIN", "SOUND"
and "VISUAL" menus. When a setup screen is
displayed, select the desired item according to the
purpose.
If the power is turned off while the setup screen
remains displayed after setting changes, the changes
will be invalid. Be sure to close the setup screen before
turning power off.
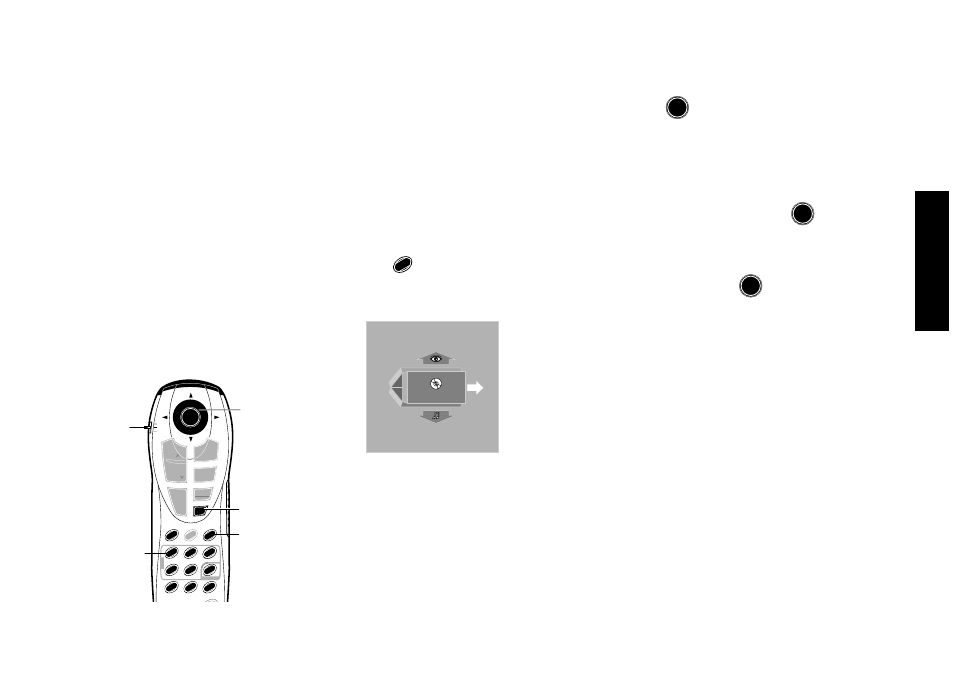
1.
Set the mode switch of the joystick remote to the
Purple position.
2.
Press
SET UP
1
to open the "SET UP MENU" in which
"MAIN" is displayed.
M A I N
SET UP MENU
EXIT
Tilt the joystick up or down to switch the displayed
menu name to "SOUND" or "VISUAL".
¶ When you press the RETURN button or tilt the
joystick in the direction of arrow "EXIT" while
the "SET UP MENU" screen is displayed, the
setup mode can be canceled.
ENTER button
Joystick
RETURN button
SET UP button
Numeric buttons
ENTER
DISPLAY
¡
PAGE
INDEX
¢
PLAY
3
STOP
7
TOP MENU
SQ.MODE
P.MODE
ON SCREEN
RETURN
1
8
REPEAT
A-B REPEAT
CHECK
ALL INFO.
SET UP
TEXT DISP.
T.SEARCH
P.B.C.
TIME DISP.
P.AUDIO
AUDIO
MENU
PAGE
INDEX
4
1
C
SKIP
DISC
0
+10
4
2
3
5
6
7
8
9
Mode switch
C (Clear) button
3.
Press
ENTER
to open the setup screen.
¶ While a setup screen is displayed, tilting the
joystick toward "EXIT" allows the setup mode
to be canceled and tilting it toward "MENU"
returns to the "SETUP MENU".
4.
Select the desired item by tilting the joystick in the
required direction, then press
ENTER
to open the
setup change screen.
5.
Select a setting by tilting the joystick in the required
direction and press
ENTER
to enter the change in
memory.
¶ Press the RETURN button or tilt the joystick to
the left to return to the setup screen.
For actual setup operations, see page 18 and after.
Control Buttons Used in Setups
SET UP button: Press to display the "SETUP MENU".
(Set the mode switch to the Purple position before
pressing this button.)
Joystick: Tilt the joystick in the 4 directions of up,
down, left and right to move the cursor to the de-
sired point.
ENTER button: After moving the cursor to the de-
sired point, press the ENTER button to enter the
point and display the next setup screen.
RETURN button: Press to return to the previous setup
screen.
Numeric buttons, C (Clear) button: Use these but-
tons to input a figure using numeric buttons or to
clear an input with the C button. (Set the mode
switch to Orange position before pressing any of
these buttons.)