Connecting the camera to a computer, Connecting to windows 98 and 98 se, Automatic installation – Konica Minolta DIMAGE-Z20 User Manual
Page 50
98
D
ATA
-
TRANSFER MODE
Connecting the camera to a computer
Confirm the battery has sufficient power before connecting the camera to a computer; the full-bat-
tery indicator should be displayed on the monitor. The use of the AC adapter (sold separately) is
recommended over the use of the battery. For users with Windows 98 or 98 Second Edition, read
the section on page 99 on how to install the necessary USB driver before connecting the camera to
a computer.
1. Start up the computer. The computer must be on before connect-
ing the camera.
2. To transfer images from a memory card, insert the memory card
into the camera. To transfer images from the camera’s internal
memory, remove the memory card from the camera. To insert or
remove the memory card while the camera is connected to a
computer, see page 106.
3. Open the USB port/Video-out terminal cover. Attach the smaller
plug of the USB cable to the camera. The arrow mark on the plug
should face the back of the camera. Make sure the plug is firmly
attached.
4. Attach the other end of the USB cable to the computer’s USB
port. Make sure the plug is firmly attached. The camera should be
connected directly to the computer’s USB port. Attaching the
camera to a USB hub may prevent proper operation.
5. Press the main switch to turn on the camera. The USB connection
is made automatically; a screen appears to indicate the operation.
The monitor turns off when the connection has been made. If the
USB connection is not made, disconnect the camera and restart
the computer. Repeat the connection procedure above.
Initializing USB connection.
3
4
99
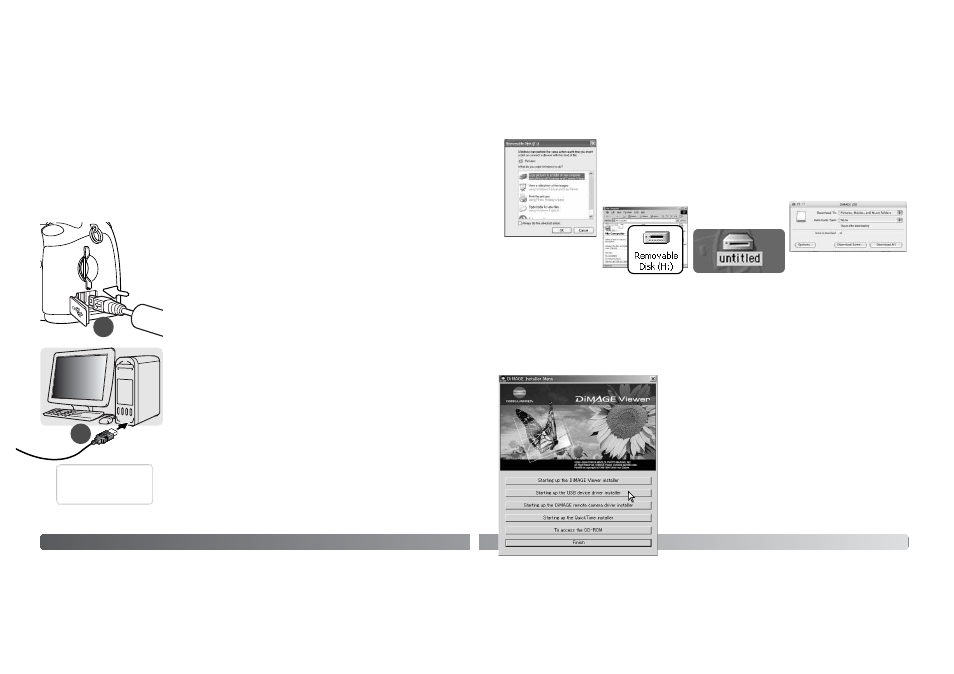
When the USB connection is completed, a drive icon, or volume, appears in
My Computer or the desktop; the name varies with memory card. When
using Windows
®
XP or Mac OS X, a window may open requesting instruc-
tions on what to do with the image data; follow the directions in the window.
Windows XP
Mac OS X
Windows
Mac OS
The driver needs only to be installed once. If the driver cannot be installed automatically, it can be
installed manually with the operating system’s add-new-hardware wizard; see the instructions on
the following page. During installation, if the operating system requests the Windows
®
98 CD-ROM,
insert it into the CD-ROM drive and follow the accompanying instructions on the screen. No special
driver software is required for other Windows
®
or Macintosh operating systems.
Connecting to Windows 98 and 98 SE
Before connecting the camera to the computer, place the
DiMAGE Viewer CD-ROM in the CD-ROM drive. The
DiMAGE installer menu should automatically activate. To
automatically install the Windows
®
98 USB driver, click on the
starting-up-the-USB-device-driver-installer button. A window
appears to confirm that the driver should be installed; click
“Yes” to continue.
When the driver has been successfully installed, a window
appears. Click “OK.” Restart the computer and connect the
camera (p. 98) to complete the operation.
Automatic Installation