A pg. 85, ainformationb), A pg. 85), A pg. 85 – JVC DR-MX1S User Manual
Page 85: Adelete a channelb), Awhen receiving a, Scrambled broadcast (hdd & dvd deck only), B (a pg. 85), 85 f, Awhen, R to
Masterpage:Right+
EN
85
Filename [MX1SEU_13Subsidiary.fm]
SUBSIDIARY SETTINGS
Page 85Monday, 6 December 2004 14:01
Delete A Channel
1
AManual Channel SetB (A pg. 84).
2
Press
FGD E to select the channel you want to delete.
3
Press CANCEL(
L) to delete a channel. The channel next to
the cancelled one moves up one line.
●
Repeat steps 2 – 3 as necessary.
4
Press SET UP or RETURN to close the Confirmation screen.
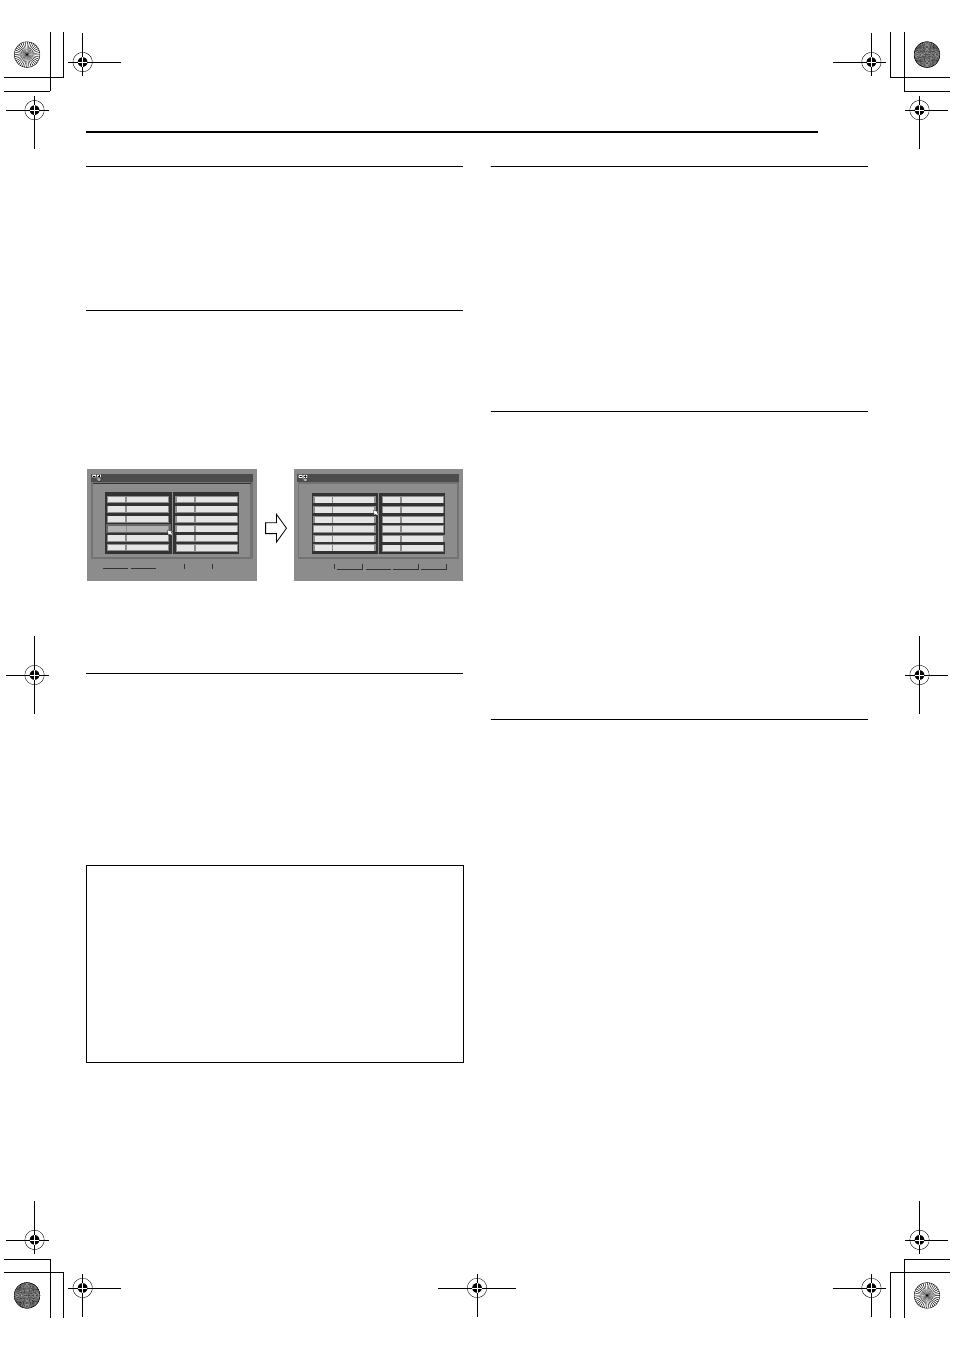
Change Station Channel Position
1
AManual Channel SetB (A pg. 84).
2
Press
D E to select AMOVEB, then press ENTER.
3
Press
FGD E to select the channel you want to move, then
press ENTER.
4
Press
FGD E to select the new channel position, then press
ENTER.
Example: If you moved the station in position 4 to position 2, the
stations originally in positions 2 and 3 each move down
one space.
●
Repeat steps 3 – 4 as necessary.
5
Press SET UP or RETURN to close the Confirmation screen.
When Receiving A Scrambled Broadcast (HDD & DVD
Deck Only)
1
Set
AL-2 SELECTB to ADECODERB. (A pg. 72)
2
AManual Channel SetB (A pg. 84).
3
Press
FGD E to select the channel position broadcasting
scrambled programmes, then press ENTER. The Confirmation
screen appears.
4
Press
F G to select ADECODERB, then press ENTER.
5
Press
F G to set ADECODERB to AONB, then press ENTER.
6
Press RETURN to return to the Manual Channel Set screen.
●
Repeat steps 3 – 5 as necessary.
7
Press SET UP or RETURN to close the Confirmation screen.
Set Stations (A)
Set station names that are registered in your unit.
1
AManual Channel SetB (A pg. 84).
2
Press
FGD E to select the channel you want to modify, then
press ENTER. The Confirmation screen appears.
3
Press
F G to select AIDB, then press ENTER.
4
Move the arrow to the left ID selection column. Registered
station names (ID) (A pg. 98) appear as you press
F G.
5
Press ENTER to select the desired ID, then press ENTER
again to select
AOKB.
6
Press RETURN to return to the Manual Channel Set screen.
●
Repeat steps 2 – 5 as necessary.
7
Press SET UP or RETURN to close the Confirmation screen.
Set Stations (B)
Set station names other than the ones registered in your unit.
1
AManual Channel SetB (A pg. 84).
2
Press
FGD E to select the channel you want to modify, then
press ENTER. The Confirmation screen appears.
3
Press
F G to select AIDB, then press ENTER.
4
Press
FGD E to select the desired characters (A–Z, 0–9, –, Z,
+,
& (space)), then press ENTER.
●
Enter the remaining characters the same way (maximum of 4).
5
After entering all characters, press
FGD E to select AOKB, then
press ENTER.
6
Press RETURN to return to the Manual Channel Set screen.
●
Repeat steps 2 – 5 as necessary.
7
Press SET UP or RETURN to close the Confirmation screen.
NOTE:
The characters available for the station name (ID) are A–Z, 0–9, –,
Z, +,
& (space) (maximum of 4).
Fine-Tuning Channels Already Stored
1
AManual Channel SetB (A pg. 84).
2
Press
FGD E to select the channel you want to fine-tune, then
press ENTER. The Confirmation screen appears.
3
Press
F G to select AFINEB, then press ENTER.
4
Press
F G until the picture appears in its best quality, then
press ENTER.
●
Repeat steps 2 – 4 as necessary.
5
Press RETURN to return to the Manual Channel Set screen.
6
Press SET UP or RETURN to close the Confirmation screen.
INFORMATION
If you live in Eastern Europe,
ATV SYSTEMB setting appears
instead of
ADECODERB setting on the Manual Channel Set
screen. When you can see the picture but can hear no audio,
select appropriate TV system (D/K or B/G). Normally, TV
programmes are broadcast as follows.
For Eastern Europe : D/K
For Western Europe : B/G
A Select a country in Eastern Europe in step 5 of AAuto
B Press
F G to select ATV SYSTEMB in step 7 of AManual
C Press
F G to select appropriate TV System (D/K or B/G).
<
>
PR
PR
01
C01
----
02
02
CTEA
03
05
1000
12
----
05
01
9LIV
06
04
AB3
07
----
08
----
09
----
10
----
11
----
04
3SAT
<
>
PR
PR
01
C01
----
02
C79
3SAT
03
02
CTEA
12
----
05
01
9LIV
06
04
AB3
07
----
08
----
09
----
10
----
11
----
05
C79
04
05
1000
MOVE
INITIAL SET UP > MANUAL CH SET
EDIT
RETURN
INITIAL SET UP > MANUAL CH SET
MOVE
EDIT
RETURN
CH
ID
CH
ID
CH
ID
CH
ID
MX1SEU_00.book Page 85 Monday, December 6, 2004 2:01 PM