Sat control set, Satellite receiver control setting, Hdd & dvd deck only) – JVC DR-MX1S User Manual
Page 22: A pg. 22, Installing satellite controller, Setting satellite receiver’s brand and channel
Filename [MX1SEU_05Name.fm]
Masterpage:Left0
22
EN
Page 22
Monday, 6 December 2004 14:00
SAT CONTROL SET
The following procedure is required if you receive satellite
channels through a satellite receiver. Approximately 20 seconds
before the
a
timer programming (A pg. 49) or Manual
Timer programming (A pg. 51) starts, the unit sets its input mode
to
AL-2B and automatically switches the satellite receiver’s channels
using the provided Satellite Controller.
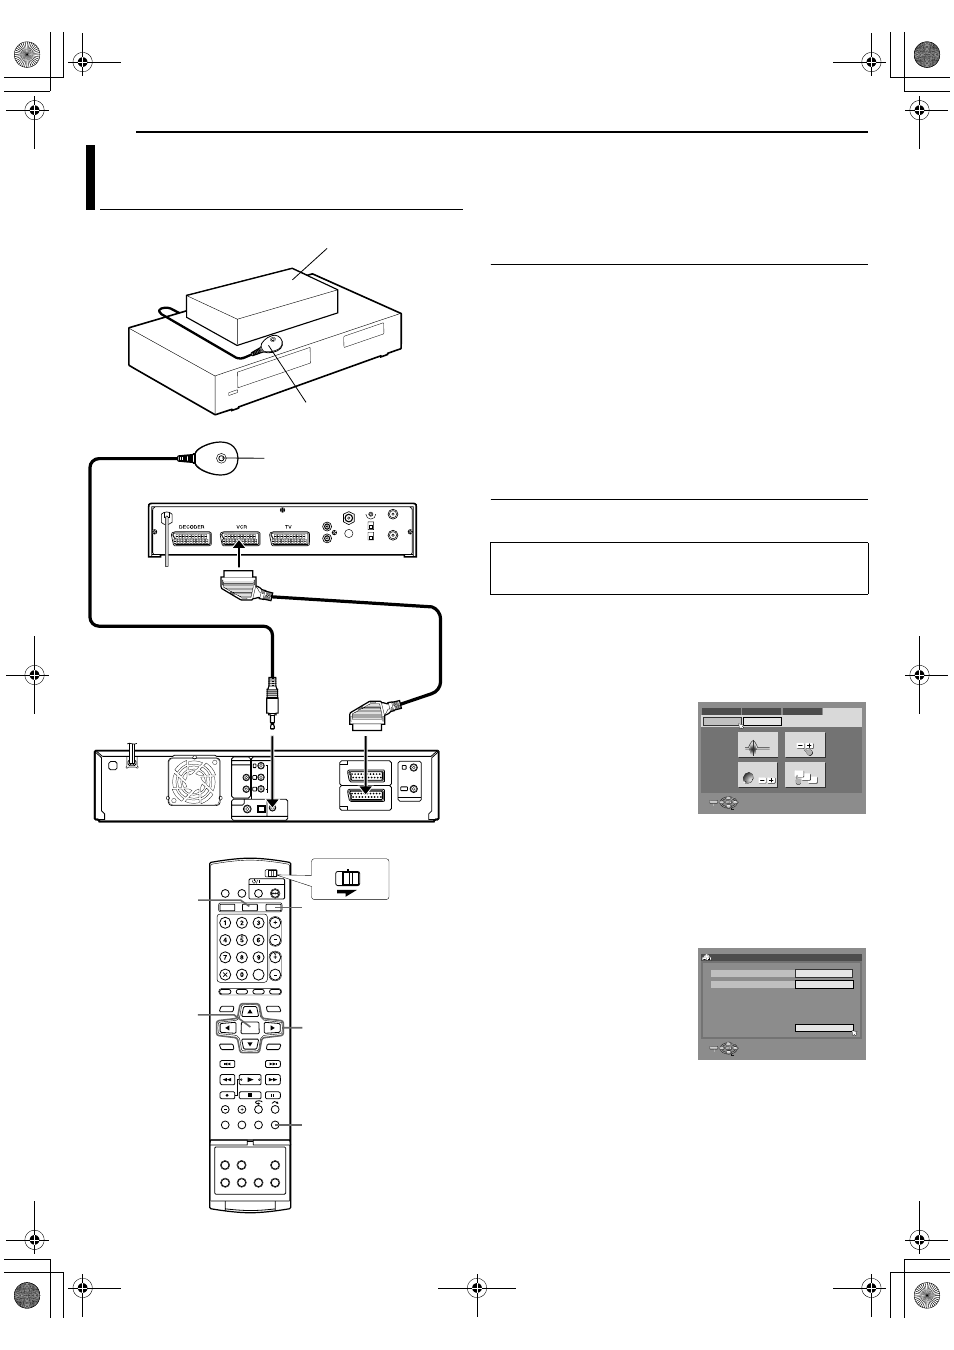
Installing Satellite Controller
1
Place the Satellite Controller so that the path between its
transmitter and the satellite receiver’s remote sensor is
unobstructed.
2
Fix securely using the adhesive strip attached on the back of
the Satellite Controller.
3
Be sure to connect the unit’s [L-2 IN/DECODER] connector to
the satellite receiver’s 21-pin SCART connector.
NOTE:
When connecting your satellite receiver, refer to its instruction
manual.
4
Connect the Satellite Controller to the [SAT CONTROL]
connector on the rear panel.
Setting Satellite Receiver’s Brand And Channel
After installation, set the satellite receiver’s brand and channel
correctly; otherwise, the Satellite Controller cannot work correctly.
1
Turn on the satellite receiver’s power.
2
Press HDD or DVD so that the HDD or DVD lamp lights up on
the unit.
3
Press SET UP to access the Main Menu screen.
4
Press
D E to select AINITIAL SET UPB, then press G.
5
Press
D E to select ATUNER
SET
B, then press G.
6
Press
FGD E to select ASAT
CONTROL SET
B, then press
ENTER.
7
Press
F G to select ABRANDB,
then press ENTER.
8
Press
F G to select the brand
code from the list on page 23, then press ENTER.
●
If the unit is in playback or recording mode, you cannot set the
brand code.
9
Press
F G to select APROGRAMMEB, then press ENTER.
10
Press
F G to select one of the channel positions on the
satellite receiver, then press ENTER.
●
You can select the channel position between 1 to 999.
11
Press
F G to select ATESTB,
then press ENTER. The unit
enters the Test mode.
Satellite Receiver Control Setting
(HDD & DVD Deck Only)
Satellite receiver
Satellite Controller
(provided)
(suggested locations)
Transmitter
21-pin SCART cable
(supplied)
To [SAT CONTROL]
Your unit
Satellite receiver
Back of unit
Satellite Controller (supplied)
To [L-2 IN/
DECODER]
rtwe
ENTER
SET UP
DVD
HDD
CABLE/SAT
DVD
TV
●
Turn on the unit.
●
Turn on the TV and select the AV mode.
●
Slide the TV/CABLE/SAT/DVD switch to DVD.
13
12
11
ENTER
SELECT
SET UP
EXIT
DVD VIDEO SET UP
AUTO CH SET
HDD/DVD SET UP
FUNCTION SET UP
INITIAL SET UP
TUNER SET
CLOCK SET
MANUAL CH SET
SAT CONTROL SET
GUIDE PROG SET
SELECT WITH @ THEN PRESS [ENTER]
PRESS [SET UP] TO EXIT
12
73
ENTER
SELECT
SET UP
EXIT
INITIAL SET UP > SAT CONTROL SET
BRAND
PROGRAMME
TEST
SELECT WITH @ THEN PRESS [ENTER]
PRESS [SET UP] TO EXIT
MX1SEU_00.book Page 22 Monday, December 6, 2004 2:01 PM