Hd5212, Loading an mp3/wma disc, Installing a usb device – Jensen HD5212 User Manual
Page 22: Loading an sd card
18
HD5212
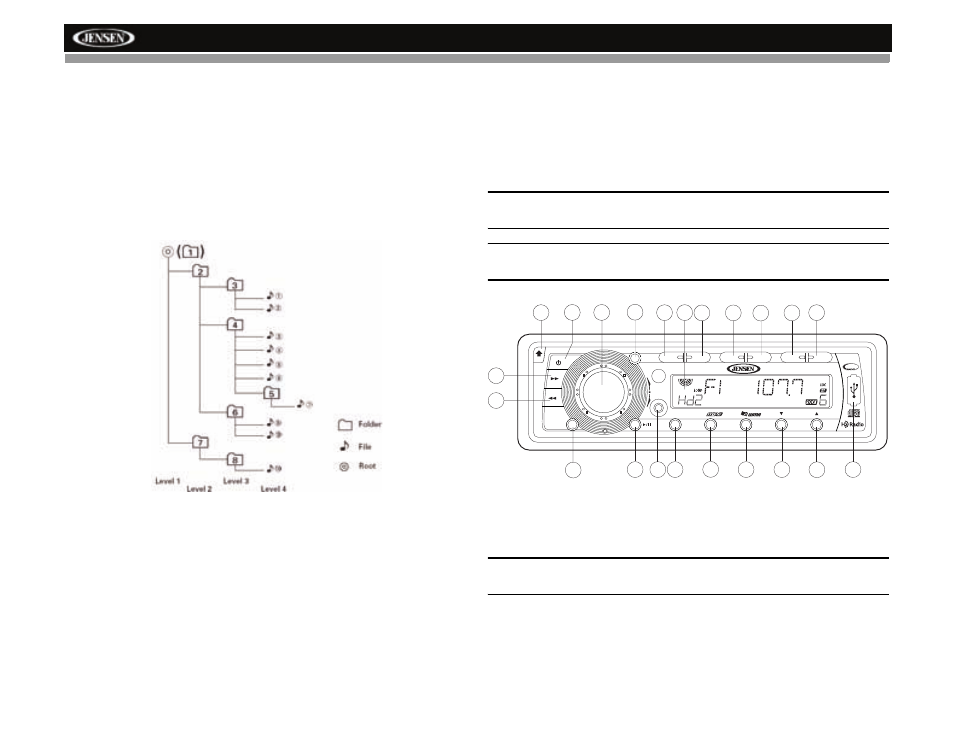
FIle Playing Order
When selected for play, files and folders (Folder Search, File Search or
Folder Select) are accessed in the order they were written by the CD writer.
As a result, the order in which they are expected to be played may not
match the order in which they are actually played. You may be able to set
the order in which MP3/WMA are to be played by writing them onto a
medium such as a CD-R with their file names beginning with play sequence
numbers such as "01" to "99".
For example, a medium with the following folder/file hierarchy is subject to
Folder Search, File Search or Folder Select as shown below.
Loading an MP3/WMA Disc
Press the open button (9) to lower the front panel, then Insert an MP3/WMA
disc. After the disc is loaded, the track number and elapsed time will appear,
then the display will scroll through any ID3 Tag information while the file is
playing. If the disk contains ID3 tag information, you can scroll through it by
pressing the DISP button (7). If no ID3 tag information is available, the unit
will display the elapsed time. When ID3 information is available, the display
will alternate between track name and format/track number.
Installing a USB Device
Gently lift the rubber USB slot cover (22) from the top and pull it down.
Insert your USB thumb drive into the USB slot on the front of the radio. The
unit will automatically search for MP3 and WMA files on the device and
begin playback. You can access USB PLAY mode from any other mode by
pressing the SRC button (2). “USb” is displayed in the bottom left corner of
the LCD.
NOTE: Not all USB devices are supported by this unit. Standard USB
memory sticks approved by Microsoft are supported.
WARNING: Do not remove the device when USB PLAY mode is active.
Press SRC (2) to change to another mode before removing the device.
Loading an SD Card
Insert the SD card, label side up, into the SD slot located behind the front
panel. Replace the front panel when finished.
NOTE: You must remove the front panel to access the SD card slot.
See “Detaching the Front Panel” on page 7.
The unit will read the files on the card automatically. “Sd” appears in the
bottom left corner of the display when an SD card is being read.
To remove the card, first press the SRC button (2) to switch to another
mode and stop SD playback. Press in on the card to eject it, and then pull it
straight out. Most cards have a thin recess that helps with removal.
PRESS
RPT
SHF
SCN
1
2
3
4
5
6
SEL
CAT/DIR
AUX IN
MONO
DISP
EQ
BAND
SRC
TUNE/CH
MUTE
A~Z
0~9
PS
ENTER
IPOD
FILE/FOLDER
HD5212
SAT
READY
1
2
4
7
10
11
3
5
6
8
9
20
12
19
21
13
14
16
15
17
18
22