InFocus 760 User Manual
InFocus Projectors
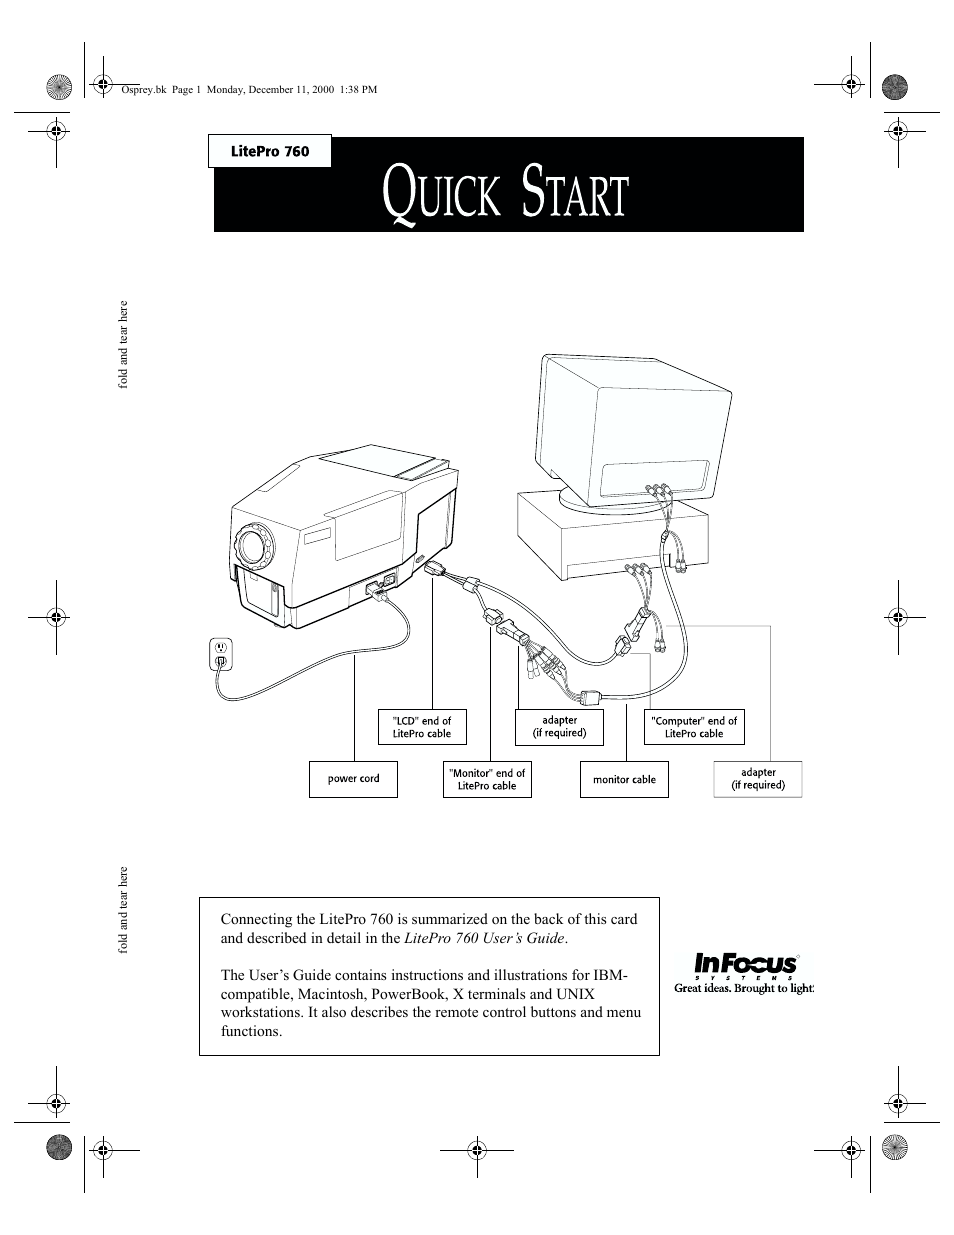
Table of contents
Document Outline
- Connecting the LitePro 760 is summarized on the back of this card and described in detail in the ...
- The User’s Guide contains instructions and illustrations for IBM- compatible, Macintosh, PowerBoo...
- If you are setting up the LitePro projector for the first time, install the 2 bulbs that were shi...
- 1
- Place the projector on a flat surface with the lens pointing towards the projection screen. Remov...
- 2
- Plug the “LCD” end of the LitePro cable into the “Computer” connector on the side of the projector.
- 3
- Unplug the computer’s monitor cable from the computer.
- 4
- If your computer is not an IBM- compatible, find the adapters that correspond to your computer. (...
- 5
- Plug the “Computer” end of the LitePro cable into the computer’s monitor connector.
- 6
- If you want to display the image on your monitor as well as on the projection screen, plug the “M...
- 7
- Plug the power cord into the projector, then into your electrical outlet.
- 8
- Press the “1” side of the projector’s power switch. The projector powers up and displays the Lite...
- 9
- Lift the front of the projector by the handle and release the elevator foot. When the image is at...
- 10
- Adjust the focus by turning the lens focus ring.
- 11
- If you attached your monitor in Step 7, turn on the monitor.
- 12
- Turn on the computer. The computer image should display on the projection screen.
- 13
- If your computer is ...
- Use these adapters ...
- Sun SPARCstation, SGI Indy or Indigo, Intergraph or color NeXTstation
- HP, IBM RS6000, DEC VAXstation or DECstation, Tektronix X terminal
- Apple Macintosh or PowerBook
- IBM-compatible desktop or laptop, SGI Starter, Tadpole SPARCbook
- no adapters needed
- fold and tear here
- fold and tear here
- Copyright © 1995 by In Focus Systems, Inc. Wilsonville, Oregon. All rights reserved.
- This equipment has been tested and found to comply with the limits for a Class A digital device, ...
- UL, CUL, TUV
- This equipment generates, uses and can radiate radio frequency energy and, if not installed and u...
- • Reorient the receiving antenna for the radio or television.
- • Relocate the equipment with respect to the receiver.
- • Plug the equipment into a different outlet so the equipment and receiver are on different branc...
- • Fasten cables using mounting screws to ensure adequate electromagnetic interference controls.
- All trademarks are the property of their respective owners and are used in this publication for i...
- The following are trademarks or registered trademarks of their respective companies:
- • IBM and PS/2: International Business Machines, Inc.
- • Apple, Macintosh, Mac II, LC, PowerBook, Quadra, Performa, and Power Mac: Apple Computer Corp.
- • VAXstation and DECstation: Digital Equipment, Inc.
- • IRIS, Indy and Indigo: Silicon Graphics Computer Systems
- • Sun, SPARCstation: Sun Microsystems, Inc.
- • SPARCbook: Tadpole Technology, Inc.
- • LitePro and IN FOCUS SYSTEMS: In Focus Systems, Inc.
- • UNIX: AT&T Technologies, Inc.
- Please read these instructions before using your LitePro projector. Failure to comply with these ...
- These graphics are used throughout this manual to draw your attention to important information ab...
- These graphics are used on the LitePro:
- Attention - Refer to the User’s Guide for important safety information.
- Fuse - Refer to “Replacing the Fuse” on page31 of this User’s Guide for important safety informa...
- Hot Surface - Do not touch until the LitePro has cooled.
- Use only a three-wire grounding type power source. The power source should not exceed 250 volts r...
- Use only the power cord that was shipped with the LitePro. Although other power cords might be si...
- The LitePro is grounded through the grounding conductor on the power cord. To avoid electric shoc...
- For protection against the risk of fire, use only a fuse of the specified type. Refer to page41 ...
- To avoid overheating and unacceptable image quality, replace the projection lamp with a lamp of t...
- The rear of the LitePro becomes very hot during operation. Avoid touching the exhaust grill on th...
- Openings in the LitePro case provide ventilation to protect it from overheating. Keep loose paper...
- Do not set drinks on top of the LitePro. Spilled liquids can flow inside and damage the LitePro.
- The only user-serviceable parts on the LitePro are inside the lamp door at the rear. Do not open ...
- Introduction 1
- Compatibility 2
- Cables and Adapters 2
- Usage Guidelines 3
- If You Need Assistance 3
- Connecting the LitePro 760 5
- Setting Up 5
- Connecting your Computer 7
- Powering Up the LitePro 15
- Turning the LitePro Off 15
- Using the LitePro 760 17
- Using the Remote Control 17
- Focusing the Image 17
- Adjusting the Height 18
- Reference to the Remote Control Buttons 19
- Using the Menu 21
- Menu Functions 22
- Switching Projection Lamps 24
- Maintenance 27
- Cleaning the Lens 27
- Replacing the Projection Lamps 28
- Replacing Batteries in the Remote Control 30
- Replacing the Fuse 31
- Troubleshooting 35
- Before You Call for Assistance 35
- Solutions to Common Problems 36
- Appendix 39
- Compatibility and Cabling 39
- Specifications 41
- Accessories 43
- Cable Connector Pin Assignments 44
- Portable and Laptop Activation Chart 46
- Index 49
- The In Focus Systems LitePro 760 LCD projector has a resolution of 1024x768 pixels and 24,389 dis...
- Shipping Box Contents
- 1.
- LitePro 760 LCD Projector
- 7.
- 13W3 Adapters
- 2.
- LitePro 760 User’s Guide
- 8.
- BNC Adapters
- 3.
- Remote Control (2)
- not shown:
- 4.
- Power Cord
- Fuses
- 5.
- LitePro Cable
- Projection Lamps
- 6.
- Mac II Adapters
- Lens Cover
- Carrying Case
- Read Me First card
- The LitePro 760 is compatible with a wide variety of computers including:
- • IBM-compatible desktop and laptop systems in VGA, SVGA, XGA and VESA modes
- • IBM PS/2 in VGA and MCGA modes.
- • most Macintosh systems, including PowerBook, Mac II, Performa, Quadra and PowerMac
- • UNIX workstations
- • X terminals
- The LitePro 760 is not compatible with these systems:
- • IBM-compatibles in CGA or EGA graphics mode
- • Macintosh 128, 512, Plus, SE, SE/30 or Classic
- • Macintosh Portable
- Refer to the Appendix for a complete list of the systems that have been tested with the LitePro 760.
- The LitePro 760 comes with these cables and adapters:
- • LitePro cable, this Y-shaped cable connects the LitePro to your computer and to your monitor. I...
- • Two Macintosh adapters that attach to the “Monitor” and “Computer” ends of the LitePro cable fo...
- • Two 13W3 adapters that attach to the “Monitor” and “Computer” ends of the LitePro cable for Sun...
- • Two BNC adapters that attach to the “Monitor” and “Computer” ends of the LitePro cable for HP, ...
- • Power cable.
- • The back of the LitePro can be very hot to the touch after use. Use extreme care or let it cool...
- • Do not block the grills at the back of the LitePro. Restricting the air flow through the LitePr...
- • Handle the LitePro as you would any product with glass components. Be especially careful not to...
- • Avoid leaving the LitePro in direct sunlight or extreme cold for extended periods of time. If t...
- • Transport the LitePro in the original shipping carton or approved hard case (see your In Focus ...
- The first place to look for help is in this manual. Be sure to check the troubleshooting guidelin...
- If this manual does not answer your question, call your In Focus dealer. You can also call In Foc...
- Your LitePro is backed by a limited one-year warranty. The details of the warranty are printed at...
- This chapter describes how to position the LitePro for optimum viewing and how to connect it to y...
- • The projector must be within 6 feet of your power source.
- • The projector must be within 6 feet of the computer.
- • If you are installing the projector on the ceiling, refer to the Ceiling Mount Installation Gui...
- • For information about projector placement and image size, see the “LitePro Tips” box on the nex...
- • If you want to use the LitePro’s Rear Project feature, set it up behind your translucent screen...
- • While the cord is connected, you can switch the projection lamp off by pressing the standby but...
- LitePro Tips
- IMAGE SIZE
- The distance from the LitePro’s lens to the screen determines the size of the projected image as ...
- To connect the projector to your computer, refer to the table below. Follow the procedure that co...
- If Your Computer is:
- You will use:
- Turn to:
- Sun SPARCstation
- two 13W3 adapters
- page8
- SGI Indy and Indigo
- two 13W3 adapters
- page8
- Intergraph 2400 or 6400 workstation
- two 13W3 adapters
- page8
- Color NeXTstation
- two 13W3 adapters
- page8
- HP workstation
- two BNC adapters
- page10
- IBM RS6000/220 or 250
- two BNC adapters
- page10
- DEC VAXstation or DECstation 3100
- two BNC adapters
- page10
- Tektronix X Terminal
- two BNC adapters
- page10
- IBM-compatible desktop computer
- no adapters
- page11
- IBM PS/2, 90/XGA or 95/XGA
- no adapters
- page11
- SGI Starter 1
- no adapters
- page11
- Macintosh desktop computer
- two Mac adapters
- page12
- IBM-compatible laptop computer
- no adapters
- page13
- Tadpole SPARCbook
- no adapters
- page13
- Macintosh PowerBook
- one Mac adapter
- page14
- Follow this procedure if your computer is a Sun SPARCstation, SGI Indigo or Indy, Intergraph 2400...
- • If your computer is an SGI, plug the “SGI” end of the adapter into the “Computer” end of the Li...
- • If your computer is an SGI, plug the “SGI” end of the adapter into the “Monitor” end of the Lit...
- 5. Plug the adapter (with the cable attached) into the computer’s monitor cable.
- 6. Tighten the thumb screws on all the connectors to ensure proper grounding.
- 7. Turn on the monitor.
- 8. Turn on the LitePro 760 by pressing the “1” side of the power switch. (Refer to “Powering Up t...
- 9. Turn on the computer.
- Follow this procedure if your computer is an HP workstation or X terminal, an IBM RS6000/220, a D...
- 1. Locate your monitor cable; it connects the monitor to the computer. Unplug it from the compute...
- 2. Attach one of the BNC adapters to the “Computer” end of the LitePro cable. Plug the adapter (w...
- 3. Attach the other BNC adapter to the “Monitor” end of the LitePro cable. Plug the adapter (with...
- 4. Tighten the thumb screws on all the connectors to ensure proper grounding.
- 5. Turn on the monitor.
- 6. Turn on the LitePro 760 by pressing the “1” side of the power switch. (Refer to “Powering Up t...
- 7. Turn on the computer.
- Follow this procedure if your computer is an IBM-compatible desktop computer, IBM PS/2, IBM 90/XG...
- 1. Locate your monitor cable; it connects the monitor to the computer. Unplug it from the compute...
- 2. Attach the computer’s monitor cable to the “Monitor” end of the LitePro cable.
- 3. Attach the “Computer” end of the LitePro cable to the monitor connector on the computer.
- 4. Tighten the thumb screws on all the connectors to ensure proper grounding.
- 5. Turn on the monitor.
- 6. Turn on the LitePro 760 by pressing the “1” side of the power switch. (Refer to “Powering Up t...
- 7. Turn on the computer.
- Follow this procedure if your computer is a Mac II or any Mac with a separate monitor.
- • If your monitor is 13 inches or smaller, set the switch on the adapter to “LoRes”. If the monit...
- 3. Attach the other Mac adapter to the “Monitor” end of the LitePro cable. Plug the adapter (with...
- 4. Tighten the thumb screws on all the connectors to ensure proper grounding.
- 5. Turn on the monitor.
- 6. Turn on the LitePro 760 by pressing the “1” side of the power switch. (Refer to “Powering Up t...
- 7. Turn on the computer.
- Follow this procedure if your computer is an IBM-compatible laptop or Tadpole SPARCBook.
- Many laptop computers automatically turn off their monitor when another display device is connect...
- You’ll need an Apple PowerBook video-out cable to use the LitePro with a PowerBook.
- 1. Attach the video-out cable to the PowerBook.
- 2. Attach one of the Mac adapters to the “Computer” end of the LitePro cable. Attach the adapter ...
- 3. Tighten the thumb screws on all connectors.
- 4. Turn on the LitePro 760 by pressing the “1” side of the power switch. (Refer to “Powering Up t...
- 5. Turn on the computer.
- 6. Open the PowerBook’s Control Panel.
- 7. Click “Mirroring”.
- 8. Restart the PowerBook.
- Powering Up the LitePro
- Turn on the projector by pressing the “|” side of the power switch on the side of the projector.
- • After about 5 seconds, the projector test pattern appears. (If it does not, refer to “Troublesh...
- • If the image is not projected directly on the screen, adjust the height of the elevator. Refer ...
- • You may also need to focus the projector. Turn the focus ring on the projector’s lens until the...
- It is very important to allow the projector to cool down before turning it completely off. Turnin...
- • The bulb turns off, but the fans remain on to cool the LCD.
- This section describes how to use the LitePro 760, including these operations.
- • If the image is not completely displayed, adjust the height of the LitePro (page18) or use the...
- • If the image is out of focus, rotate the lens to focus it (this page).
- • If the image still looks bad after you have adjusted the focus, adjust the signal synchronizati...
- • If the colors do not look right, adjust the brightness (page20) and/or the red/green/blue colo...
- • If you want to project from behind your screen, switch to Rear Project mode (page23).
- • If the bulb has burned out, switch to the spare lamp (page24). If you need to install new lamp...
- This section also provides a reference to the remote control buttons and the menu commands.
- To use the remote control, point it at the projection screen or at the front of the LitePro. The ...
- To focus the image, rotate the projection lens until the image is clear. Rotate the lens clockwis...
- Your LitePro is equipped with a self-locking, quick-release elevator foot. If the projected image...
- To raise the LitePro:
- 1. Raise the front of the projector off the table by lifting up on the handle.
- 2. Press the quick-release button (just inside the handle). The elevator foot releases.
- 3. Gently lift or lower the projector to the desired height. When you release the handle, the ele...
- 4. To more closely adjust the projector’s height, rotate the elevator foot clockwise to raise the...
- To lower the elevator foot:
- • Holding the LitePro handle, press the elevator’s quick release button. Push the elevator back u...
- This section provides an alphabetical reference to the remote buttons. The names of the buttons a...
- When you press menu, the LitePro menu appears at the top of the screen. Press menu again to remov...
- When you press standby, the projector turns off its lamp to conserve electricity. The fans remain...
- The operation of the arrow buttons depends on whether or not the on-screen menu is displayed. Whe...
- When the menu is not displayed, the arrow buttons move the image in the direction of the arrow. I...
- The arrow buttons are auto-repeating; they repeat their function as long as you hold down the but...
- Adjust the contrast if the white areas of the projected image do not appear to be solid white. To...
- Both contrast buttons are auto-repeating; they continue to adjust the contrast setting as long as...
- Adjusting the brightness lightens or darkens the image. To lighten the image, press the + (plus) ...
- Adjusting the brightness changes the amounts of red, green and blue in the image. If the LitePro ...
- Both ends of the brightness button are auto-repeating; they continue to adjust the brightness set...
- Adjusting the synchronization fine tunes the LitePro to match the signals from your computer, dec...
- There are 32 sync levels. Press the sync+ or sync- buttons to cycle through the sync levels unt...
- The LitePro 760’s on-screen menu allows you to adjust the individual colors in the projected imag...
- • language of the menu
- • number of displayable colors
- • rear projection mode
- • tracking
- • color inversion
- • reset adjustments
- Each of the menu functions is described on the following pages in “Menu Functions”.
- To display the menu:
- • Press the menu button on the remote. (The image quickly blinks off and back on when you display...
- To remove the menu from the screen:
- • Press the menu button again.
- • Use the left and right buttons to highlight a menu function.
- • Use the up and down arrow buttons to adjust or change a menu function.
- To reset all menu settings to their factory default values, select Reset. (The image quickly blin...
- The left side of the menu contains information about the state of the LitePro. If you need to cal...
- • Track The current track setting. This value changes as you adjust the Track bar. (Refer to “Tra...
- • Horiz The horizontal synchronization rate.
- • Vert The vertical synchronization rate.
- • Mode This value identifies the mode in which the LitePro is operating.
- Follow the instructions given above in “Using the Menu” to access the menu and select the functio...
- Adjusting the Red bar changes the amount of red in the projected image. As you move the adjustmen...
- Pressing the brightness button on the remote changes the red, blue and green values.
- Adjusting the Green bar changes the amount of green in the projected image. As you move the adjus...
- Adjusting the Blue bar changes the amount of blue in the projected image. As you move the adjustm...
- The Track function adjusts the LitePro 760’s internal clock to match the signal from your compute...
- Adjusting the contrast setting affects the amount of white in the projected image. Adjust the con...
- Changes the language in which the menu is displayed. You can choose English, French, German, Span...
- When you select Rear Project, the LitePro 760 reverses the image so you can project from behind t...
- The Colors function allows you to change the number of displayable colors. You can select 8 or 24...
- When you select Inverse, the LitePro switches all the colors of the image so that their opposites...
- When you select Reset, the LitePro changes all the adjustments you made back to the factory defau...
- • position
- • brightness
- • contrast
- • sync
- • red, green and blue
- • colors
- • track
- • inverse
- The LitePro was shipped with two projection lamps. To avoid breaking during shipping, they are no...
- When both lamps are installed in the LitePro, only one is used at a time. The other is available ...
- To switch from the active lamp to the spare lamp:
- • Gently slide the lamp changer knob to the other side of the projector as shown here.
- This section describes:
- • how to clean the lens,
- • how to replace the projection lamps,
- • how to replace the batteries in the remote control, and
- • how to replace the fuse.
- Follow these steps to clean the projection lens.
- • Be careful not to use excessive amounts of cleaner.
- • Abrasive cleaners, solvents or other harsh chemicals may scratch the lens.
- When a lamp fails, be sure to replace it with another EVD bulb (36 volt, 400 watt) from General E...
- You can order replacement lamps from In Focus. Refer to “Accessories” on page43 for information.
- Follow these steps to replace the lamps.
- 1. Press the “0” side of the LitePro’s power switch. Then, allow the LitePro to cool thoroughly (...
- Allow the LitePro to cool for at least 20 minutes before you attempt to open the lamp door! The i...
- 2. While you’re waiting for the LitePro to cool, find a clean soft cloth that you can use to hold...
- 3. Disconnect the power cord from the LitePro.
- 4. Open the lamp door. To do this, push in on the two buttons as shown below, then lift the door up.
- 5. Hold the lamp door open with one hand.
- 6. Using the cloth, unplug the old bulb from its socket as shown below. Be very careful not to to...
- Do not touch the bulbs with your bare fingers. Always hold them with their plastic bag or a clean...
- 7. Keeping it in its plastic bag, remove one of the replacement bulbs from the box.
- 8. Without forcing it, insert the bulb all the way into the socket. Be sure to insert the bulb st...
- 9. Slide the lamp changer to the other side.
- 10. Replace the other bulb if necessary. Be sure not to touch it with your bare fingers.
- • Save the box. You may need it later to pack the bulbs for shipping.
- Your LitePro is equipped with a bulb life detection system called Bulb Guard. When the operating ...
- Follow these steps to replace the batteries.
- A power line surge or spike can blow the power supply fuse and cause the LitePro to stop working....
- The correct fuse for your LitePro depends on the power line voltage in the country where you are ...
- • If your line voltage is 220V to 240V (as in most European countries), use a 6.3 amp, 250V, 5x20...
- • If your line voltage is 100V to 120V (as in Japan, the United States and most North American co...
- Follow these steps to replace the fuse.
- 1. Make sure that the condition that caused the fuse to blow no longer exists.
- 2. Turn off the LitePro by pressing the “O” side of the power switch on the side of the LitePro.
- 3. Unplug the power cord from the LitePro.
- 4. Locate the fuse holder on the side of the LitePro between the power switch and the power cord ...
- 5. Using a small coin or a flat blade screwdriver, turn the fuse holder a quarter turn in the clo...
- 6. Pull the fuse holder out of the LitePro.
- 7. Remove the blown fuse from the fuse holder.
- 8. Push the new fuse into the clips of the holder until it is securely seated.
- 9. Place the fuse holder back in the LitePro.
- 10. Using the same tool you used in step 5, turn the fuse holder a quarter turn counter-clockwise.
- 11. Plug the power cord back in.
- 12. Press the “|” side of the power switch to turn the LitePro back on.
- Do not open the LitePro case! Opening the case may cause electric shock! Except for the projectio...
- Before calling your dealer for assistance, follow these steps in this order to make sure everythi...
- 1. Make sure you connected the LitePro to you equipment as described in “Connecting the LitePro 7...
- 2. Check cable connections. Verify that all computer and power cables are properly connected.
- 3. Verify that all power is switched on.
- 4. Verify that you have pushed the On/Off button on the remote.
- 5. If the LitePro still does not display an image, reboot the computer. (Macintosh computers requ...
- 6. If the image is still bad, unplug the LitePro from the computer and check the computer monitor...
- 7. If the problem still exists, read through the problems and solutions in this chapter.
- If you call In Focus for assistance:
- • Display the menu (press the menu button on the remote). Write down the information that is disp...
- • Find out what kind of graphics controller card is installed in your computer. (This is the circ...
- • Is the projector switched on? The “|” side of the power switch should be pressed. Refer to the ...
- • Is the LitePro properly plugged into a live AC outlet?
- • If your Lite Pro is plugged into a power strip, is the power strip turned on?
- • Is the lens cap still on the projection lens at the front of the projector?
- • Are the lamps installed? Refer to “Replacing the Projection Lamps” on page28 or the Read Me Fi...
- • Is the bulb burned out? If the bulb is burned out, you can switch to the spare. Refer to “Switc...
- • Has the projector’s fuse blown? Refer to “Replacing the Fuse” on page31 for more information.
- • Is the LitePro adjusted properly? Adjust the brightness. Refer to “brightness” on page20 for m...
- • Does the cable have bent pins in any of the connectors? Check the pins on all three ends of the...
- • The brightness control may need to be adjusted. Adjust the brightness up or down until the text...
- • Use the arrow buttons on the remote to center the image. (The menu must be off when you re-posi...
- • Are your cables connected correctly? Check to see that the cable is connected to the graphics p...
- • Did you turn on the equipment in the correct order? You may need to repeat the power up sequenc...
- • Is your computer graphics system set up correctly? Check the following:
- - Is your computer’s graphics board turned on?
- - If your computer has an external video board, is it turned on?
- - Does your computer have a compatible graphics board? The LitePro 760 is not compatible with CGA...
- • You may need to adjust the tracking to reduce or enlarge the projected image. Refer to “Track” ...
- • Turn the projection lens to focus the image.
- • The projection screen must be at least 4 feet (1.2m) from the LitePro.
- • The projection lens may need cleaning.
- • Rear projection mode is probably set. To switch back to forward projection:
- 1. Press the menu button on the remote to display the menu.
- 2. Select “Rear Projection”. Press the up or down button to switch back to forward projection.
- 3. Press menu again to remove the menu.
- • Adjust the contrast. Refer to “contrast” on page20 for more information.
- • The projection lens may need cleaning.
- • Adjust the contrast. Refer to “contrast” on page20 and page23 for more information.
- • Adjust the Sync. Refer to “sync” on page20 for more information.
- • Adjust the brightness and/or contrast. Remember that, just as there are differences in the disp...
- • One of the integrated circuits inside the LitePro has failed. The only functionality that is lo...
- • You may need to replace the batteries in the remote. Refer to “Replacing Batteries in the Remot...
- The following table lists the computers that the LitePro 760 was compatible with when this manual...
- System
- Resolution
- Adapter
- IBM VGA 256 colors
- 640x400
- none
- IBM VGA graphics
- 640x480
- none
- IBM text
- 720x480
- none
- Super VGA extended
- 800x600
- none
- Super VGA high resolution, interlaced and non-interlaced
- 1024x768
- none
- 132 column text
- 1056 chars. wide
- none
- IBM XGA and 8514, interlaced
- 1024x768
- none1
- IBM RS6000 Model 220, with Gt1 adapter with 8515
- 1024x768
- none
- IBM RS6000 Model 220, with Gt1 adapter with 6091
- 1024x768
- BNC
- Intergraph
- 1184x884
- 13W3
- SGI Indigo
- 1024x768
- 13W3
- SGI Indy
- 1024x768
- 13W3
- Sun SPARCstation
- 1024x768
- 13W3
- 1152x9002
- 13W3
- Digital Equipment Corporation (DEC)
- 1024x864
- BNC
- NeXTstation color
- 1120x8322
- 13W3
- NeXTstation monochrome
- 1120x8322
- 13W33
- Hewlett Packard 710 Series 16”
- 1024x768
- BNC
- Hewlett Packard 16” X terminal
- 1024x768
- BNC
- Apple Macintosh
- 640x480
- Mac
- Mac with SuperMac 16” color monitor
- 832x624
- Mac
- Mac with SuperMac 19” color monitor
- 1024x768
- Mac
- Mac with SuperMac 19” or 20” dual mode monitor
- 1024x768 or 1152x8702
- Mac
- Mac with SuperMac 21” two-page monitor
- 1152x8702
- Mac
- Mac with Radius 21” Actual Size monitor
- 1056x8072
- Mac
- Mac with Radius Precision Color/20 Two-Page monitor
- 1152x8702
- Mac
- Mac with Radius Precision Color/20 Actual Size monitor
- 1024x768
- Mac
- Mac with Radius Precision Color/20 16” mode monitor
- 832x624
- Mac
- Mac with Radius Precision Color/19 Actual Size monitor
- 1024x768
- Mac
- Mac with RasterOps 21” color monitor
- 1152x8702
- Mac
- Mac with RasterOps 19” color monitor
- 1024x768
- Mac
- Mac with RasterOps Dual Scan monitor
- 1024x768
- Mac
- 1152x8702
- Mac
- Mac with RasterOps 16” color monitor
- 832x624
- Mac
- Mac with E-Machines monitor, modes 1 - 8
- 640x480 to 1152x8702
- Mac
- Mac with Apple 16” color monitor
- 832x624
- Mac
- Mac with Apple 21” color monitor
- 1152x8702
- Mac
- Lapis LC 21
- 1024x768
- BNC
- 1 Use the XGA terminator if you do not connect your monitor. Call In Focus Technical Support for ...
- 2 The LitePro 760 displays only a 1024x768 image; some of the higher resolution image will be cut...
- 3 This connection requires a monochrome-to-RGB converter box from Extron.
- Projection Lamps
- Type
- 400 watt tungsten halogen, ANSI EVD type bulbs - manufactured by OSRAM, part number HLX 64663
- Life
- Average 50 hours each
- Fuse
- 100 to 120V nominal line
- 10A, 250V, 3AB
- 220 to 240V nominal line
- 6.3A, 250V, 5x20mm
- Input Power Requirements
- 100 to 240 VAC, 7.2A to 2500 mA, 50 to 60 Hz.
- Remote Control
- Battery
- Two (2) AAA alkaline cells
- Range
- 25 feet (7.62m) when reflected off a white wall or projection screen within 45˚ of the projection...
- Optical
- Brightness
- minimum 150 lumens (measured by ANSI 12 point method)
- Uniformity
- 2:1 maximum (measured by 12 point method)
- Projection Range
- 5 to 15 feet (1.5 to 4.6 m)
- Temperature
- Operating
- 15˚ to 32˚C
- Non-operating
- -20˚ to 60˚C
- Altitude
- Operating
- 0 to 10,000 feet (3048 meters)
- Non-operating
- 20,000 feet (6096 meters)
- Humidity
- Operating and non-operating
- 10 to 90% RH, non-condensing
- Dimensions
- LitePro 760
- 20 x 11.5 x 8 inches
- (51 x 29 x 20 cm)
- Weight
- Unpacked
- 19.5 lbs. (8.8 kg)
- As shipped
- 28 lbs (12.7 kg)
- Contact your In Focus dealer to order. Refer to the In Focus Accessories Catalog for additional i...
- Standard Accessories (ship with LitePro)
- Part Number
- Read Me First card
- 009-0192-xx
- LitePro 760 User’s Guide
- 010-0086-xx
- Soft Carry Case
- 110-0079-xx
- Shipping Box
- 110-0080-xx
- LitePro Cable (VGA cable)
- 210-0041-xx
- Projection Lamp, 36V, 400W
- 232-0020-xx
- Mac Adapters (set of 2)
- 516-0005-xx
- BNC Adapters (2)
- 515-0028-xx and 515-0029-xx
- 13W3 Adapters (2)
- 515-0030-xx and 515-0031-xx
- Lens Cap
- 340-0148-xx
- Remote Control
- 590-0142-xx
- Power Cords (one ships with LitePro, depends on country)
- North American Power Cord
- 210-0023-xx
- Australian Power Cord
- 210-0027-xx
- UK Power Cord
- 210-0028-xx
- European Power Cord
- 210-0029-xx
- Danish Power Cord
- 210-0030-xx
- Swiss Power Cord
- 210-0031-xx
- Fuses and Fuse Holders (one set ships with LitePro, depends on country)
- Fuse, 10A, 3AB (use w/110V)
- 749-0013-xx
- Fuse Holder for 10A, 3AB Fuse (use w/110V)
- 749-0014-xx
- Fuse, 6.3A, 5x20mm (use w/220V)
- 749-0010-xx
- Fuse Holder for 6.3A, 5x20mm Fuse (use w/220V)
- 749-0011-xx
- Compatible Product
- LitePro Ceiling Mount Kit
- 591-0098-xx
- The Y-shaped LitePro cable that shipped with your LitePro has three connectors, they are labeled ...
- The end of the LitePro cable that plugs into the LitePro itself is a male 26-pin D-style connecto...
- Input Pin
- Signal Description
- Output Pin
- 1
- Vertical sync
- 10
- 2
- Horizontal sync
- 11
- 8
- Blue analog
- 14
- 6
- reserved
- 12
- 7
- reserved
- 13
- 9
- Red analog
- 15
- 16
- reserved
- 3
- 17
- reserved
- 4
- 18
- Green analog
- 5
- 20
- GND
- 21
- GND
- 22
- GND
- 23
- Digital/analog video cable ID
- 24
- GND
- 25
- VGA/no video cable ID pin
- 26
- Monochrome digital (Hercules)
- 19
- The pin assignments are the same for the “Monitor” and “Computer” connectors. The “Monitor” conne...
- Pin
- Signal Description
- 1
- Red analog input
- 2
- Green analog input with composite sync
- 3
- Blue analog input
- 4
- GND
- 5
- GND
- 6
- Red GND
- 7
- Green GND
- 8
- Blue GND
- 9
- NC
- 10
- Sync GND
- 11
- GND
- 12
- NC
- 13
- Horizontal sync/composite sync input
- 14
- Vertical sync input
- 15
- NC
- Most laptop computers de-activate their built-in monitors when a second display device is connect...
- Computer
- Key command to activate port
- Key command to de-activate port
- Acer
- Ctrl-Alt-Esc (for setup)<
- Ctrl-Alt-Esc (for setup)
- AST
- FN-D or Ctrl-D
- FN-D or Ctrl-D
- Ctrl-FN-D
- Ctrl-FN-D
- FN-F5
- FN-F5
- type from A:/IVGA/CRT
- type from A:/IVGA/CRT
- Austin
- Ctrl-Alt-,,
- Ctrl-Alt-,
- Altima*
- Shift-Ctrl-Alt-C
- Shift-Ctrl-Alt-L
- setup VGA/Conf.Simulscan
- setup VGA/Conf.Simulscan
- Amrel* **
- setup menu
- setup menu
- Shift-Ctrl-D
- Shift-Ctrl-D
- Apple
- see Mac Portable and Mac PowerBook
- BCC
- automatic - no activation command needed
- reboot computer
- Bondwell
- LCD or CRT option
- LCD or CRT option
- Chaplet**
- setup screen
- setup screen
- Commax
- Ctrl-Alt-#6
- Ctrl-Alt-#5
- Compaq**
- Ctrl-Alt-<
- Ctrl-Alt->
- FN-F4
- FN-F4
- Data General
- Ctrl-Alt-Command
- Ctrl-Alt-Command
- Data General Walkabout
- 2 CRT/X at DOS prompt
- reboot
- Datavue
- Ctrl-Shift-M
- Ctrl-Shift-M
- Dell*
- Ctrl-Alt-<
- Ctrl-Alt->
- Ctrl-Alt-F10
- Ctrl-Alt-F10
- Digital
- automatic
- reboot
- FN-F2
- FN-F2
- Dolch
- dip switch to CRT
- dip switch to LCD
- Epson
- dip switch to CRT
- dip switch to LCD
- Everex**
- setup screen option
- setup screen option
- For-A
- Ctrl-Alt-Shift-C
- Ctrl-Shift-Alt-L
- Gateway 2000
- FN-F1
- FN-F1
- Grid* **
- FN-F2, choose auto or simultaneous
- FN-F2
- Ctrl-Alt-Tab
- Ctrl-Alt-Tab
- Hyundai
- setup screen option
- setup screen option
- IBM 970
- automatic
- warm reboot
- IBM ThinkPad
- setup screen option
- setup screen option
- Kris Tech**
- FN-F8
- FN-F8
- Mac Portable
- no video port: not compatible
- Mac PowerBook
- 140, 145, 170
- no video port: requires a 3rd-party interface
- 160, 165, 180, 250
- automatic: use Set Mirroring option
- warm reboot
- 230
- requires Apple Docking Station
- Mastersport
- FN-F2
- FN-F1
- Micro Express
- automatic
- warm reboot
- Microslave
- automatic
- warm reboot
- Mitsubishi
- SW2 On-Off-Off-Off
- SW2 Off-On-On-On
- NCR
- setup screen option
- setup screen option
- NEC*
- setup screen option
- setup screen option
- CRT at the DOS prompt
- LCD at the DOS prompt
- Packard Bell*
- FN-F2
- FN-F2
- Ctrl-Alt-<
- Ctrl-Alt->
- Panasonic
- FN-F2
- FN-F2
- Samsung
- setup screen option
- setup screen option
- Sanyo
- setup screen option
- setup screen option
- Sharp
- dip switch to CRT
- dip switch to LCD
- SPARC-Dataview
- Ctrl-Shift-M
- Ctrl-Shift-M
- Tandy* **
- Ctrl-Alt-Insert
- Ctrl-Alt-Insert
- setup screen option
- setup screen option
- Texas Instruments
- setup screen option
- setup screen option
- Top-Link* **
- setup screen option
- setup screen option
- FN-F6
- FN-F6
- Toshiba* **
- Ctrl-Alt-End
- Ctrl-Alt-Home
- FN-End
- FN-Home
- 4500
- FN-F5
- FN-F5
- setup screen option
- setup screen option
- Wyse
- software driver
- software driver
- Zenith
- FN-F10
- FN-F10
- * These manufacturers have other models that automatically send video to the external CRT port wh...
- ** These manufacturers offer more than one key command depending on the computer model.
- 13W3 adapters 1, 2, 8
- accessories 43
- activation commands for laptop computers 46
- adapters
- 13W3 1, 2, 8
- BNC 1, 2, 10
- for specific computers 2, 7, 39
- Macintosh 1, 2, 12, 14
- ordering spares 43
- shipped with panel 2
- shipped with projector 2
- air movement inside unit 3
- altitude limits 42
- Apple, see Macintosh
- arrow buttons
- re-positioning image 19
- using in menu 19, 21
- assistance, see Technical Support
- batteries, replacing in remote control 30
- blue adjustment 22
- BNC adapters 1, 2, 10
- brightness button 20, 22
- brightness, adjusting 20
- Bulb Guard 30
- bulb, see lamp
- cables
- connecting to LitePro 6
- for specific computers 39
- LitePro cable 2, 6
- monitor 8, 10, 11, 12
- pin assignments for LitePro cable 44, 45
- power cable 2, 5
- shipped with projector 2
- CGA graphics 2
- colors
- adjusting red, green or blue 22
- don’t match monitor colors 38
- inverting 23
- maximum number available 1, 23
- not displayed 36
- selecting number of 23
- Colors menu function 23
- compatibility 2, 39
- "Computer" end of LitePro cable 8, 10, 11, 12, 13, 14
- computers
- compatible with LitePro 2, 39
- connecting to LitePro 7
- contrast button 20
- DEC workstation
- adapters 2
- compatibility 39
- connecting 10
- defaults, resetting 21
- EGA graphics 2
- "EEPROM failed" displayed 38
- focusing the image 17
- fuse
- ordering spares 43
- replacing in LitePro 31
- specifications 41
- fuzzy lines displayed 23
- green adjustment 22
- height of LitePro 18
- HP workstation
- adapters 2
- compatibility 39
- connecting 10
- humidity limits 42
- IBM workstation
- adapters 10
- compatibility 39
- connecting 10
- IBM-compatible personal computers
- compatibility 2, 39
- desktop, connecting 11
- laptop, connecting 13
- image
- blinks 21, 30
- colors don’t match monitor’s colors 38
- flashes off and on 30
- focusing 17
- fuzzy lines 23
- has lines or spots 38
- not centered 37
- not displayed 36
- out of focus 17, 37
- re-positioning 19
- reversed 38
- streaked 38
- too wide or too narrow 37
- Indigo workstation (SGI)
- adapters 8
- connecting 8
- Indy workstation (SGI)
- adapters 8
- connecting 8
- Intergraph workstation
- adapters 8
- compatibility 39
- connecting 8
- Inverse menu function 23
- inverting image colors 23
- lamp
- average life 24, 41
- BulbGuard 30
- flashing off and on 30
- handling 29
- life detection system 30
- ordering spares 43
- replacing the lamps 28
- specifications 41
- switching to the spare 24
- Language menu function 23
- language, selecting for menus 23
- laptop computers
- activation sequence to allow secondary display 13, 46
- compatibility 2
- connecting to LitePro 13, 14
- LCD, description 1
- "LCD" end of LitePro cable 6
- LitePro
- accessories 43
- adjusting the height 18
- connecting to computer 6
- displaying menu 19
- not working 36
- operating limits 42
- positioning 5
- replacing batteries in the remote 30
- replacing fuse 31
- replacing lamps 28
- specifications 41
- switching to the spare bulb 24
- turning off lamp 19
- LitePro cable
- "Computer" end 8, 10, 11, 12, 13, 14
- "LCD" end 6
- "Monitor" end 8, 10, 11, 12
- connecting to LitePro 6
- description 2
- ordering spares 43
- pin assignments 44, 45
- Macintosh
- adapters 1, 2, 12, 14
- Classic 2
- compatibility 2, 39
- connecting to LitePro 12
- Performa 2
- PowerBook 2, 14
- PowerMac 2
- Quadra 2
- video-out cable 14
- MCGA graphics 2
- menu
- adjusting functions 21
- change language of 23
- description of functions 22
- displaying 19, 21
- removing 19
- selecting functions 21
- menu button 19
- monitor
- cable 8, 10, 11, 12
- connecting to LitePro 8, 10, 11, 12
- projected colors don’t match 38
- monitor activation, IBM-compatible laptop 13
- "Monitor" end of LitePro cable 8, 10, 11, 12
- NeXT workstation
- adapters 2
- compatibility 39
- connecting 8
- optical specifications 41
- PC, see IBM-compatible personal computers
- Performa, see Macintosh
- pin assignments for LitePro cable 44, 45
- power cable
- connecting to LitePro 5
- ordering spares 43
- power supply specifications 41
- PowerBook, see Macintosh
- PowerMac, see Macintosh
- project from behind the screen 23
- Quadra, see Macintosh
- raise the LitePro 18
- Rear Projection menu function 23
- red adjustment 22
- remote control
- description of buttons 19
- not working 38
- ordering spares 43
- range 17
- replacing batteries 30
- specifications 41
- using to display menu 21
- using to turn bulb on and off 15, 19
- resetting menu adjustments 21
- SGI workstation
- adapters 2
- compatibility 39
- connecting a Starter 1 11
- connecting a workstation 8
- shipping contents 1
- signal synchronization 20
- SPARCbook, connecting 13
- spare lamp 24
- specifications 41
- standby button 19
- Starter 1 (SGI), connecting 11
- Sun workstation
- adapters 2
- compatibility 39
- connecting 8
- sync button 20
- Tadpole SPARCbook, connecting 13
- Technical Support
- diagnostic information 22
- in Europe 3
- in USA 3
- information to have on hand before you call 36
- things to try before you call 35
- Tektronix X terminal
- adapters 2
- connecting 10
- temperature limits 41
- test pattern, won’t go away 37
- text not visible 36
- Track menu function 23
- tracking
- adjusting 23
- current setting 22
- troubleshooting 35
- UNIX workstations, compatibility 2, 39
- vertical lines displayed 23, 38
- VGA graphics 2
- video (monitor) activation, IBM-compatible laptop 13
- video-out cable, for PowerBook 14
- X terminals, compatibility 2
- In Focus Systems Inc. (“In Focus”) warrants that each LitePro 760 (“the Product”) sold hereunder ...
- In Focus shall have no further obligation under the foregoing limited warranty if the Product has...
- THE WARRANTY PRINTED ABOVE IS THE ONLY WARRANTY APPLICABLE TO THIS PURCHASE. ALL OTHER WARRANTIES...
- IT IS UNDERSTOOD AND AGREED THAT IN FOCUS’ LIABILITY WHETHER IN CONTRACT, IN TORT, UNDER ANY WARR...
- Part Number 010-0086-00