Important – MITSUBISHI ELECTRIC WD-57831 User Manual
Page 46
46
Chapter 3. TV Setup
Additional Setup Using the
NetCommand Menu, continued
IMPORTANT
To hear audio that is sent from the TV to the A/V
receiver, you must have:
•
physically connected the TV to the A/V receiver
•
learned the IR codes for the A/V receiver inputs
•
chosen the correct input under NetCommand
AV RECEIVER SETUP
•
selected the A/V receiver for audio in the Input
Selection menu
4. Highlight the text box under
AV RECEIVER SETUP.
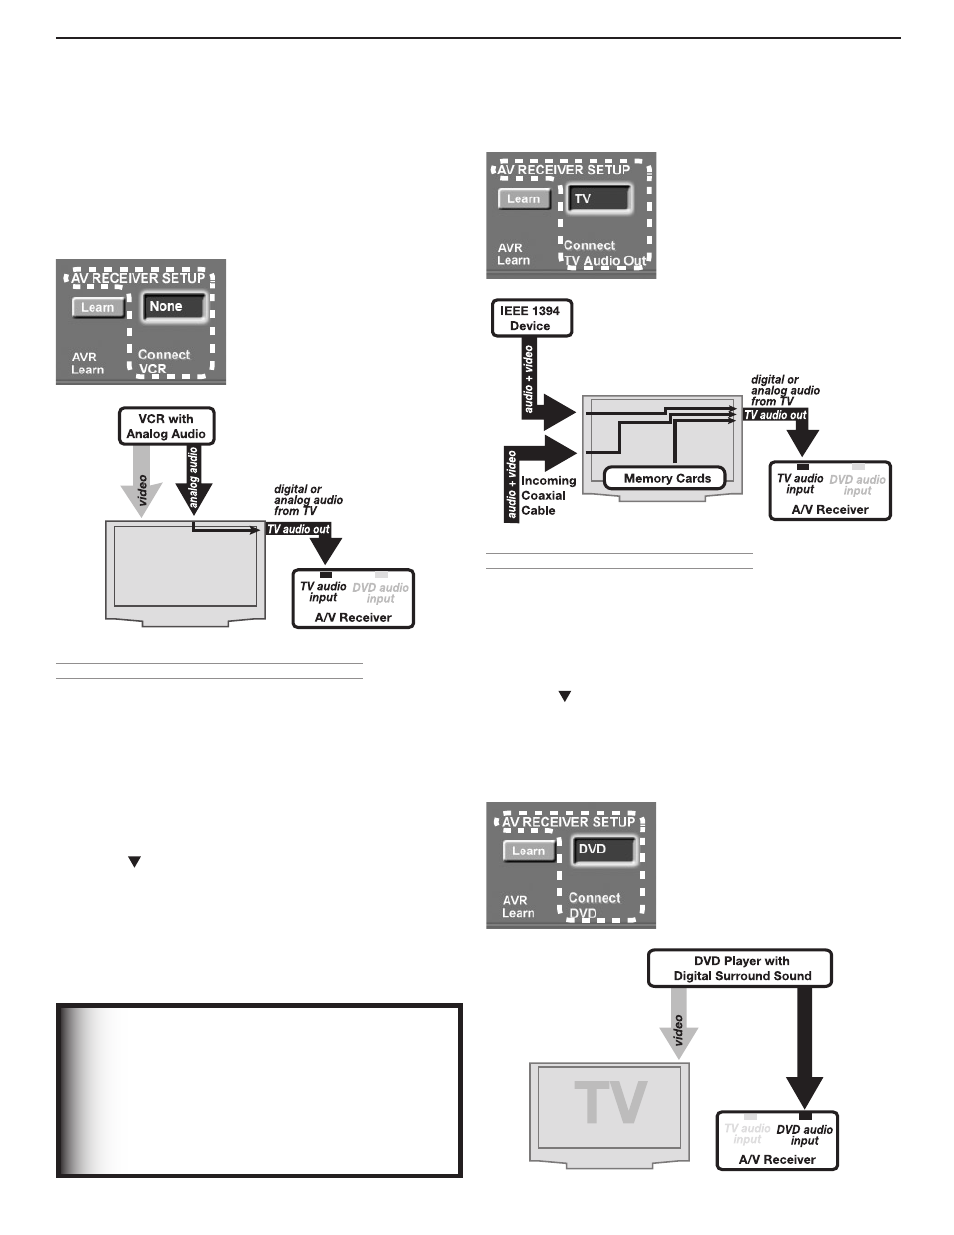
5. Confirm that the setting is at
None, the default.
This setting tells the TV to automatically transfer VCR
audio to the A/V receiver. The TV converts analog
audio to digital for ouput to a digital A/V receiver.
6. Press
EXIT to close all menus.
Figure 17, left and below. A/V
receiver setup indicating the
analog VCR’s audio output is
automatically sent to the A/V
receiver via the TV’s audio
output.
"73FDFJWFS
%7%BVEJP
JOQVU
57BVEJP
JOQVU
EJHJUBMPS
BOBMPHBVEJP
GSPN57
57BVEJPPVU
7$3XJUI
"OBMPH"VEJP
WJ
E
FP
BO
BM
PH
B
VE
JP
57
B
VE
JP
P
VU
EJ
HJ
UB
MT
VS
SP
VO
E
TP
VO
E
57
57
B
VE
JP
P
VU
EJ
HJ
UB
MT
VS
SP
VO
E
TP
VO
E
Audio Available from TV Only (see figure 18)
1. Press
INPUT to display the Input Selection menu.
2. Highlight the icon for an antenna input (
ANT 1 or
ANT 2) and press ENTER to switch to the input. Select
an antenna input in this step even if you have a cable
box or satellite receiver connected on the
HDMI,
COMPONENT, or INPUT jacks.
3. Press
MENU and open the NetCommand menu.
4. Highlight the text box under
AV RECEIVER SETUP.
5. Press to move through the list to
TV. This is the list
of A/V receiver inputs you named in the AV Receiver
(AVR) Learn screen (see figure 15).
The
TV setting here indicates that audio out from
the TV (
DIGITAL AUDIO OUT or AUDIO OUT
LEFT/RIGHT) is sent to the A/V receiver’s TV
AUDIO input. Audio from ANT 1 and ANT 2,
memory cards, and IEEE 1394 devices must go to the
A/V receiver from the TV’s audio outputs as there is
no way to send the audio directly to the A/V receiver.
6. Press
EXIT to close all menus.
Figure 18, Left and below. A/V
receiver setup indicating that the
TV’s audio output (
DIGITAL
AUDIO OUT or AUDIO OUT
LEFT/RIGHT) is connected
to the A/V receiver’s TV audio
input.
57
57
B
VE
JP
P
VU
Digital Surround Sound (see figure 19)
1. Press
INPUT to display the Input Selection menu.
2. Highlight the icon for the DVD player and press
ENTER
to switch to the DVD input.
3. Press
MENU and open the NetCommand menu.
4. Highlight the text box under
AV RECEIVER SETUP.
5. Press to move through the list to
DVD.
This setting tells the TV that digital surround sound
from the DVD player is connected directly to the A/V
receiver’s
DVD AUDIO input.
6. Press
EXIT to close the screen.
Figure 19, left and below. A/V
receiver setup indicating the
DVD player’s audio output is
connected directly to the A/V
receiver’s DVD audio input.
57
B
VE
JP
P
VU
EJ
HJ
UB
MT
VS
SP
VO
E
TP
VO
E