Garland 200 User Manual
Page 41
Part # MCOSM06 Rev 1 (11/03/08)
Page 41
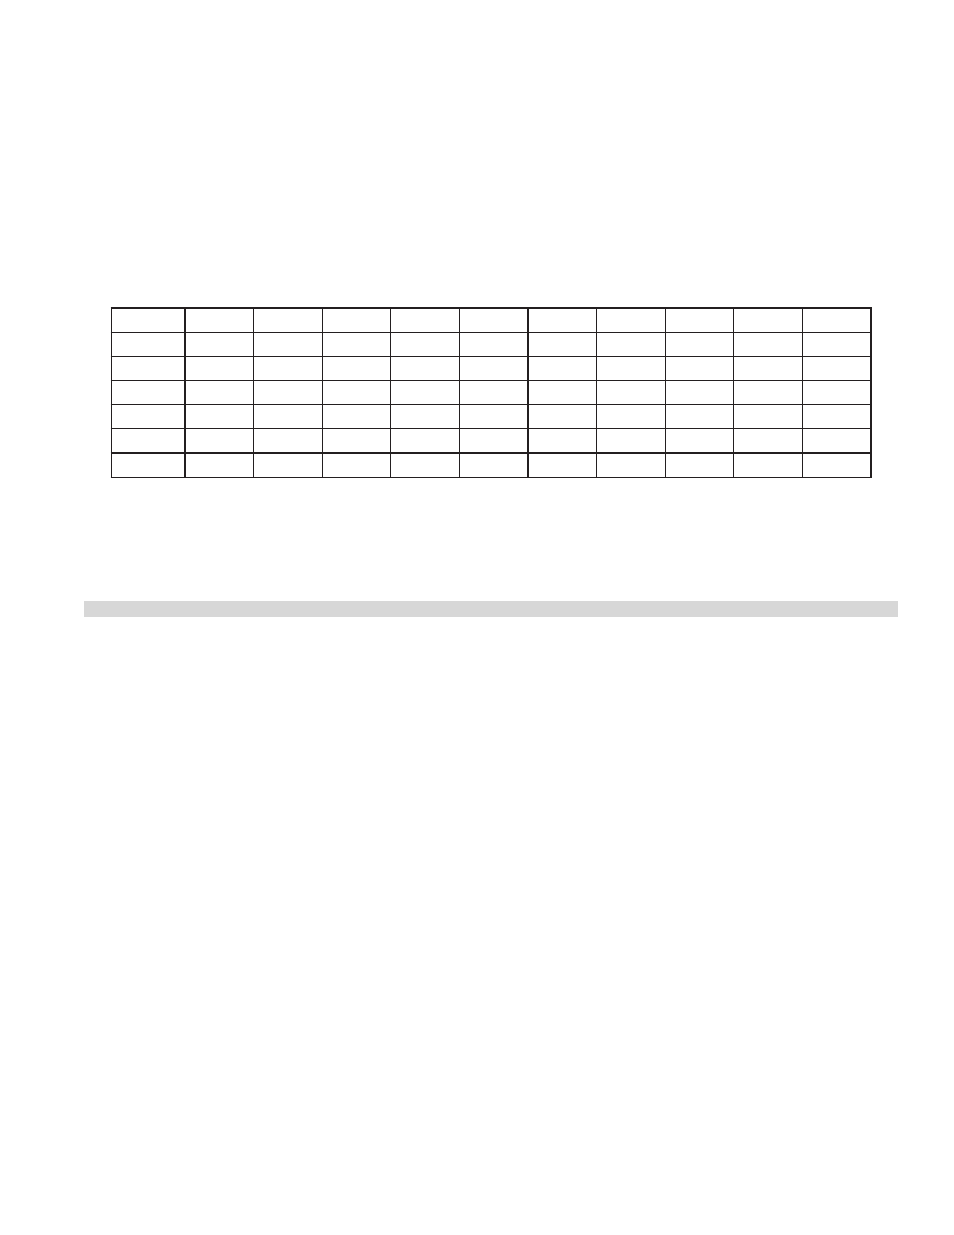
Resistance Vs. Temperature Chart
For Internal Oven Temperature Sensor
The Chart below will provide the Ohms at various
temperatures. This will enable you to determine if the
temperature probe is operable.
The chart is in degrees Fahrenheit.
TEMP
0°
10°
20°
30°
40°
50°
60°
70°
80°
90°
0°
932
953
974
995
1016
1038
1059
1080
1101
1122
100°
1143
1163
1184
1205
1226
1247
1267
1288
1309
1329
200°
1350
1370
1391
1411
1432
1452
1472
1493
1513
1533
300°
1553
1574
1594
1614
1634
1654
1674
1694
1714
1733
400°
1753
1773
1793
1813
1832
1852
1871
1891
1911
1930
500°
1949
1969
1988
2008
2027
2046
2065
2085
2104
2123
200 & 300 SERIES CONTROLLERS CALIBRATION
Both the 200 & 300 series controllers use a 0 to 10.25k OHM
potentiometer. First check the sweep on the potentiometer
between the middle wire and one of the outside wires
for a gradual increase or decrease in the resistance as the
potentiometer stem is turned.
Gas Units – Calibration 300 Series
1. Remove the temperature dial from the potentiometer.
2. Turn the potentiometer to its lowest setting (fully counter
clock-wise).
3. Place the temperature dial back on the potentiometer.
4. Align the mark on the temperature dial to the top left
edge of the 'F': on the left of the temperature dial and
sung down one of the set screws. DO NOT fully tighten
yet.
5. Set the temperature dial to 150°F and allow the oven
cavity for reach set temperature.
6. Confirm the temperature inside the oven cavity with you
meter and that shown on the temperature dial.
7. If an adjustment is required, loosen the set screw
and position the mark on the temperature dial to the
temperature shown on your meter.
8. Tighten set screw down.
9. Repeat as required (once is usually enough).
10. Fully tighten both set screws.
Gas Units – Calibration 200 Series
1. Remove the temperature dial from the potentiometer.
2. Turn the potentiometer to its highest setting (fully clock-
wise).
3. Place the temperature dial back onto the potentiometer.
4. Align the mark on the temperature dial 1/4" PAST the
500°F marking on the overlay and snug down one of the
set screws. Do NOT fully tighten yet.
5. Set the temperature dial to 159°F and allow the oven
cavity to reach set temperature.