Scansnap s510m getting started – FUJITSU SCANSNAP S510M User Manual
Page 25
ScanSnap S510M Getting Started
24
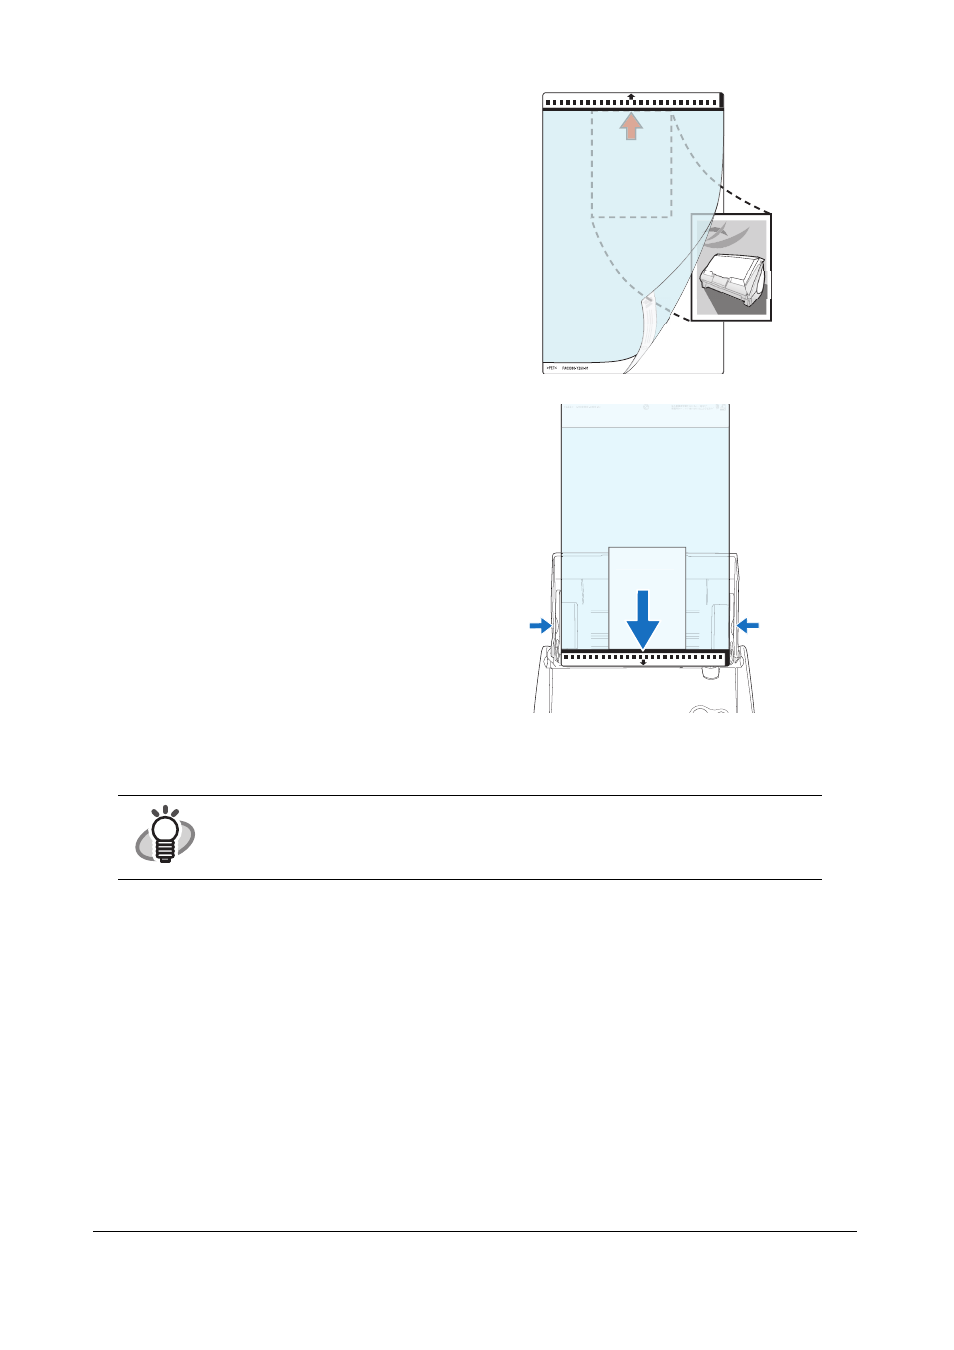
4. Open the Carrier Sheet and place the document inside.
5. Load the Carrier Sheet onto the ScanSnap.
6. Press the [SCAN] button.
⇒
Scanning starts.
⇒
The image is centered and output in the specified size.
HINT
The loading method and ScanSnap Manager’s settings differ according to the documents to be
scanned. Refer to "ScanSnap S510M Operator’s Guide" on the ScanSnap Setup CD-ROM
for details.
Neatly align the top of the material with the top of
the Carrier Sheet.
Center the material so that it is entirely contained
in the Carrier Sheet.
• Load the Carrier Sheet with the portion striped
in black and white as the leading edge as shown
in the right figure.
• Place the Carrier Sheet so that the back side of it
faces up.
• Adjust the side guides to the width of the
Carrier Sheet to avoid skewing.
• When the Carrier Sheet is used for scanning,
continuous scanning is not possible. Scan one
piece or one sheet at one time.
Bac
k s
ide
SCAN
POWER
- fi-5015C (26 pages)
- M3093GX\DG (7 pages)
- M3099EX (100 pages)
- S500M (24 pages)
- M3096GX (53 pages)
- M3093GX (50 pages)
- fi-4750L (95 pages)
- Image Scanner fi-5650C (161 pages)
- C150-E194-01EN (38 pages)
- fi-4120C2 (130 pages)
- fi-4010CU (2 pages)
- SCANSNAP P2WW-2301-01ENZ0 (90 pages)
- fi-5110C (137 pages)
- fi-4530C (132 pages)
- fi-4110CU (40 pages)
- FI-6140 (20 pages)
- fi-5120C (28 pages)
- M3091DC (51 pages)
- fi-5110EOX (135 pages)
- SCANPARTNER 620C (26 pages)
- fi-4750C (94 pages)
- fi-5220C (28 pages)
- fi-5530C (28 pages)
- SCANSNAP P2WW-2300-01ENZ0 (81 pages)
- SCANSNAP NETWORK SCANNER N1800 (23 pages)
- Network Scanner fi-6010N (21 pages)
- fi-4640S (61 pages)
- SCANSNAP S300M (38 pages)
- M3093DE (51 pages)
- fi-5750C (40 pages)
- Image Scanner fi-6230 (222 pages)
- fi-6230 (211 pages)
- C150-E187-01EN (94 pages)
- Mobile Color Scanner (65 pages)
- SCANPARTNER 600C (95 pages)
- IMAGE FI-5530C2 (179 pages)
- C150-E140-03EN (63 pages)
- fi-4220C2 (141 pages)
- CardMinder P2WW-2640-01ENZ0 (40 pages)
- M3097DG (70 pages)
- SCANSNAP! FI-4110EOX2 (97 pages)
- fi-60F (55 pages)
- ScanSnap Upgrade P2WW-1860-01EN Scanner (55 pages)
- fi-4340C (114 pages)
- fi-4120C (180 pages)