Lingenfelter L450010197 L450020197 Lingenfelter C5 Corvette Battery Relocation v1.5 User Manual
Page 9
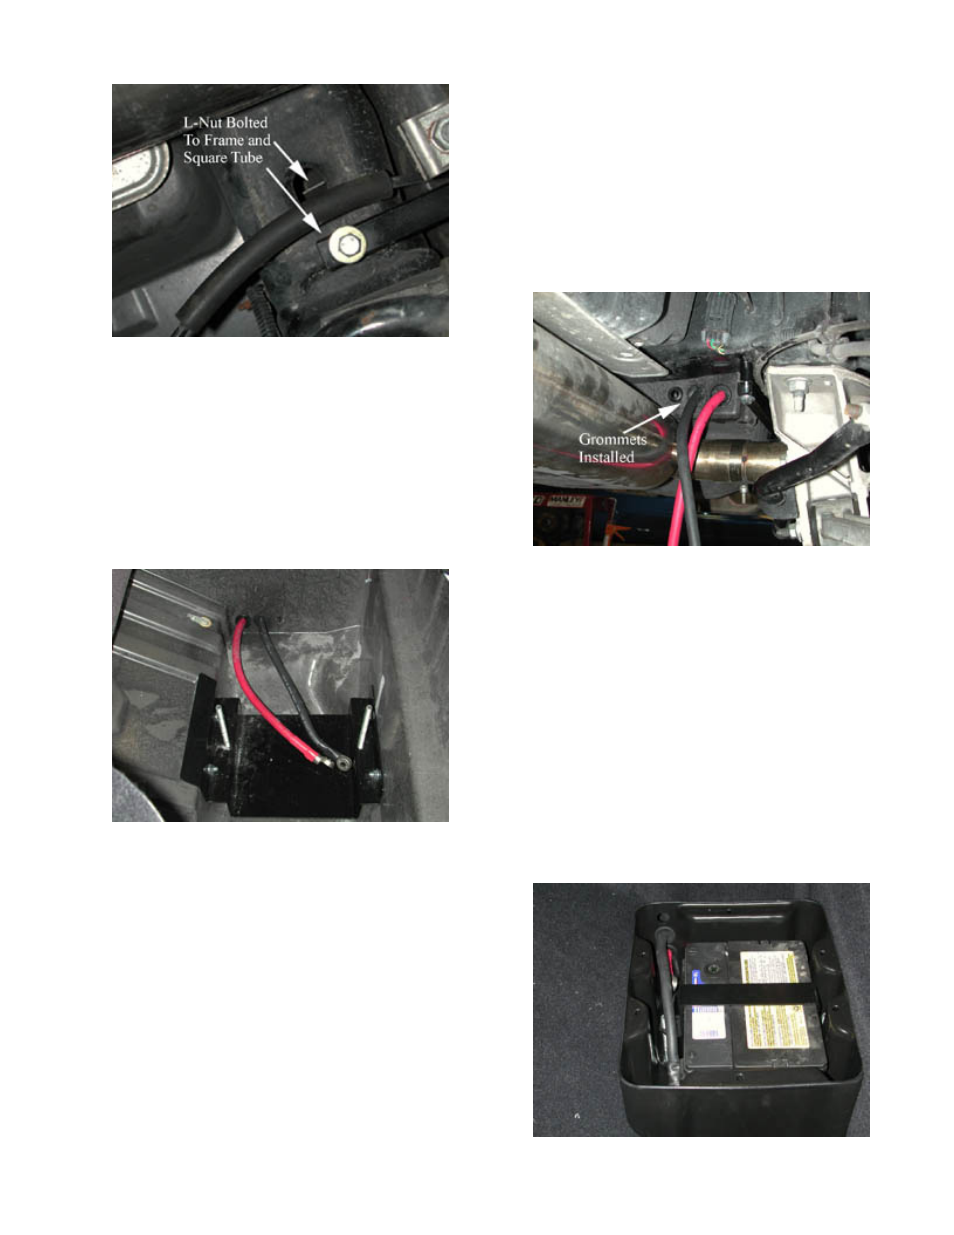
Now route the positive cable through the bottom hole
of the box and install grommet (part #22). Repeat
for the negative cable. Install the smaller remaining
grommet (part #21) in the top hole. Install the battery
and slide cables in or out to achieve proper length
but do not fasten to battery. Make sure they are not
resting against the battery and creating a “hot cable.”
Install black bracket that holds down the battery (part
#10). The slotted hole in this bracket will go towards
the front of the car for that hole we will use a flat
washer (part #24) and a Nylock nut (part #15). Use
just a Nylock nut on the rear stud, tighten snuggly but
do not over-tighten.
From outside of the car, route the round end of the
positive (red) cable (part #3) through the 1” hole in
the fiberglass panel that is located towards the front.
Spray a large grommet (part #21) with WD40 and
from inside the car, force it over the cable end and
work it into place on the fiberglass. On the standard
kit, repeat with the negative cable (part #4). The
lightweight kit uses the frame as the ground path.
Now install the smaller rubber grommet (part #21) in
the remaining hole. Work carpet back into location
feeding the cables through the proper holes as marked
on “Pattern 1”. Place two rubber washers (part #23)
on each stud of the metal battery tray. Work them
down to the bottom so they seat against the tray. Now
install the plastic battery box (part #1) by sliding it
down over the studs and making sure it is seated to
the lowest point. Install a regular 3/8”x16 nut on each
stud and run it down to the plastic. Tighten snuggly
but do not over-tighten. If studs appear to be leaning
outward straighten by grabbing the upper edges of the
battery box and adjusting as necessary.
Reinstall the square tube member, but do not tighten
it. Locate the two black “L” nuts (part #20). These
will go in the slots on the frame rails. Hold in
place with needle–nose pliers while installing the
5/16”x18”x2-1/2 (part #16) bolts with flat washer.
Tighten these bolts securely. Now tighten all other
bolts/nuts previously installed. On the right side, use
a blunt object to bend the L nut so it is flush with the
frame, this is where a battery cable will pass.
Page 8 of 21