Lokar TH350 Stainless Kickdown Bracket User Manual
Lokar For the car
Building American Quality… With A Lifetime Warranty!
General Installation Notes:
Please read these instructions completely before beginning the installa-
tion. If you have any questions please call.
Before beginning the installation, disconnect the negative battery cable
and use wheel chocks to block the vehicle's wheels.
Make sure the engine, transmission, body and frame are properly
grounded.
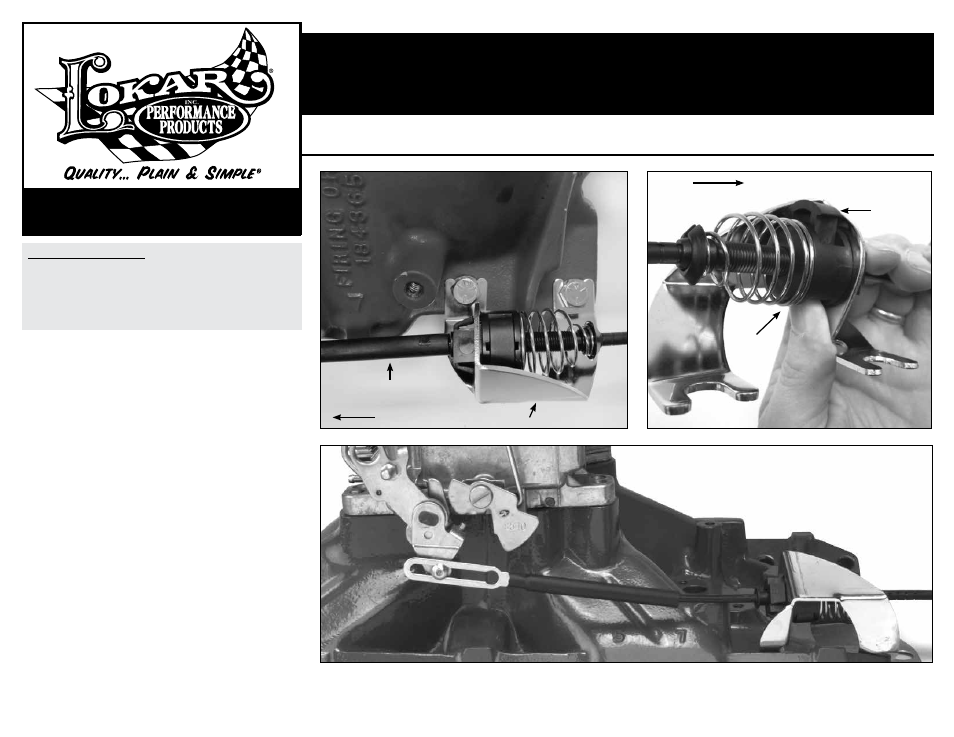
Step 1: Disconnect the kickdown cable from the carburetor linkage.
Step 2: Squeeze the latch tabs on the kickdown cable and push rearward
to remove the kickdown cable from the existing kickdown bracket.
Step 3: Loosen the two rear bolts on the driver’s side of the intake
manifold that hold the existing kickdown bracket in place, and
remove the existing kickdown bracket.
Step 4: Install the new Lokar kickdown bracket under the bolt heads. If
there are washers on the bolts, make sure the kickdown bracket
is installed against the intake manifold, underneath the washers.
Step 5: Tighten the intake manifold bolts to the manufacturer’s torque
specification.
Step 6: Insert the kickdown cable (not included) into the square hole in
the new kickdown bracket, and push it forward until it latches
on both sides.
Fig. 1 Check to make sure it is securely latched by
attempting to pull the cable housing rearwards out of the bracket.
Step 7: Reconnect the kickdown cable to the throttle linkage on the
carburetor. Double check the kickdown cable adjustment. When
the kickdown cable is properly adjusted you should be able to
open the throttle to the wide open position without interference
from the kickdown cable; and with the throttle wide open, you
should not be able to pull the kickdown cable any further.
If the kickdown cable needs to be adjusted, it is best to refer to
the factory service information for the type of cable you are using.
The adjustment method varies by application. However, if you are
using a "universal" style cable such as the one shown in
Fig. 2,
release the latch on the black housing by pushing it up from the
bottom. If you cannot get it to release by hand, you may be able
to pry the latch up with a screwdriver. Move the throttle to the
wide open position and hold it there. Push the latch back down
to lock the cable housing into position. Release the throttle.
TOLL FREE 1-877-469-7440 • (865) 966-2269 • FAX (865) 671-1999 • [email protected] • www.lokar.com
®
TH350 Stainless Kickdown Bracket Installation Instructions
TH350 Stainless Kickdown Bracket
Installation Instructions
INS0127
Rev. 07/29/2014
Page 1
© 2012 Lokar, Inc.
Fig. 1
Fig. 2
Kickdown Cable
(not included)
Latch
Released
Push
Up
Kickdown Bracket
Front
Front
Step 8: Check to make sure that the throttle moves through its full range of travel with no binding or sticking.
When the installation is completed, the kickdown cable and bracket should look like
Fig. 3.
Fig. 3