Lokar Door Handle, Window Crank & Vent Window Crank User Manual
Lokar For the car
Building American Quality… With A Lifetime Warranty!
General Installation Notes:
Please read instructions completely before beginning installation.
If you have any questions please call.
Lokar Handles and Cranks require a minimum of 3/8" of shaft
length protruding beyond the door panel for installation.
Before starting installation, set parking brake and scotch vehicle
wheels to avoid accidental movement of the vehicle.
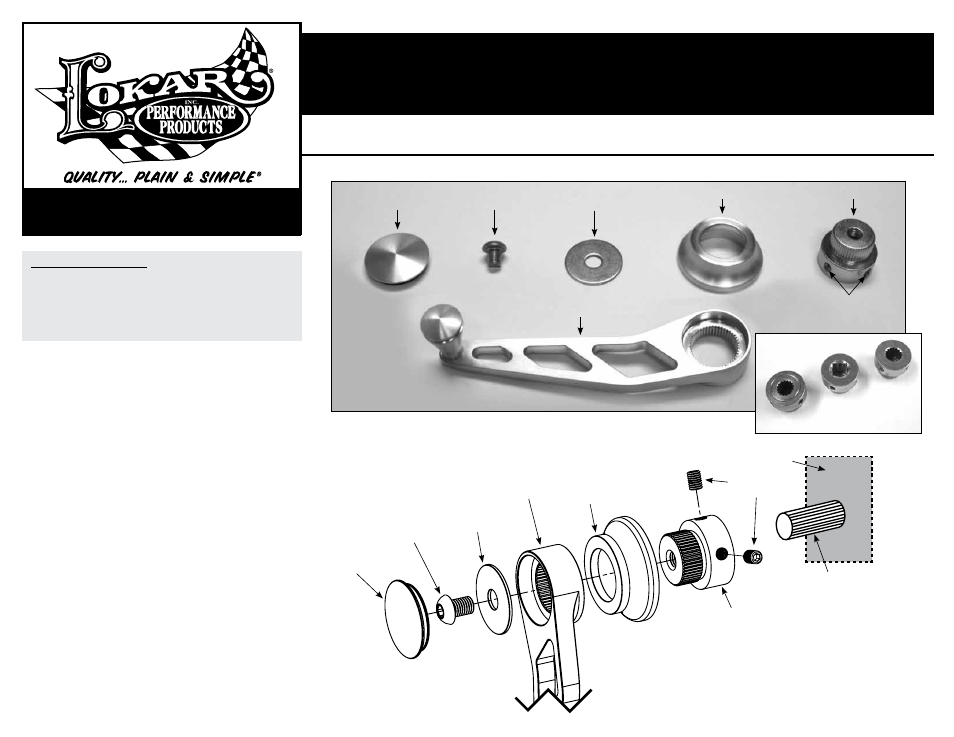
Refer to Fig. 1 for the component names and Fig. 2 for an exploded view.
Step 1: Remove existing door handles/window crank arms. Clean the
handle/crank shafts to remove any dirt or rust.
Step 2: If this is a new installation and the handle/crank shafts (not
included) on the window regulator or door handle mechanism
are excessively long, the shafts can be cut to the desired
length. Be sure to leave them long enough so that the trim
ring does not touch the door panel and create wear.
Step 3: Slide the shaft insert and trim ring out of the new Lokar
handle/crank arm. Then remove the cap from the handle/crank
arm by pushing it outwards from behind.
Step 4: Slide the shaft insert onto the handle/crank shaft. Tighten
the two #10-32 x 1/4" set screws on the shaft insert against
the shaft.
Step 5: Slide the trim ring onto the shaft insert.
Step 6: Determine how you want the handle/crank arm to be posi-
tioned, and slide the handle/crank arm onto the shaft insert.
Install the large diameter washer into the recess in the handle/
crank arm, and then install the 1/4"-28 x 5/16" button head
bolt through the washer and into the insert.
Step 7: Install the cap onto the handle/crank arm. If the cap needs
to be removed in the future, it can be pried away from the
handle/crank arm using a razor blade inserted between the
cap and the handle/crank arm.
TOLL FREE 1-877-469-7440 • (865) 966-2269 • FAX (865) 671-1999 • [email protected] • www.lokar.com
®
Door Handle, Window Crank & Vent Window Crank
Installation Instructions
Door Handle, Window Crank & Vent Window Crank
Installation Instructions
INS0052 Rev. 09/04/12 RPD 04/09/14
Page 1
© 2012 Lokar, Inc.
Cap
Cap
1/4"-28 x 5/16"
Button Head Bolt
1/4"-28 x 5/16"
Button Head Bolt
Handle/Crank
Arm
Handle/Crank
Arm
Shaft Insert
Shaft Insert
Handle/Crank Shaft
(Not Included)
Note: Shaft Is Square
On Some Applications
Door Panel
(Not Included)
Large Diameter
Washer
Large Diameter
Washer
Trim Ring
Trim
Ring
#10-32 x 1/4"
Set Screws
#10-32 x 1/4"
Set Screws
Note: Kit Includes Complete Pair; Only One Side Is Shown Below.
Fig. 1
Fig. 2
GM Pre 1949
Ford
Pre 1949
GM & Ford
1949 & Later