Lokar Tri-Power Throttle Cable Bracket with Springs User Manual
For rochester 4-bolt carburetors
Building American Quality… With A Lifetime Warranty!
General Installation Notes:
Please read instructions completely before beginning installation. If you
have any questions please call.
Before starting installation, scotch vehicle tires to avoid accidental
movement of the vehicle. Disconnect negative battery cable before
beginning installation.
The Lokar Tri-Power Bracket and Spring Kit is designed to be installed with
a Lokar throttle cable, available separately. These instructions are for both
the small base Rochester carburetors and the Pontiac (large base) Rochester
carburetors.
Items required for installation, not supplied:
(2) carburetor base gaskets
1/4" bolt and nylock nut, if you are not installing a Lokar kickdown kit
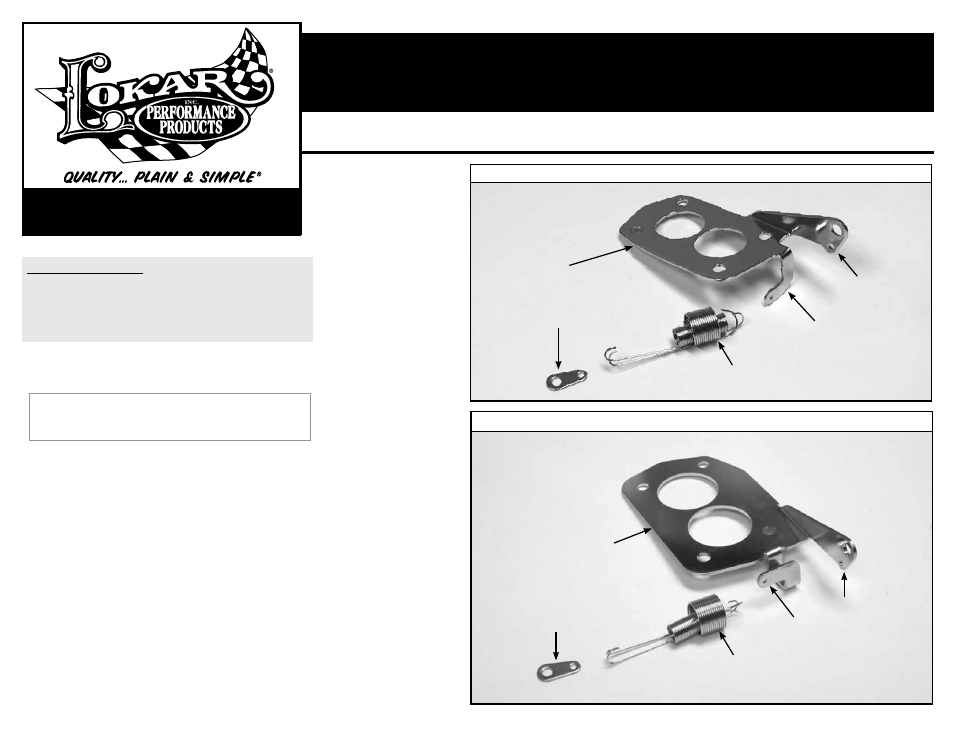
Refer to Fig. 1 and Fig. 2 for the component names.
Step 1: Remove the rear carburetor from the intake manifold. Clean the
carburetor mounting surface on both the intake manifold and the
carburetor, and place a new carburetor gasket (not included) onto the
intake manifold.
Step 2: Place the Lokar throttle cable bracket on top of the new carburetor
gasket, with the tabs on the left. Place another new carburetor gasket
(not included) on top of the throttle cable bracket.
Fig. 3
Step 3: Reinstall the rear carburetor. Install the tear drop onto the bottom
hole of the center carburetor throttle arm. If you are not using a
kickdown cable, you may attach the tear drop using a 1/4" bolt (not
included). If you are using a kickdown cable, attach the tear drop
using the hex carb stud that comes with the Lokar kickdown kit.
Secure the tear drop using a nylock nut (not included). Snug the nut
down, and then back it off just enough that the tear drop can rotate
freely.
Step 4: Install the throttle return springs. They will connect to the tear drop
on the center carburetor throttle arm and to the lower tab on the
Lokar throttle cable bracket. Make sure the longer hooks on the
springs are connected to the tear drop, as shown in
Fig. 4. Rotate the
throttle to wide open and make sure the springs do not come in con-
tact with the intake manifold or any other parts at any time.
TOLL FREE 1-877-469-7440 • (865) 966-2269 • FAX (865) 671-1999 • [email protected] • www.lokar.com
®
Tri-Power Throttle Cable Bracket with Springs Installation Instructions
for Rochester 4-Bolt Carburetors
Tri-Power Throttle Cable Bracket with Springs Installation Instructions
for Rochester 4-Bolt Carburetors
INS0066 Rev. 06/11/13
Page 1
© 2013 Lokar, Inc.
NOTE: (Step 4 Continued) On
Pontiac Tri-Power units
there is a linkage rod that
runs from the front carbure-
tor to the rear carburetor on
the right hand side of the
intake manifold. This rod
may need to be lengthened
slightly. The linkage rod
has a V-shaped bend in it,
and the front carburetor has
a small slot in the linkage
where this rod attaches. The
rod needs to be centered
in the carburetor linkage so
that it is not touching the
front or the rear of the slot.
This will ensure that the
linkage rod is not pulling
the front carburetor open at
idle. To lengthen the link-
age rod just straighten the
V-shaped portion as needed.
Small Base Throttle Cable Bracket
Pontiac (Large Base) Throttle Cable Bracket
Tear Drop
Tear Drop
Throttle Cable
Bracket
Throttle Cable
Bracket
Throttle Return
Springs
Throttle Return
Springs
Lower Tab
Lower
Tab
Upper Tab
Upper
Tab
Fig. 1
Fig. 2
Step 5: Proceed with the throttle
cable and/or kickdown cable
installation, following the
instructions that came with
the cable(s). The throttle
cable will be installed into
the larger of the two holes
in the upper tab of the
Lokar throttle cable bracket.
The smaller hole on the
upper tab is for attaching a
Lokar kickdown mounting
bracket if needed.
Note that the throttle cable
is attached to the small
hole in the carburetor
throttle arm, not the large
hole with the bushings.
See
Fig. 4 for a completed
installation with no kick-
down cable, and
Fig. 5 for a
completed installation with
a Lokar kickdown cable.