Appliance setup, Warning – Heat & Glo Fireplace Heat & Glo SLR-C (COSMO) User Manual
Page 57
57
Heat & Glo • SLR-C • 2292-900 Rev. H • 2/13
A. Remove Fixed Glass Assembly
See Section 14.F.
B. Remove the Shipping Materials
Remove shipping materials from inside or underneath the
fi rebox. The standard black rock media and manual bag
assembly are also shipped underneath the fi rebox.
C. Clean the Appliance
Clean/vacuum any sawdust that may have accumulated
inside the fi rebox or underneath in the control cavity.
D. Accessories
Install approved accessories per instructions included
with accessories. Install approved accessories per in-
structions included with accessories.
Contact your dealer
for a list of approved accessories
.
WARNING! Risk of Fire and Electric Shock! Use ONLY
Hearth & Home Technologies-approved optional acces-
sories with this appliance. Using non-listed accessories
could result in a safety hazard and will void the warranty.
14
14
Appliance Setup
E. Glass Rock Media Kit
NOTE: During appliance set up, gas pressure verifi ca-
tion, or troubleshooting, do not operate appliance with
glass off for more than 30 seconds to prevent the media
tray from warping. Flames may curl back underneath the
media tray with glass removed.
WARNING! Choking Hazard! Keep glass rock media
out of reach of children.
CAUTION! Risk of Cuts, Abrasions or Flying Debris.
Wear protective gloves and safety glasses during instal-
lation. Sheet metal edges are sharp.
Cleaning the Glass Rock Media
During shipment of the glass rock media, dust and debris
can accumulate in the rock bag. It is recommended that
the glass rock media be rinsed thoroughly with water to re-
move dust and small glass rock particles. An easy method
to clean the glass rock media is to empty the contents of
the bag into a bucket and rinse thoroughly with a garden
hose. Allow the glass rock media to dry before installing
into the fi replace.
Installation
1. Position rock media placement jig over pilot shield to
prevent inadvertent glass rock media placement in front
of pilot shield.
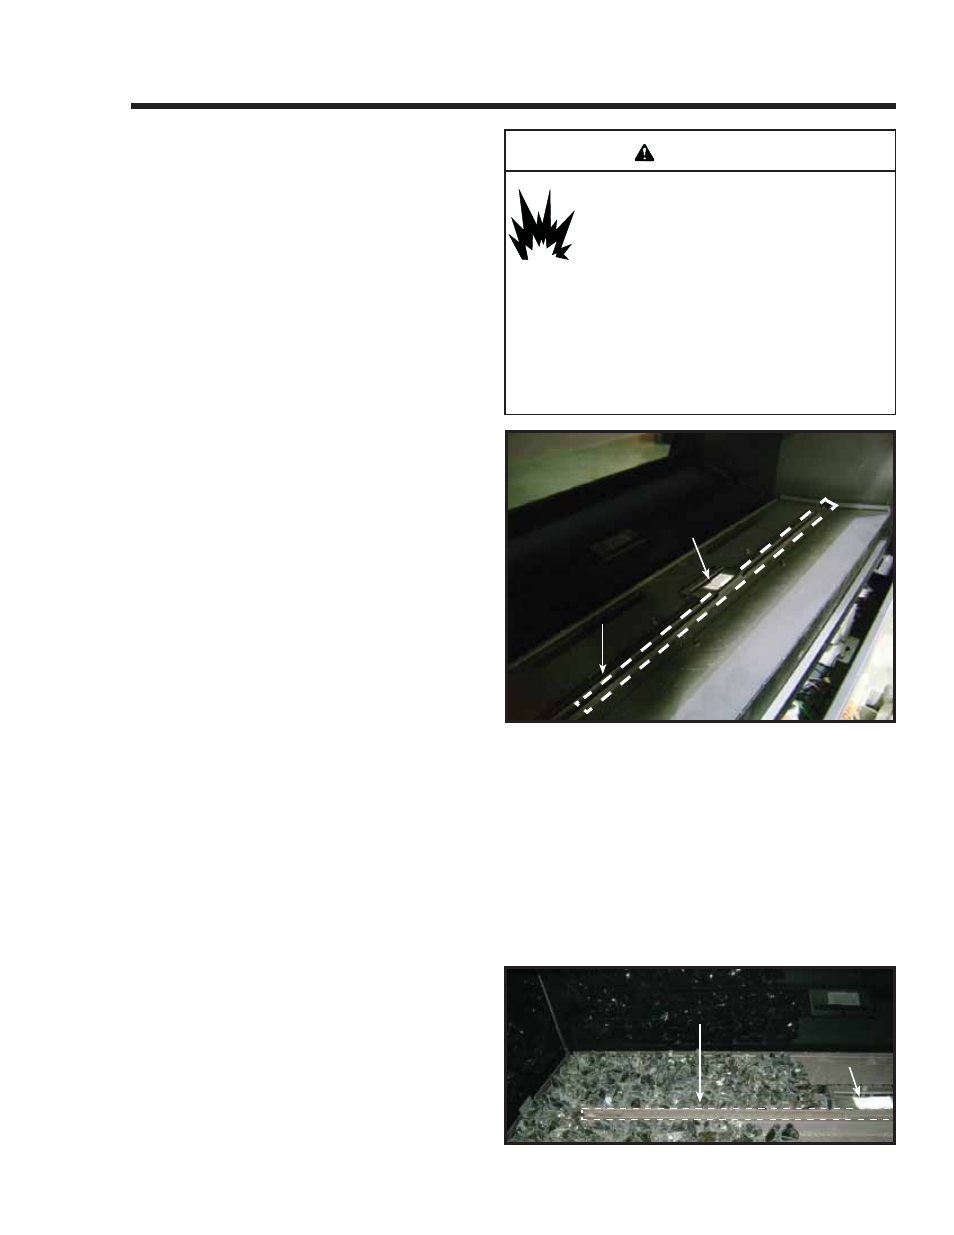
2. Figure 14.1 shows the outline of the media tray edges
and pilot transient ports. DO NOT install glass rock
media in the outlined area. This may cause delayed
ignition, undesirable burner fl ame, or lighting issues.
3. Place an even layer of glass rock media around the
base pan as shown in Figure 14.2. Do not place glass
rock media between the inside edges of the media tray.
Place entire contents of the bag onto the media tray.
See Figure 14.2.
4. Remove rock placement jig by removing one screw
that attaches jig to pilot shield. See Figure 14.2.
Place smaller sized glass rock media on top of the
pilot shield. See Figure 14.3. Do not place glass rock
media in front of pilot assembly.
WARNING
Delayed Ignition Risk
• Place glass rock media according to instructions.
• Do NOT place glass rock media in area in front
of pilot or between burner tracks.
• Do NOT place glass rock media in a position
that they may fall into area in front of pilot.
• Do NOT use any media other than the glass
rock media supplied with this fi replace.
• Do NOT use more than 10 pounds of glass rock
media per fi replace.
Fireplace will not function properly.
Delayed ignition may occur.
NO GLASS ROCK
MEDIA BETWEEN
BURNER TRACKS
( INSIDE DASHED LINE)
Figure 14.1. Rock Media Placement Jig
Figure 14.2. Installing Glass Rock Media
ROCK MEDIA
PLACEMENT JIG
ROCK MEDIA
PLACEMENT JIG
NO GLASS ROCK MEDIA
BETWEEN BURNER TRACKS
(INSIDE DASHED LINES)