Installing the hood – Electrolux 316488521 User Manual
Page 7
7
7
7
7
7
Installing the hood
Installing the hood
•
••
•• For the most efficient air flow exhaust, use a
straight run or as few elbows as possible.
Refer to “Ductwork installation guidelines
Ductwork installation guidelines
Ductwork installation guidelines
Ductwork installation guidelines
Ductwork installation guidelines”
paragraph for further informations.
Vent unit to outside of building, only.
•
••
•• On avarage 2 hours are necessary to complete
installation (without considering cut to be done on
wall and or on cabinet, installation of ducts ,
conduit and electrical connections to the mains).
•
••
•• The hood is fitted with Screws and Drywall
Anchors suitable for most surfaces, consult a
Qualified Installer, check if they perfectly fit with
your cabinet/wall.
•
••
•• Do not use flex ducting.
•
••
•• COLD WEATHER installations should have an
additional backdraft damper installed to minimize
backward cold air flow and a nonmetallic thermal
break to minimize conduction of outside
temperatures as part of the ductwork. The
damper should be on the cold air side of the
thermal break.
The break should be as close as possible to
where the ducting enters the heated portion of
the house.
•
••
•• Remote blowers require a five wire installation.
•
••
•• Make up air: Local building codes may require the
use of Make-Up Air Systems when using Ducted
Ventilation Systems greater than specified CFM of
air movement.
The specified CFM varies from locale to locale.
Consult your HVAC professional for specific
requirements in your area.
•
••
•• T
T
T
T
Typical installation
ypical installation
ypical installation
ypical installation
ypical installation
Min installation height from the range top to the
bottom of the hood is 30" if a gas range is used
or 24" to 30" if an electric range is used.
These hoods ar
These hoods ar
These hoods ar
These hoods ar
These hoods are not r
e not r
e not r
e not r
e not recommended to be used
ecommended to be used
ecommended to be used
ecommended to be used
ecommended to be used
over indoor grills.
over indoor grills.
over indoor grills.
over indoor grills.
over indoor grills.
The hood may be installed onto a wall and vented to
the outdoors, or it can be installed for recirculating
operation (recirculating accessories not supplied with
the hood).
This hood can be installed over any electric and gas
cooktop/range.
It can not be installed over any pr
It can not be installed over any pr
It can not be installed over any pr
It can not be installed over any pr
It can not be installed over any professional
ofessional
ofessional
ofessional
ofessional
cooktop/range.
cooktop/range.
cooktop/range.
cooktop/range.
cooktop/range.
Step 1
Step 1
Step 1
Step 1
Step 1
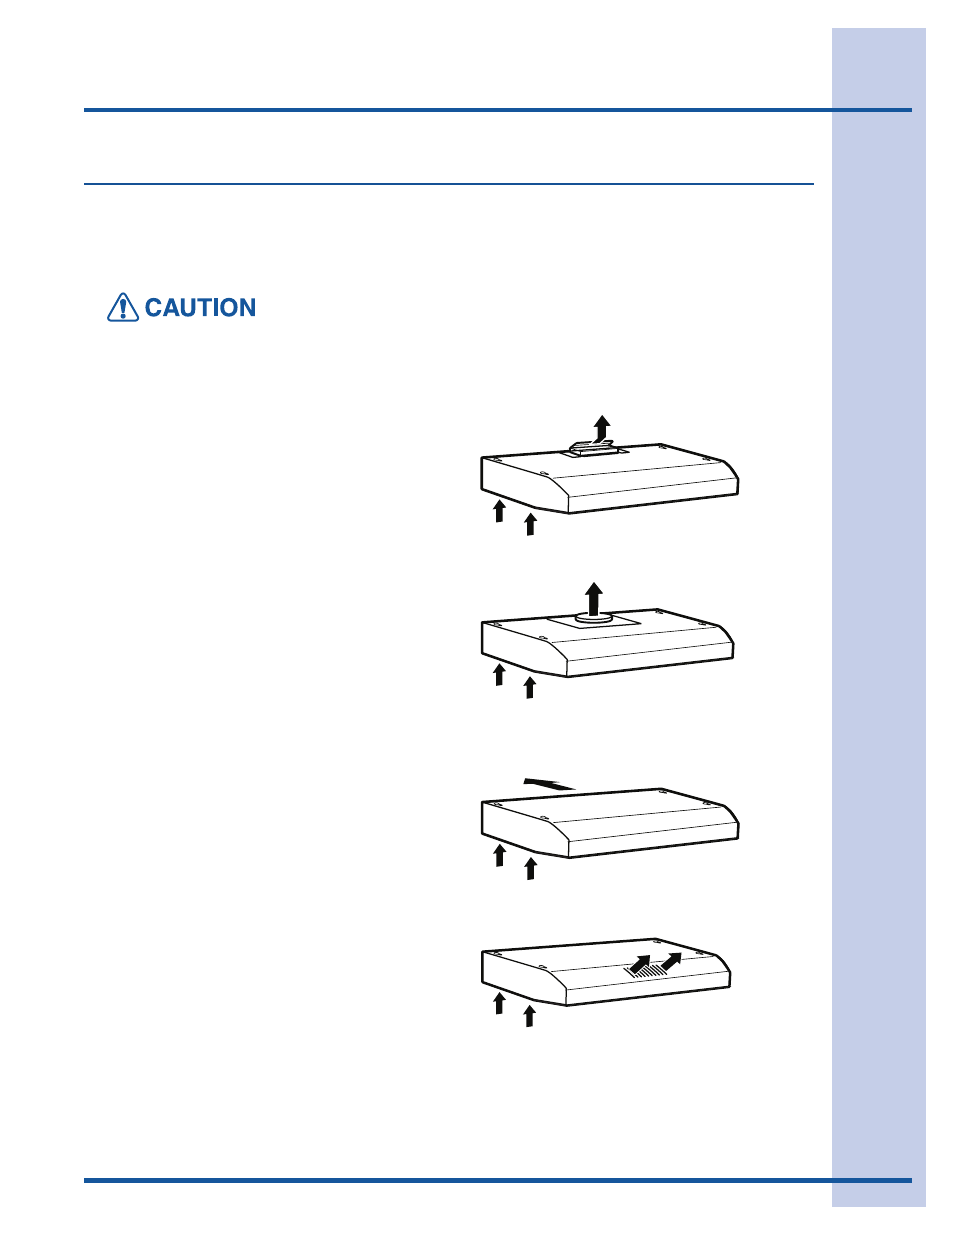
Choose vent options
Choose vent options
Choose vent options
Choose vent options
Choose vent options
V
V
V
V
Vent Exhaust Option
ent Exhaust Option
ent Exhaust Option
ent Exhaust Option
ent Exhaust Option
The hood is designed for vertical or horizontal
discharge or can be installed in a recirculating
ductless version:
V
V
V
V
Vertical discharge:
ertical discharge:
ertical discharge:
ertical discharge:
ertical discharge:
Use a rectangular duct 3 1/4” x 10”.....
....or use a round 7” duct
Horizontal discharge:
Horizontal discharge:
Horizontal discharge:
Horizontal discharge:
Horizontal discharge:
Use a rectangular duct 3 1/4” x 10”
Recir
Recir
Recir
Recir
Recirculating
culating
culating
culating
culating (non vented ductless)