Installing the hood – Electrolux 316488521 User Manual
Page 11
11
11
11
11
11
Outside r
Outside r
Outside r
Outside r
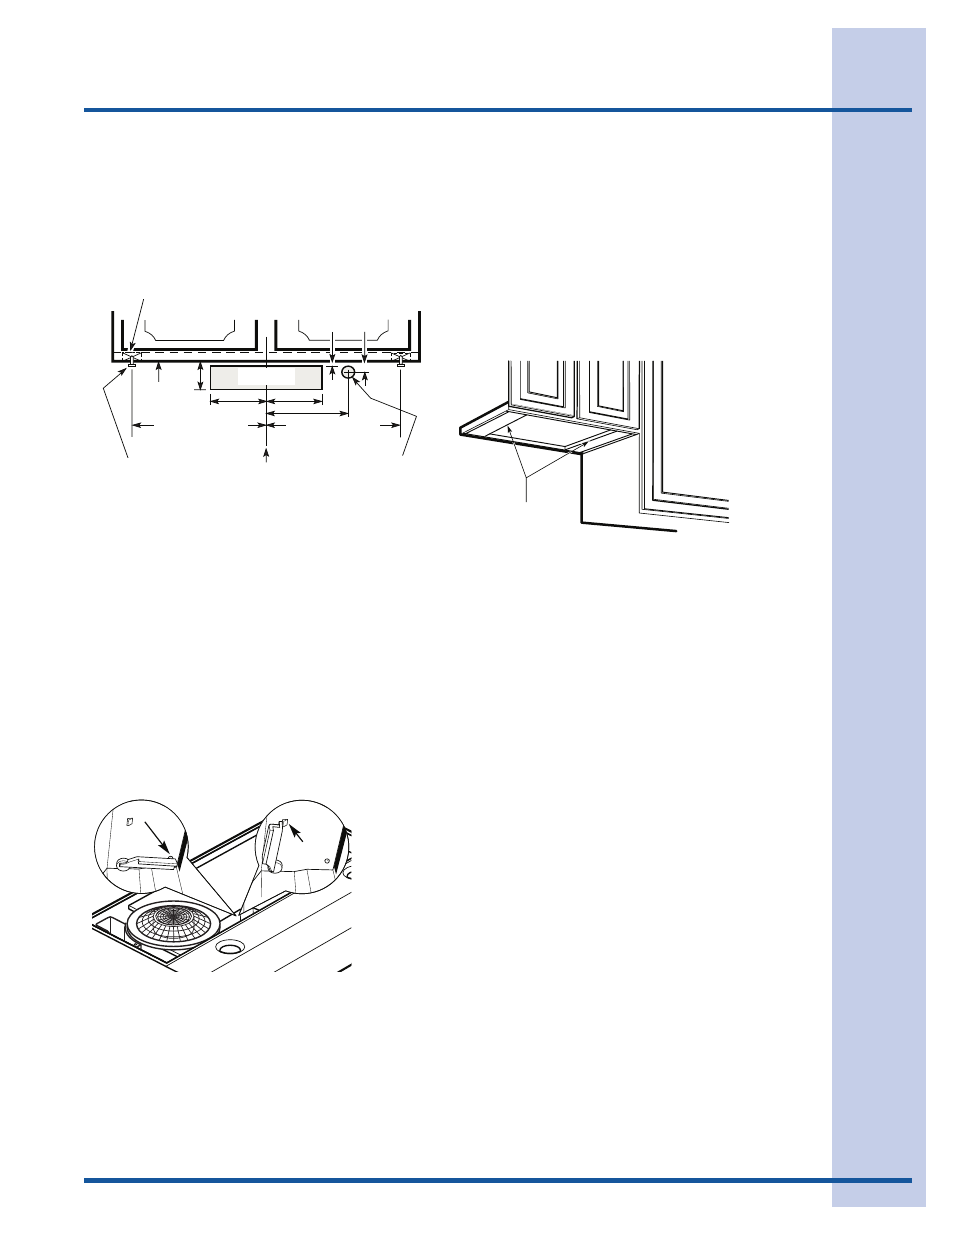
Outside rear exhaust
ear exhaust
ear exhaust
ear exhaust
ear exhaust
(Horizontal duct– 3 1/4”x 10” Rectangular)
•
••
••
Use the diagram or the hood as a template
and mark the locations on the cabinet for ductwork,
electrical wiring and keyhole screw slots.
Center line
Hood mounting screws (4)
Wood shims (recessed
bottom cabinets only)
Cabinet front
Electrical access hole
(in wall)
Cabinet
bottom
1/8" 7/16"
13 15/16" (30" Hood)
16 15/16" (36" Hood)
13 15/16" (30" Hood)
16 15/16" (36" Hood)
Horizontal duct
access hole
5 1/4"
5 1/4"
12 7/16"
3 3/4"
Recir
Recir
Recir
Recir
Recirculating
culating
culating
culating
culating
Use the hood as a template and mark the locations
on the cabinet for the electrical wiring and keyhole
screw slots.
Since the hood is to be recirculated (not to be vented
outside), do not cut out any vent openings in the wall
or cabinet bottom.
Step 9
Step 9
Step 9
Step 9
Step 9
Choose V
Choose V
Choose V
Choose V
Choose Venting Option
enting Option
enting Option
enting Option
enting Option
The hood can be set to vent outside or to recirculate
air back into the kitchen.
Set for
outside venting
Set for
recirculating
Stop tab
Stop tab
Hood shown Lying upside down
The plastic vent lever is located near the center of the
hood opening.
T
T
T
T
To vent to the outside,
o vent to the outside,
o vent to the outside,
o vent to the outside,
o vent to the outside, make sure the plastic vent
lever is in the HORIZONT
HORIZONT
HORIZONT
HORIZONT
HORIZONTAL
AL
AL
AL
AL position (flat against the
metal top of the hood).
T
T
T
T
To r
o r
o r
o r
o recir
ecir
ecir
ecir
ecirculate air into the kitchen,
culate air into the kitchen,
culate air into the kitchen,
culate air into the kitchen,
culate air into the kitchen, make sure the
plastic vent lever is in the VER
VER
VER
VER
VERTICAL
TICAL
TICAL
TICAL
TICAL position (flat
against the plastic blower housing).
NOTE:
NOTE:
NOTE:
NOTE:
NOTE: In order to change the vent lever position, you
will need to pull the lever out slightly to clear the
plastic tabs.
Step 10
Step 10
Step 10
Step 10
Step 10
For r
For r
For r
For r
For recessed bottom cabinet only
ecessed bottom cabinet only
ecessed bottom cabinet only
ecessed bottom cabinet only
ecessed bottom cabinet only
If the cabinets have front, side or back trim, make 2
wood shims the width of the trim and attach them to
the cabinet bottom recess on both sides. See
previous page for marking locations.
Step 11
Step 11
Step 11
Step 11
Step 11
Cut holes at marked locations for duct and electrical
wiring. For the vertical duct, cut out 3/4” extra toward
the front of the cabinet so you can move the duct
freely when installing the hood.
It may also ease installation by cutting the hole 10 1/
2” instead of 10”.
Step 12
Step 12
Step 12
Step 12
Step 12
Drive a mounting screw (from the hardware packet)
partway into each center of the narrow neck of the
keyhole slots marked on the cabinet bottom.
Step 13
Step 13
Step 13
Step 13
Step 13
Fix the wiring conduit to the hood.
Step 14
Step 14
Step 14
Step 14
Step 14
Slide the hood back against the wall. Tighten the
mounting screws. Be sure the screw heads are in the
narrow neck of the keyhole slot.
Connect Ductwork to hood.
W
W
W
W
Wood shims
ood shims
ood shims
ood shims
ood shims
Installing the hood