Introduction & specifications, Preparation, Fig.2 – Sealey SAC2203BLN User Manual
Page 2: Fig.4 oil drain fig.5 fig.3
7
DO NOT deface the certification plate attached to the
compressor tank.
7
DO NOT cover the compressor or restrict air flow around the
unit whilst operating.
DANGER! DO NOT direct the output jet of air towards
people or animals.
7
DO NOT operate the compressor without an air filter.
7
DO NOT allow anyone to operate the compressor unless
they have received full instructions.
WARNING! the air tank is a pressure vessel and the
following safety measures apply:
7
DO NOT tamper with the safety valve, DO NOT modify or alter
the tank in any way and
DO NOT strap anything to the tank.
7
DO NOT subject the tank to impact, vibration or to heat and
DO NOT allow contact with abrasives or corrosives.
3
drain condensation from tank and inspect the inside walls for
corrosion according to the maintenance schedule, have a
detailed tank inspection carried out annually. the tank shell
must not fall below the certified thickness at any point.
WARNING! If an electrical fuse blows, ensure it is replaced
with an identical fuse type and rating.
3
When not in use, store the compressor carefully in a safe,
dry, childproof location.
3
When the compressor is not in use , it should be switched
off, disconnected from the mains supply and the air drained
from the tank.
2. INTRODUCTION & SPECIFICATIONS
2.1 INTRODUCTION
Heavy-duty low noise compressor suitable for garage, bodyshop and
industrial applications. fully enclosed, insulated design gives silent
running and protects vital components from damage.
Heavy-duty single phase electric motor with soft start feature. control
box features tachometer for monitoring use and optimising service
times.
2.2 SPECIFICATIONS
Model:.................................................................... SAC2203BLN.V2
Motor output (HP):........................................................................... 3
Voltage/Phase(V/1ph):............................................................... 230/1
Input current(A):............................................................................. 16
speed (rpm):.............................................................................. 1075
Air displacement (cfm/lm):..................................................... 15/425
Max free Air delivery (cfm/lm):........................................... 10.9/309
Max Pressure (psi/bar):........................................................... 145/10
tank capacity (ltr):...................................................................... 200
dimensions (WxdxHmm):......................................... 1440x440x900
Weight (kgs):.................................................................................175
sound Pressure db(A):................................................................... 68
sound Power lwA:......................................................................... 95
3. PREPARATION
3.1 remove compressor from packaging and inspect for any
shortages or damage. If anything is found to be missing or
damaged contact your supplier.
3.2 save the packing material for future transportation of the
compressor. We recommend that you store the packing in a
safe location, at least for the period of the guarantee. then, if
necessary, it will be easier to send the compressor to the
service centre.
3.3 confirm that the mains voltage corresponds with the voltage
shown on the compressor data plate.
3.4 Position the compressor on a flat surface or with a maximum
permissible inclination of 10°. site in a well ventilated place,
protected against atmospheric pollution and not in a place
subject to explosion hazard. If the surface is in a raised
position, make sure it cannot fall, securing it in a suitable way.
fig.2
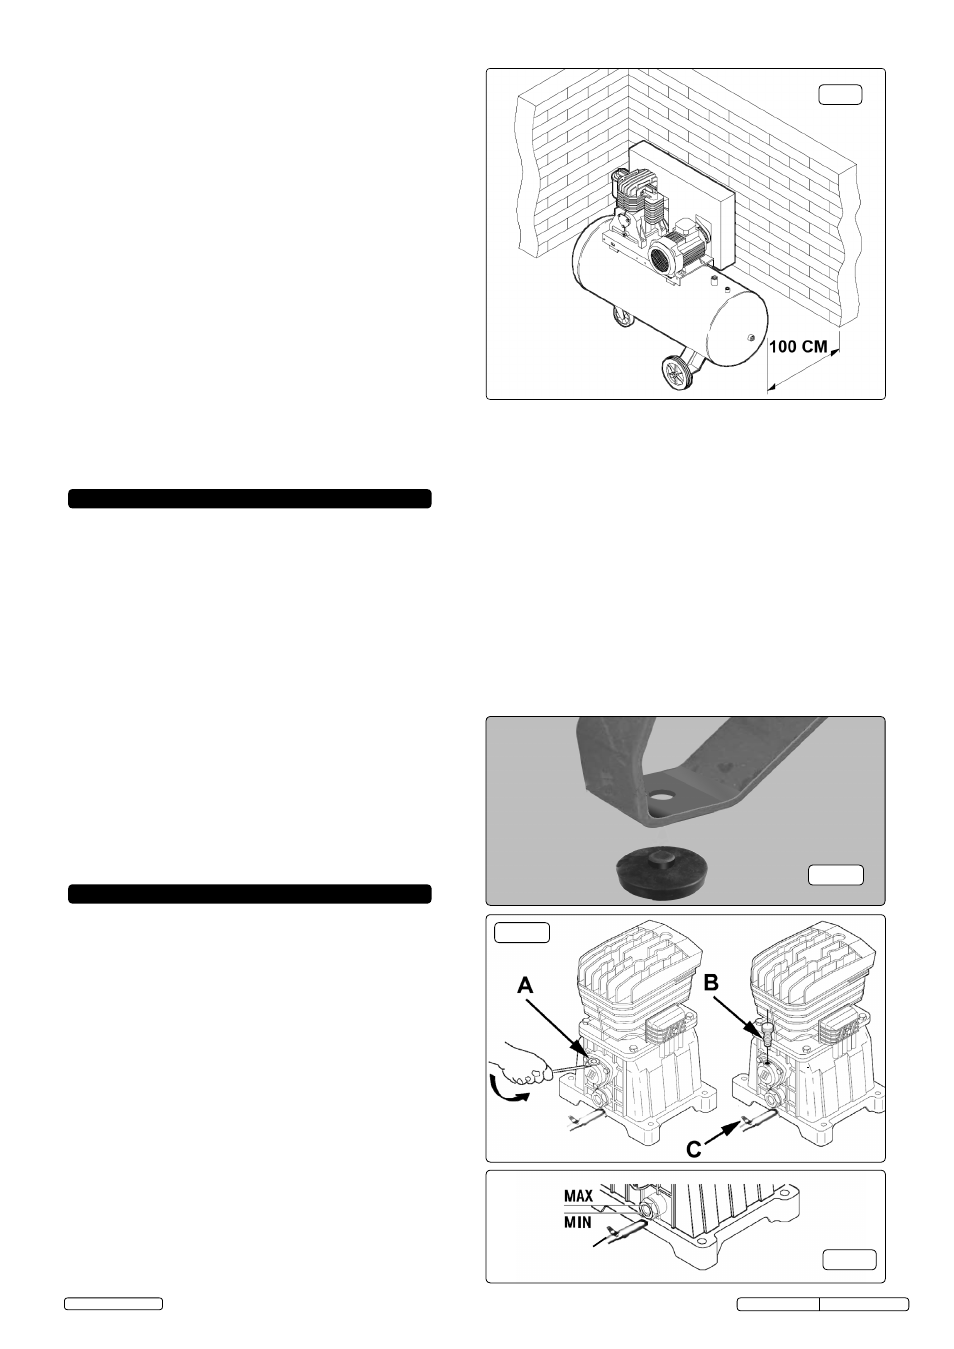
3.5
To ensure good ventilation and efficient cooling, the
compressor must be at least 100cm from any wall.
Compressors fitted on the tank, with fixed feet, should not be
rigidly secured to the ground. fit the 4 anti-vibration supports,
raise the compressor using a suitable pallet truck or fork lift
and push the supports onto the base of each foot (fig.3).
3.6
take care to transport the compressor correctly,
DO NOT
overturn it or lift it with hooks or ropes.
3.7
Before using the compressor, check the oil level by observing
the sight glass as shown in fig.5. If the oil is not up to the max
mark it should be topped up with synthetic oil suitable for
temperatures ranging from -5°c to 45°c (viscosity 5W50).
We do not recommend using mineral oil in these compressors.
DO NOT overfill.
NOTE: To gain access to the pump and motor you must
remove the 4 bolts from the top lid of the sound proof
casing. For some servicing such as draining oil, you must
also remove the rear panel by removing the 4 bolts.
fig.4
oil drain
fig.5
fig.3
Original Language Version
sAc2203Bln.V2 Issue: 1 - 07/11/13
Jack sealey limited