Airmar, Connecting an optional temperature sensor, Closing & mounting – Airmar Small Switchbox with Remote Switch–SB646 User Manual
Page 4: Parts, Echosounder wire colors by brand, Raymarine echosounder only
AIRMAR
®
TECHNOLOGY CORPORATION
35 Meadowbrook Drive, Milford, New Hampshire 03055-4613, USA
www.airmar.com
Copyright © 2011 Airmar Technology Corporation. All rights reserved.
4
Echosounder Wire Colors by Brand
Some echosounder cables contain wire colors that differ from those
listed on the PC board. And some cables do not contain all the wire
colors listed. If a wire color differs, match the wire’s function to the
function listed on the PC board. Check the table below.
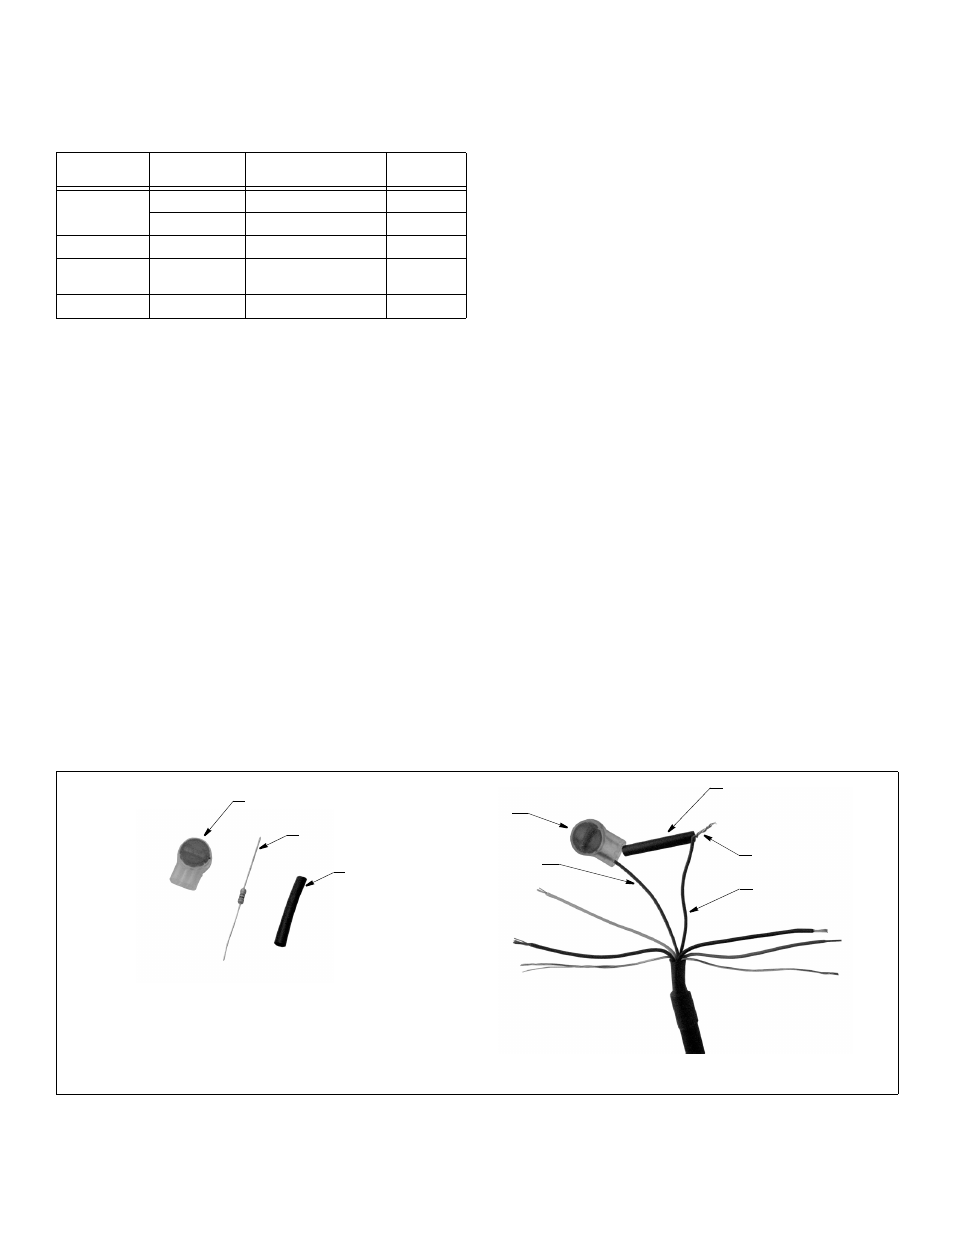
Raymarine Echosounder Only
If you are connecting a Raymarine echosounder(s), the cable
contains a green wire. Since there is no terminal on the PC board
labelled green, you will need to use the supplies in the plastic bag
marked Raymarine to connect the green wire. If you are
connecting two echosounders, follow the steps below with both
cables.
1. Strip an additional 10mm (3/8") of insulation from the brown wire.
2. Connect the green wire and one resistor by inserting the end of
each into separate holes in the butt connector (see Figure 6).
With the wires pushed tightly against the far inside wall of the
connector, lightly squeeze the button with pliers until it
depresses. Gently tug on the wire and the resistor to ensure
that they are securely connected.
3. Cover the resistor with a sleeve. While holding the sleeve tightly
against the butt connector, twist the free end of the resistor
together with the brown wire. Be sure the resistor is completely
covered by the sleeve to prevent a short circuit inside the switch.
4. The twisted pair will be connected to the terminal labeled
‘brown’. Follow the instructions “Connecting the Switchbox” on
page 3.
Echosounder
Brand
Echosounder
Wire Color
Terminal Label
Color
Wire
Function
Furuno
brown
white
T-
white
brown
T+
Lowrance
no orange wire
orange: not used
Navman,
Northstar
no orange wire
orange: not used
Raymarine
green
follow instructions below
rsense
Connecting an Optional Temperature Sensor
If you install an optional temperature sensor, it will substitute for the
temperature function in both transducers/echosounders 1 and 2.
• Connect the brown wire from the temperature sensor to the
terminal labeled brown on the Common (J1) terminal block.
• Connect the white wire from the temperature sensor to the
terminal labeled white on the Common (J1) terminal block.
NOTE: There will be two wires within both the brown and white
terminals.
• Do not connect the white wires from the transducers/
echosounders 1 and 2.
Closing & Mounting
1. From outside the switchbox, carefully pull each of the cables in
turn until about 3mm (1/8") of the cable jacket remains inside the
box (see Figure 4).
2. Use a wrench to tighten the nut on each compression fitting to
make a water-resistant seal.
3. Arrange the wires neatly inside the switchbox. Be sure that no
bare wires are touching.
4. Attach the switchbox cover with the screws provided to make a
water-resistant seal.
5. Attach the switchbox to the selected mounting surface at the
previously-drilled holes, using the screws supplied.
6. If they are not connected already, connect the power cable to the
power source and the echosounder(s) cable(s) to the instrument(s).
7. Fasten all the cables in place. Coil any excess cables and
secure them using cable ties to prevent damage.
Parts
Lost, broken, or worn parts should be replaced immediately.
Obtain parts from your instrument manufacturer or marine dealer.
Gemeco
Tel: 803.693.0777
(USA)
Fax: 803.693.0477
Email: [email protected]
Airmar EMEA
Tel: 33.(0)2.23.52.06.48
(Europe, Middle East, Africa) Fax: 33.(0)2.23.52.06.49
Email: [email protected]
Figure 6. Connecting a Raymarine echosounder
Copyright © 2008 Airmar Technology Corp.
sleeve
resistor
butt connector
brown wire
twisted
connection
green
wire
butt
connector
resistor
covered
by sleeve