Airmar, Cable routing & connection, Installation in a cored fiberglass hull – Airmar P79 User Manual
Page 4: Replacement transducer & parts
4
9. After the sealant on the base has cured, pour 71ml (2.4 fl. oz.)
of propylene glycol into the base. Do not over fill. Be sure to
follow the manufacturer’s directions for use.
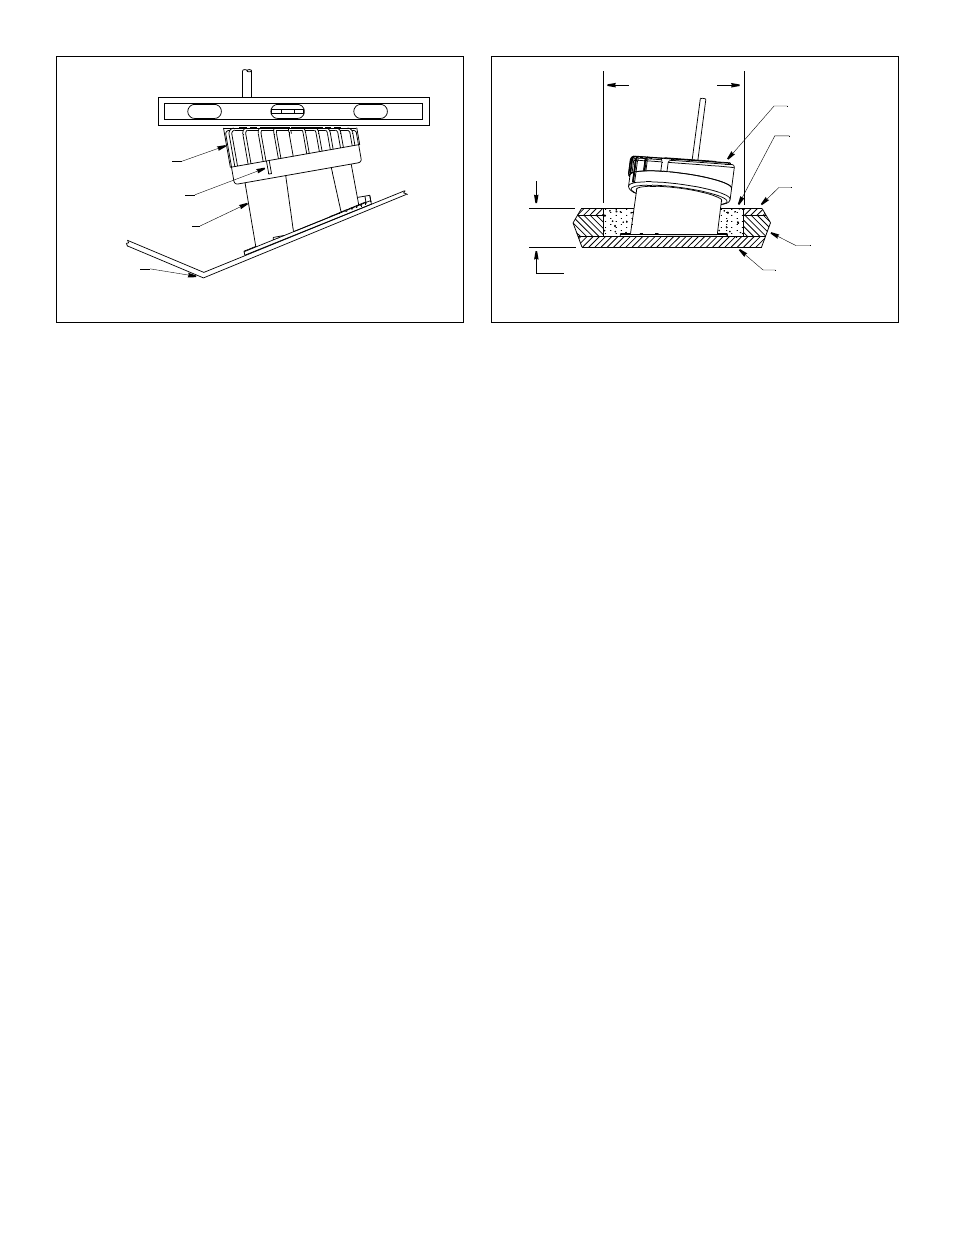
10.With the angle indicator on the keel side, lock the transducer
assembly into the base (see Figure 8). (The bosses on the
locking ring fit into the notches in the base.) Press down and
rotate clockwise until it is seated. When the transducer is
installed correctly, the top will be level. If the deadrise angle is
shallow, the transducer may appear to be level even if it is not.
Use a level to check the installation.
Cable Routing & Connection
CAUTION: If the transducer came with a connector, do not
remove it to ease cable routing. If the cable must be cut and
spliced, use Airmar’s splash-proof Junction Box No. 33-035 and
follow the instructions supplied. Removing the water-proof
connector or cutting the cable, except when using a water-tight
junction box, will void the transducer warranty.
1. Route the cable to the echosounder being careful not to tear the
cable jacket when passing it through the bulkhead and other
parts of the boat. Use grommets to prevent chafing. To reduce
electrical interference, separate the transducer cable from other
electrical wiring and sources of electrical noise. Coil any excess
cable and secure it in place with cable ties to prevent damage.
NOTE: Some transducers are equipped with a short cable,
about 1m (3'), and an extension cable. Be sure to locate the
mated 3 pin connectors well above the bilge waterline. To
facilitate this, use one of the two cable clamps supplied on
either side of the connection.
2. Refer to the instrument owner’s manual to connect the
transducer to the instrument.
Installation in a Cored Fiberglass Hull
Installation in a cored hull is difficult. The objective is to bond the
base to the inside surface of the hull’s outer skin while
preventing any moisture from penetrating the core.
CAUTION: There is no way to determine if the outer skin is solid
(no trapped air bubbles in the fiberglass) at the selected location
before cutting the inner skin.
1. Using a 100mm or 4" hole saw, cut through the inner skin and
the core at the selected location (see Figure 9). The core
material can be very soft. Apply only light pressure to the hole
saw after cutting through the inner skin to avoid accidentally
cutting the outer hull.
2. Remove the plug of core material, so the inner core of the hull is
fully exposed. Sand the inside surface of the outer skin using a
miniature disk sander. Slightly undercut the surrounding coring
if possible.
3. Clean and dry both the inside surface of the outer skin and the
transducer with a weak solvent, such as alcohol, to remove any
dust, grease, or oil.
4. Place the base in the cavity. Fill the gap between the base and
the hull with casting epoxy or resin following the manufacturer’s
directions for its use.
5. After the casting epoxy or resin has cured, proceed with
“Installation”, on page 3.
Replacement Transducer & Parts
The information needed to order a replacement transducer is printed
on the cable tag. Do not remove this tag. When ordering, specify the
part number, date, and frequency in kHz. For convenient reference,
record this information on the top of page one.
Lost, broken, or worn parts should be replaced immediately.
Base & O-ring Kit
33-268-01
Obtain parts from your instrument manufacturer or marine dealer.
Gemeco
Tel: 803-693-0777
(USA)
Fax: 803-693-0477
email: [email protected]
Airmar EMEA
Tel: +33.(0)2.23.52.06.48
(Europe, Middle East, Africa)
Fax: +33.(0)2.23.52.06.49
email: [email protected]
Figure 9. Installation in a cored fiberglass hull
transducer
i
nner skin
core
outer skin
fill with
casting epoxy
or resin
hull thickness
100mm (4")
Copyright © 2005 Airmar Technology Corp.
Figure 8. Completed installation is level
Copyright © 2005 Airmar Technology Corp.
angle
indicator
keel
transducer
assembly
base
NOTE: top of
transducer
is level
AIRMAR
®
TECHNOLOGY CORPORATION
35 Meadowbrook Drive, Milford, New Hampshire 03055-4613, USA
■ www.airmar.com
Copyright © 2005 - 2010 Airmar Technology Corp. All rights reserved.