2 – names and functions of parts, Top panel – Teac CD-200SB User Manual
Page 10
10
TASCAM CD-200SB
2 – Names and functions of parts
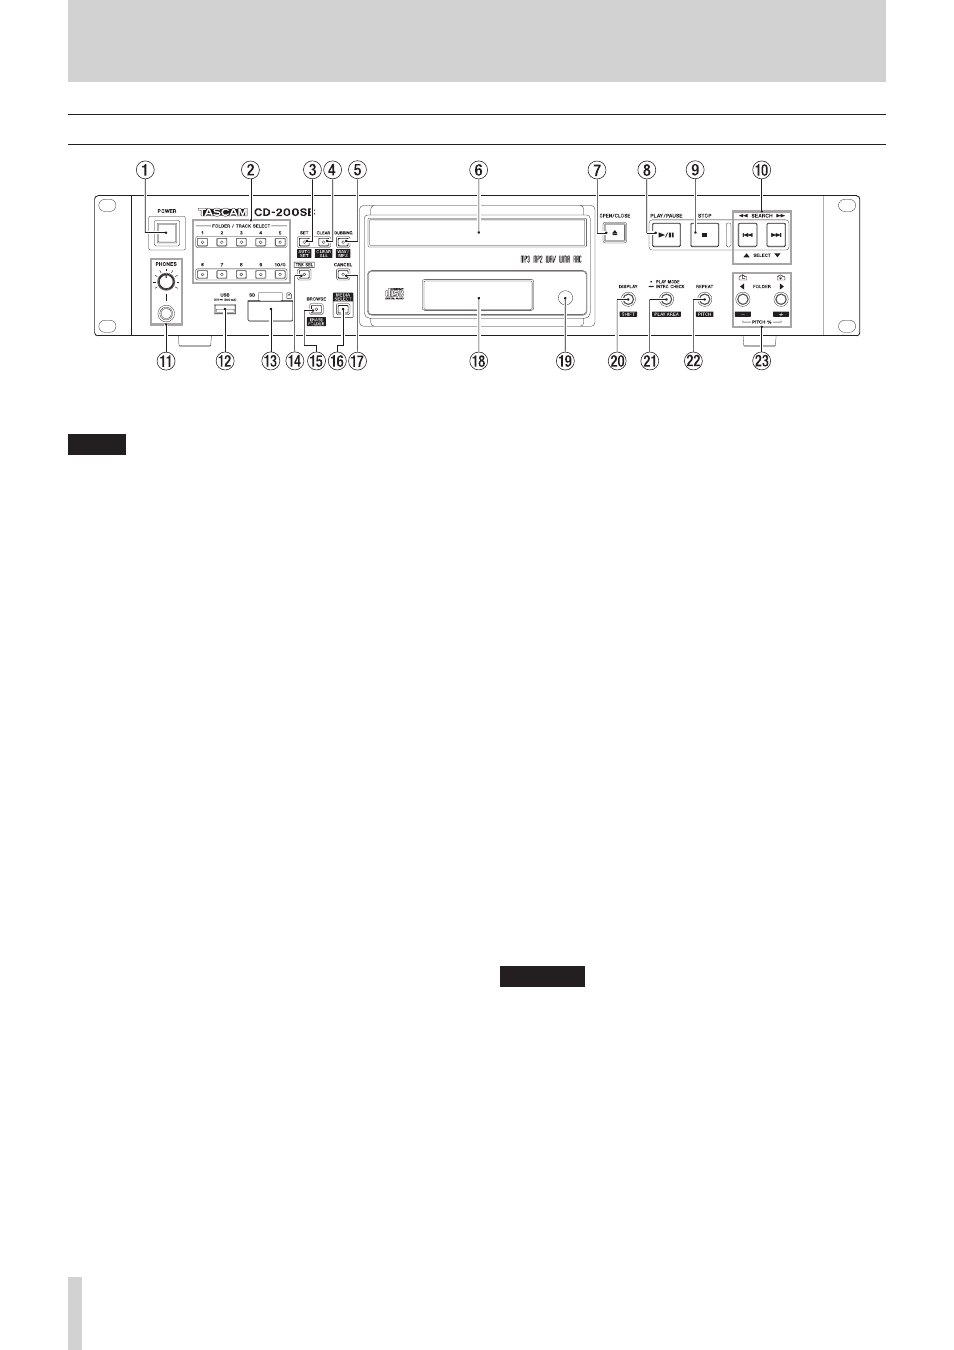
Top panel
1
POWER switch
Press this switch to turn the unit on or off.
NOTE
• Before turning this unit’s power ON/OFF, minimize the
volume of monitoring systems connected to it.
• Do not wear headphones when turning the power ON/OFF.
Noise could damage speakers or your hearing.
2
FOLDER/TRACK SELECT (1–10/0) buttons/indicators
When the TRK SEL indicator is not lit, these buttons can be
used for the direct folder function.
The indicators light on the buttons that have folders
assigned for the direct folder function. (See “Assigning direct
folders” on page 32.)
Press a button that has a lit indicator to begin playback of
the folder that has been assigned using the direct folder
function. During folder playback, the indicator blinks. (See
“Direct folder playback” on page 35.)
When the TRK SEL indicator is lit, these buttons can be used
as number (1–10/0) buttons to select track numbers on the
current media. (See “Selecting by track number” on page
23.)
Track numbers have a maximum of two digits on audio CDs
and a maximum of three digits on data CDs, SD cards and
USB flash drives.
3
SET [AUTO SET] button/indicator
Use with the direct folder function to assign folders on an SD
card or USB flash drive to FOLDER/TRACK SELECT (1–10/0)
buttons. This indicator lights during assignment. (See
“Assigning direct folders” on page 32.)
Press this button while pressing and holding the DISPLAY
[SHIFT] button to automatically assign folders on the SD
card/USB flash drive to the FOLDER/TRACK SELECT (1–10/0)
buttons that have not yet been assigned. This indicator
blinks when the direct folder AUTO SET function is in use. (See
“Automatically assign all direct folders (AUTO SET)” on page
4
CLEAR [CLEAR ALL] button/indicator
Use with the direct folder function to clear FOLDER/TRACK
SELECT (1–10/0) button folder assignments. This indicator
lights while clearing an assignment. (See “Clearing individual
direct folder assignments” on page 36.)
Press this button while pressing and holding the DISPLAY
[SHIFT] button to clear all FOLDER/TRACK SELECT (1–10/0)
buttons folder assignments. This indicator blinks while
clearing all assignments. (See “Clearing all direct folder
assignments (CLEAR ALL)” on page 37.)
5
DUBBING [WAV/MP3] button/indicator
Use when dubbing (copying) from a CD to an SD card or
USB flash drive. This indicator lights while dubbing. (See “7 –
Dubbing (copying)” on page 38.)
Press this button while pressing and holding the DISPLAY
[SHIFT] button to show the current recording format setting
used when dubbing for two seconds. Press this button again
while pressing and holding the DISPLAY [SHIFT] button
during this time to change the setting. (See “Dubbing” on
6
Disc tray
Insert discs (CD, CD-R, CD-RW) here.
7
OPEN/CLOSE button
Use to open and close the disc tray.
8
PLAY/PAUSE button
Press during playback to pause. When playback is stopped or
paused, press to start playback.
When in browse mode, use to confirm the selected track and
to start playback.
9
STOP button
Press to stop playback.
While editing a program, press to clear all the program
entries. (See “Setting the program” on page 25.)
0
SEARCH m/,[.//, SELECT 5/b]buttons
When in browse mode, use these to change the selection.
(See “5 – Browsing” on page 30.)
q
PHONES jack and knob
Use this standard stereo jack to connect stereo headphones.
Use a plug adapter when connecting headphones with
mini-plugs. Use the PHONES knob to adjust the headphone
output level.
CAUTION
Use the PHONES knob to minimize the volume before connecting
headphones. Failure to do so could cause a sudden burst of loud
noise, which might result in hearing damage, for example.