Section 3 – operating the tabber, Step 1: load a roll of tabs on the tabber, Step 2: set the sensitivity of the tab sensor – Rena T-250 User Manual
Page 11: Step 5: test for proper media transport, Step 7: adjust tab fold position, Loading tabs, Remove the exit roller, Replace the tab roll side guide
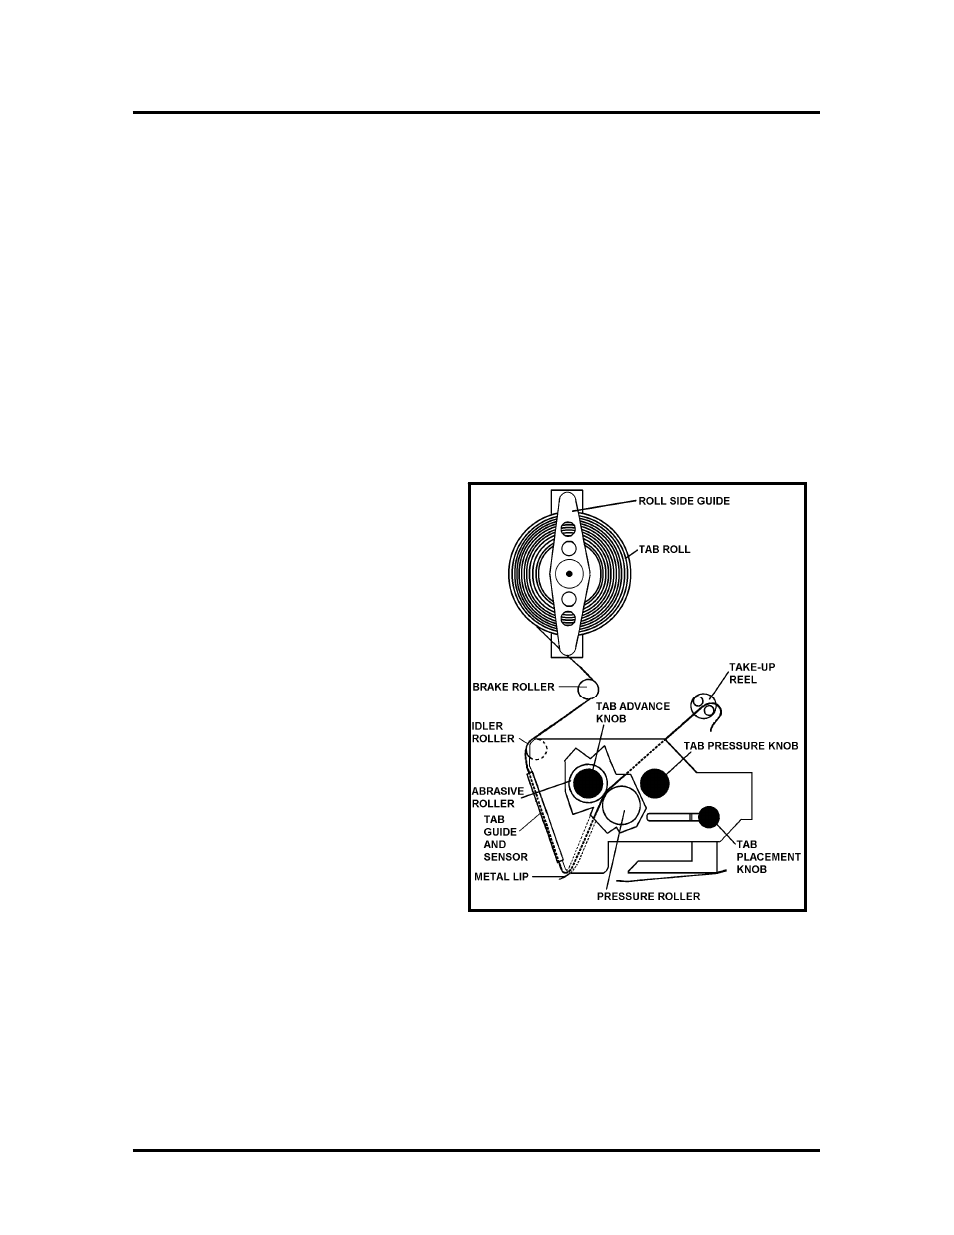
OPERATING THE TABBER
Section 3 – Operating the Tabber
There are seven steps required to set-up the T-250 Tabber to apply tabs to your media:
Step 1: Load a roll of tabs on the tabber.
Step 2: Set the sensitivity of the Tab Sensor.
Step 3: Adjust the Metering Bracket Assembly to the media.
Step 4: Adjust the Media Supports and Media Side guides to the media.
Step 5: Test for proper media transport.
Step 6: Test/Adjust for proper horizontal Tab position.
Step 7: Adjust Tab Fold Position.
Loading Tabs:
1. Remove the Exit Roller
2. Remove the Tab Roll Side Guide
by pulling it away from the Tab
Roll Support.
3. Mount the roll of tabs with the tab
leader coming off the roll on the
exit side of the tabber.
4. Replace the Tab Roll Side Guide.
5. Unwind approximately 12 inches
of tabs and remove the first 12
tabs from the backing material.
6. Thread the tab roll leader behind
the Reel Brake Assembly and
then in front of the Idler Roller.
7. Set the Tab Pressure Knob to the
on position (pressure engaged).
8. While turning the Tab Advance
Knob counter-clockwise; thread
the tab stock leader above the metal lip, up into and between the Abrasive Roller
and the Pressure Roller.
9. Continue turning the Tab Advance Knob counter-clockwise until you have
enough tab stock leader to feed 2” to 3” through the center of the Tab Take-up
Reel pins.
Operating Tip: You will need to clear the backing from the Take-up Reel when it
reaches a diameter of about 3”.
T-250 Operations Rev. 2/5/2010
11