Introduction, Controls and connections – Proel PC260 User Manual
Page 10
10
INTRODUCTION
The PROEL PC260 digital loudspeaker controller is based on the CORE DSP platform and features state-of-the-art signal processing,
advanced functions and a very intuitive user interface, with a direct access to all the editing functions and remote control capability .
The 40bit floating point resolution and the 24bit AD/DA converters ensure a perfect signal integrity with a dynamic range in excess of
110dB, for a superior sonic performance .
PC260 includes a full set of functions and features 2 inputs (with AES digital input) and 6 outputs .
Each INPUT features 5 bands of full PARAMETRIC EQ (including parametric, shelving, notch, res . HP and LP, allpass and bandpass),
28 bands of GRAPHIC EQ and 3 bands of an extremely versatile and powerful DYNAMIC EQ . A fully programmable COMPRESSOR/
LIMITER and up to 600ms of delay are also available .
The OUTPUTS include any kind of crossover filters with slope up to 48dB per octave, together with 5 bands of PEQ, fully programmable
COMPRESSOR/LIMITER and up to 600ms of delay .
Additional features include a fully assignable input/output routing and ganging, enviromental temperature compensation of delays,
a GROUPING function and a 1/3 oct . RTA with dedicated MIC input with phantom power .
The SPL Manager, specifically designed for the application in fixed installations, is a very powerful tool that allows to schedule, in 4
different scenes, 16 events on each input and output, including MUTE, level change, COMPRESSOR threshold change and PRESET
change . These events can be then performed automatically according to the internal real-time clock of the unit .
PC260 can be remotely controlled with PRONET software through the USB port on the front panel and it can be included in a PRONET
network through the two RJ-45 connectors on the rear panel .
IMPORTANT
To achieve optimum performance and guard against damage to the processor, your sound system or yourself, please read,
understand and follow all of the directions contained in this manual. Failure to do so may result in improper performance,
loss or injury.
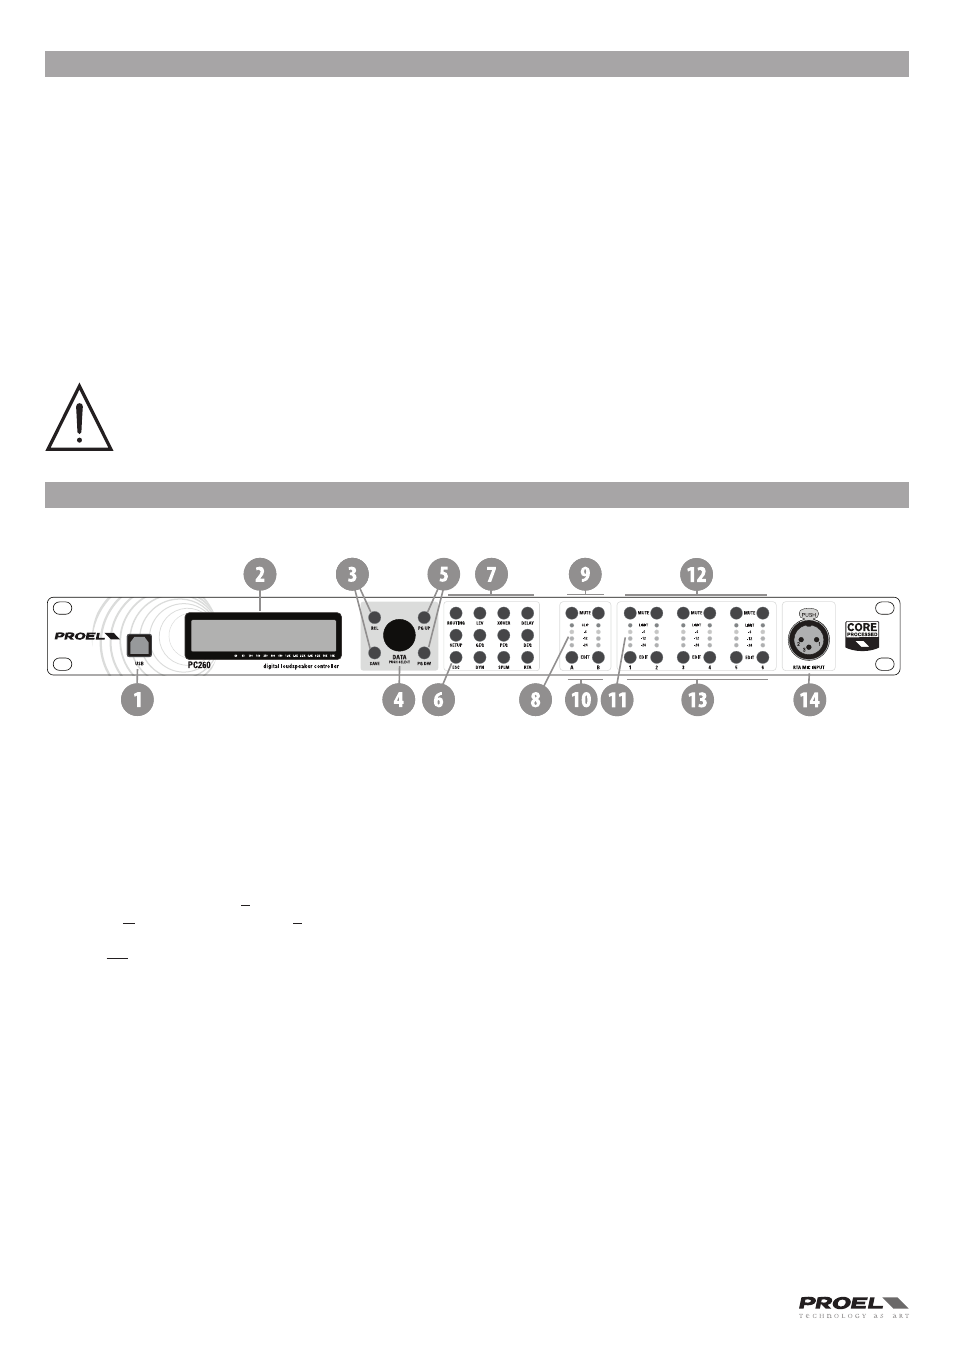
CONTROLS AND CONNECTIONS
FRONT PANEL
1. USB port
USB port for connection to a PC running Windows XP, Vista, Seven 32 or 64 bit . Using the PRONET application, the PC260 can be
operated, edited and configured for installation with an easy to use, intuitive interface .
Any available firmware updates downloadable from www .proel .com can be loaded via the USB port as well, allowing for easy in-field
updates .
2. Display
The display allows for operation and editing of the PC260 without the need of a connected PC . It works in conjunction with the buttons
to operate, navigate and edit the parameters .
In Run time mode the top line it shows the model name, the network operation mode, the lock status, the battery status and the real
time clock . in The rest of the screen it displays the machine name, the name of the currently selected factory or user preset, the
SPLM status and the routing .
Pressing the RCL or SAVE buttons switches to their respective preset menus .
Pressing a processing menu button switches the display to their respective parameters page .
The contrast is set automatically.
3. Preset buttons
RCL (Recall)
Press the RCL button to enter the Recall Preset menu (the RCL button lights) . Use the DATA knob to scroll the any factory or user
preset and push it to recall the selected preset into current memory . Pushing the DATA knob completes the preset load operation and
returns the LCD display to Run time mode . To exit without recalling a preset, press ESC .
SAVE
Press the SAVE button to enter the Save Preset manu (the SAVE button lights) . In this menu edited presets can be named and saved
to a user preset location . Use the DATA knob to choose the user memory location, to enter the preset name, then complete the saving
operation pressing SAVE again . To exit without storing the current preset, press ESC .
4. DATA entry knob
The DATA knob is used to scroll and select presets and to scroll and edit data parameters and values .
5. PG UP - PG DW buttons
Use these buttons to navigate through the menus pages . The number of the page is diplayed in the right upper corner of the screen
(the button cycles through all available pages) .