Remote control, Installing remote control batteries, Using the remote control – Dynex DX-PDP42-09 User Manual
Page 7: Features
Features
7
Remote control
Installing remote control batteries
To install the remote control batteries:
1 Remove the battery cover on the back side of the remote control.
2 Insert two 1.5 V AAA batteries into the battery compartment.
Make sure that you match the + and – symbols on the batteries
with the + and – symbols in the battery compartment.
3 Replace the cover.
Notes
Do not mix batteries of different types.
Do not mix old and new batteries.
Remove batteries when the charge is depleted.
Battery chemicals can cause a rash. If the batteries leak, clean the
battery compartment with a cloth. If chemicals touch your skin, wash
immediately.
If the remote control is not going to be used for an extended period of
time, remove the batteries.
Using the remote control
To use the remote control:
• Point the remote control directly at your TV, within a 60° angle
horizontally (30° to either side) and within 30° vertically of the
remote control sensor on the front of your TV, and within
16.4 feet (5 m) of your TV.
#
Button
Description
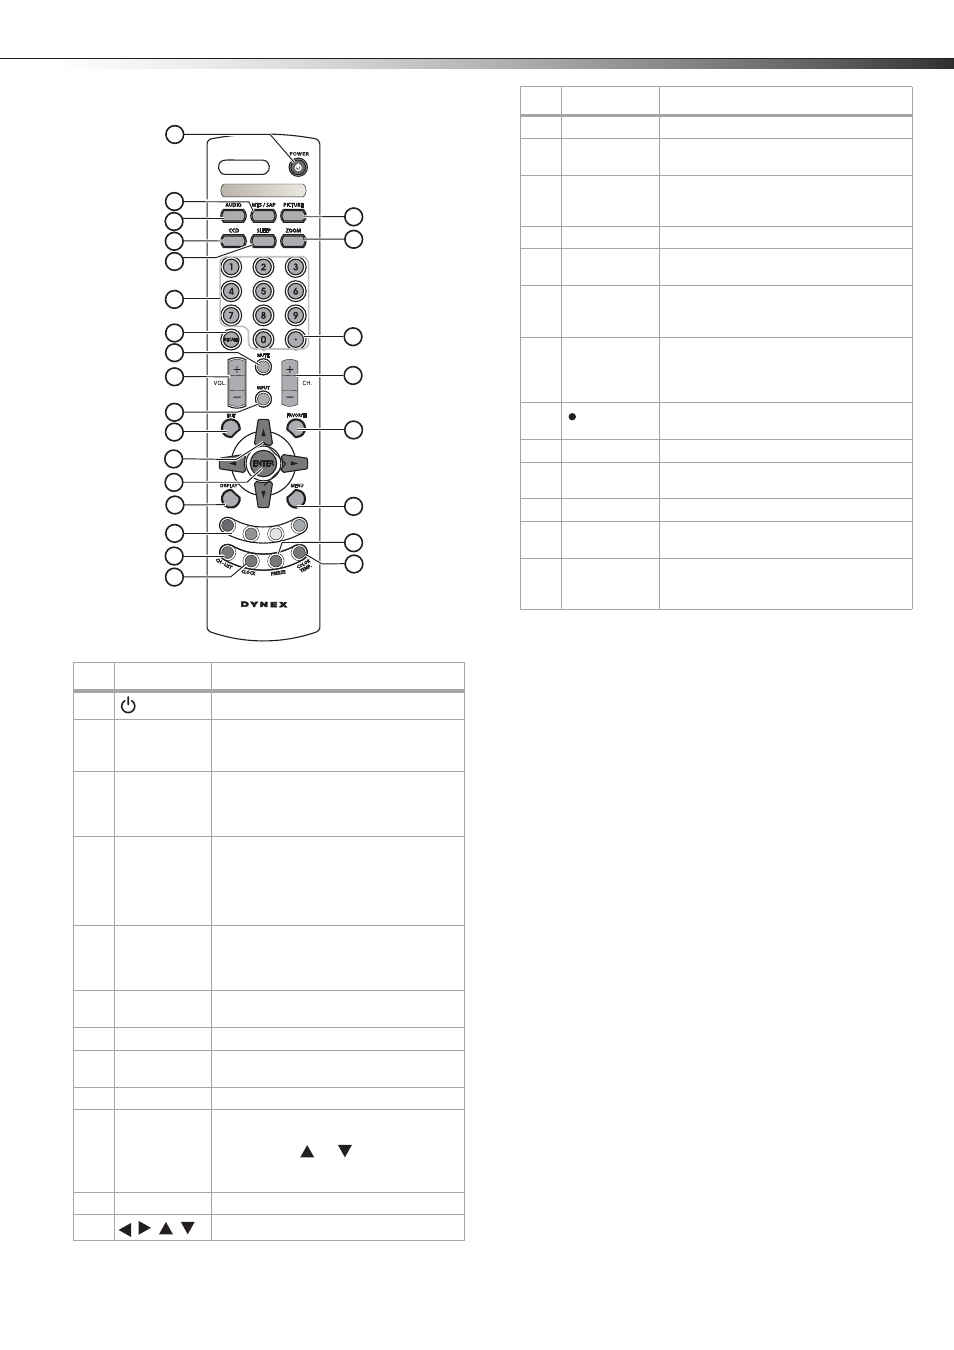
1
POWER
Press to turn your TV on or off.
2
MTS/SAP
Press repeatedly to cycle through the
available MTS/SAP sound options,
including SAP, MONO, and STEREO.
3
AUDIO
Press to cycle through the available
preset audio modes, including
Surround, Live, Dance, Techno, Classic,
Soft, Rock, Pop, and Off.
4
CCD
Press to cycle through the available
closed caption options, including:
• Analog–CC1, CC2, CC3, CC4, TT1, TT2,
TT3, TT4, or Off.
• Digital–Service1, Service2, Service3,
Service4, Service5, Service6, and Off.
5
SLEEP
Press to cycle through the available
preset times before your TV turns off.
Options include 0, 5, 10, 15, 30, 45, 60,
90, 120, 180, and 240 minutes.
6
Number
buttons
Press to enter channel numbers directly.
7
RECALL
Press to return to the previous channel.
8
MUTE
Press to mute the sound. Press again to
restore the sound.
9
VOL +/-
Press to adjust the volume.
10
INPUT
Press to open the Input Source menu
showing the available input sources for
your TV. Press
or
to select the
source you want, then press ENTER to
confirm.
11
EXIT
Press to exit the on-screen menus.
12
Press to navigate the on-screen menus.
1
2
3
5
6
4
7
14
8
9
10
11
12
13
15
17
18
19
20
21
22
23
24
25
16
13
ENTER
Press ENTER to confirm your settings.
14
DISPLAY
Press to display a variety of current
channel and input source information.
15
Red, green,
yellow, and
blue buttons
In TV mode, press to directly access four
presets from your Favorite List.
16
CH-LIST
Press to display the channel list.
17
CLOCK
Press to display the current time on the
screen.
18
PICTURE
Press to cycle through the available
preset picture modes. Choices include
Vivid, Normal, Cinema, Sport, and User.
19
ZOOM
Press to cycle through the available
aspect ratios of the picture. Choices
include NORMAL, FULL, WIDE, and
CINEMA.
20
In HDTV mode, press with 0~9 buttons to
select a digital sub-channel.
21
CH +/-
Press to change the channel.
22
FAVORITE
Press to display your favorite channels
list.
23
MENU
Press to open the on-screen TV menus.
24
FREEZE
Press to freeze the current picture. Press
again to resume normal viewing.
25
COLOR TEMP.
Press to cycle through the available color
temperature presets. Choices include
Cool, Warm, and Normal.
#
Button
Description