Saw assembly, Assembling saw stand, Assembling saw to stand – Delta 36-465 User Manual
Page 10
10
DO NOT OPERATE THIS MACHINE UNTIL YOU READ AND UNDERSTAND THE ENTIRE
INSTRUCTION MANUAL. MAKE SURE THE SAW IS SECURELY ATTACHED TO THE STAND BEFORE
PERFORMING ANY CUTTING OPERATIONS.
Fig. 4
Fig. 5
Fig. 6
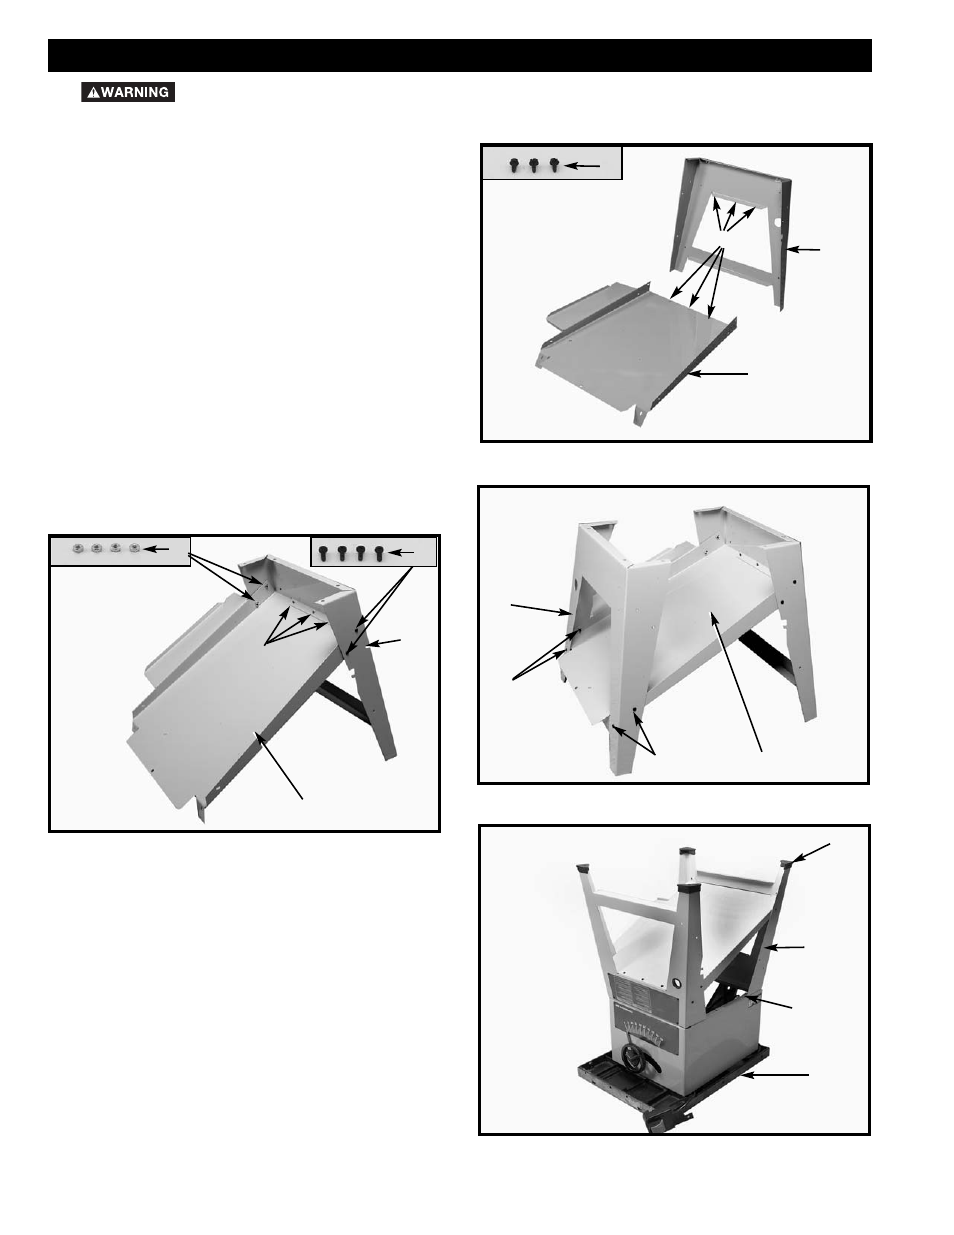
ASSEMBLING SAW STAND
1.
Assemble the dust chute and support panel (A)
Fig. 4, to the inside of the front stand panel (B) with three
#10 x 1/2
″ sheet metal screws (C).
2. Insert four #10-32 x 1/2" screws (D) Fig. 5 through
support panel and dust chute. Install four #10-32 hex
nuts (E) Fig. 5. IMPORTANT: The front stand panel
should be assembled with the Warning Label facing the
front of the saw. Do not completely tighten the stand
hardware at this time. Also, make certain the dust
chute/support panel (A) Fig. 5, is located under the lip of
front stand panel (B) and the sheet metal screws (C)
point up.
3.
Assemble the other end of dust chute and support
panel (A) Fig. 6, to rear stand panel (F) as shown with
four #10-32 x 1/2" screws and #10-32 hex nuts, which
are shown at (C). NOTE: Do not completely tighten stand
hardware at this time.
B
A
A
B
A
C
C
F
Fig. 7
ASSEMBLING
SAW TO STAND
1.
Turn saw table face down on a piece of cardboard
to protect the table surface. Place stand (B) Fig. 7, onto
saw (A). Align eight holes in the stand (B) with mounting
holes in the saw (A). Fasten stand with eight 5/16"-18
bolts, flat washers, lockwashers, and hex nuts one of
which is shown at (C) Fig. 7. Assemble flat washers on
bolts, place bolts through holes, assemble lockwashers
then hex nuts finger tight. Do not completely tighten
hardware at this time.
2.
Install four rubber feet (D) Fig. 7, on the end of each
stand leg (B).
3.
Turn saw table face up.
C
A
B
C
C
E
D
D
SAW ASSEMBLY
C