Genee World GV-8100 User Manual
Page 5
POWER (Control the visualiser On/Off)
Mir (V-reverse the image)
Frz (Freeze the image)
Neg (Display film negatives)
Title (Freeze the top 1/8 of the screen)
D./S. (Switch between static mode and dynamic mode)
Far/Near (Focus far or near)
Split (Image Split function)
Ppw (Control the projector On/Standby)
Pin (Projector input signal selection)
/ (Move the image up/down)
CCD/PC1/PC2 (CCD/RGB input signal selection)
S-VIDEO /VIDEO (Video input signal selection)
LAMP (Control the arm lights and back light)
AUTO (To auto adjust white balance and auto focus)
T/W (Increase and decrease the magnification)
Remarks: Frz, Title, D./S. and Split functions are only available on PROJECTOR OUT port.
BUTTON INSTRUCTION
Button function instruction sheet
Button Instruction
Fold/Setup Instruction
Indicator Instruction
Freeze the Top 1/8 of the Screen
Dynamic/Static Mode
Split Screen
Move Image Up
Freeze Image
Mirror Image
Projector Input Select
Projector Power
On/Standby
Move Image Down
Negative/Positive
D./S.
Mir
Title
Split
Ppw Pin
Frz Neg
Far
Focus Adjustment
Near
S-Video/Vide o
CCD /PC1/ PC2
Auto Ad just Color
Brightn ess and Focus
Light Control
(Side Lights/Back Light/Lights Off)
POWER
Press and Hold Two Seconds
to Power Off Visualize r
2. Rotate the camera head clockwise until the camera head is parallel to the
camera stand, carefully Fold the camera stand down to the front panel.
Cautions:
a. Don’t lay the unit down flat.
b. Don’t try to stand it on its rear or sides.
c. Don’t try to pick up this unit by pulling the camera stand.
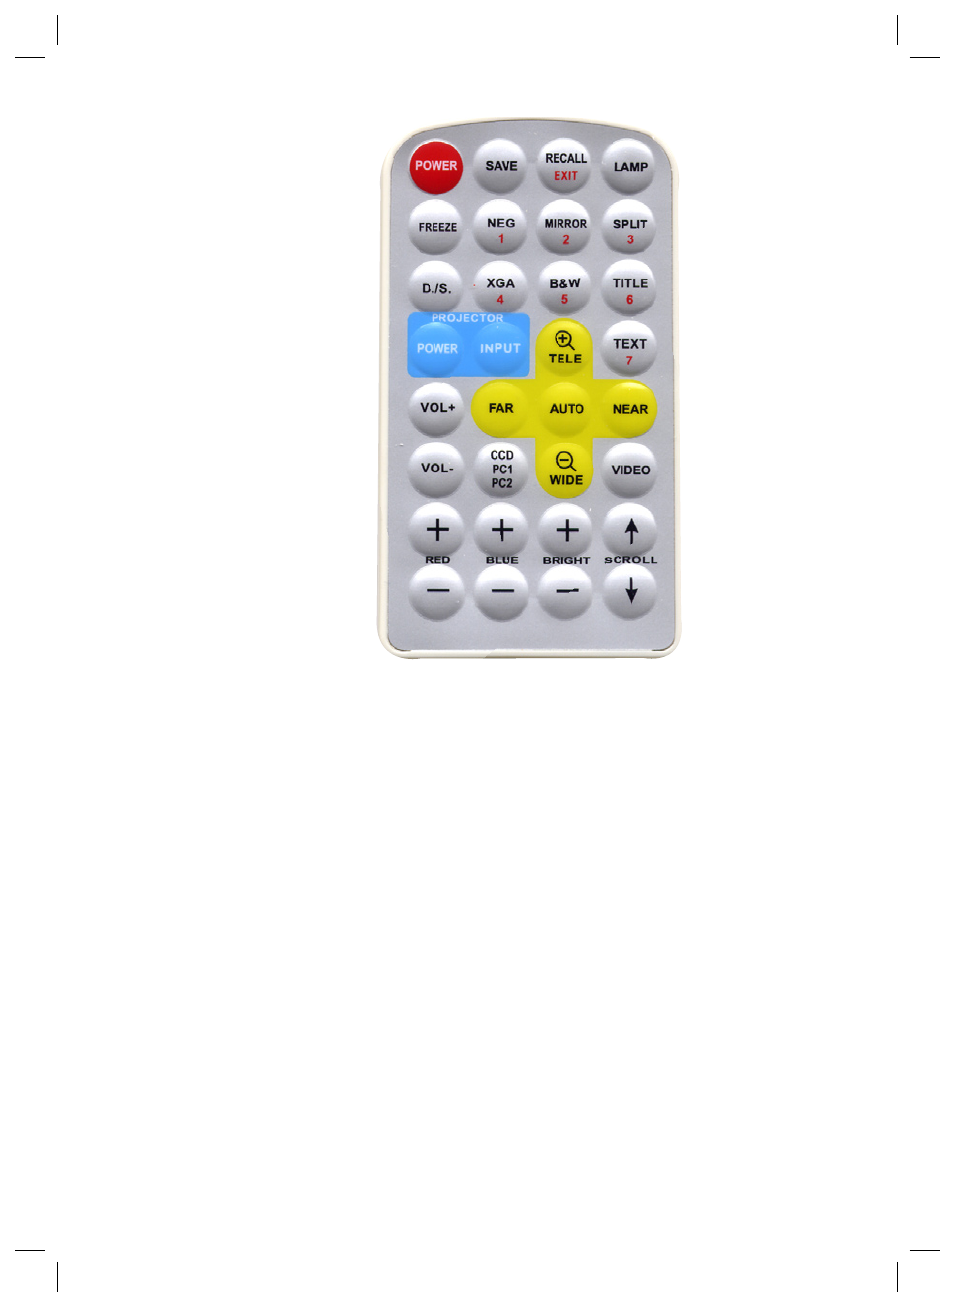
REMOTE CONTROL
POWER (Control the visualiser On/Off)
SAVE (Save captured images)
RECALL (Display saved images)
EXIT (Exit RECALL mode)
LAMP (Control the arm lights and back light)
FREEZE (Freeze the image)
NEG (Display film negatives)
MIRROR (V-Reverse the image)
SPLIT (Image split function)
D./S. (Switch between static mode and dynamic mode)
XGA (Switch between XGA (1024 x 768) and SVGA (800 x 600) mode)
B&W (Switch between colour mode and B&W mode)
TITLE (Freeze the top 1/8 of the screen)
PROJECTOR POWER (Control the projector On/Standby)
PROJECTOR INPUT (Projector input signal selection)
TEXT (Switch between image/text mode)
AUTO (To auto white balance and auto focus)
disconnect the projector from the RS232 port first) and select the Baud Rate and
Parity based on the projector’s Baud Rate, then click the “TEST” button to pop up the
Projector Code Test dialogue box, input the Baud Rate and Parity based on the
projector’s Baud rate, then click “Open”.
Click the projector control buttons on the visualiser’s operating panel to check if
the control code that the program received is the same as the sending code. If
the receiving code is same to the sending code, the input codes are correct. If the
visualiser can not control the projector, please do the following.
1. Check to see if the source control codes of projector are correct.
2. Check to make sure the connection between the visualiser and the projector is
correct.
FOLDING THE UNIT
1. Fold the right arm light down first onto the base, then the left arm down.