Genee World GV-8100 User Manual
Page 17
6.
When you open the capture program, but can not capture the image, please
set the signal input source: click “Option” “Video Crossbar”, and then set
INPUT as S-Video IN.
WORKING ON THE STAGE
1.
Place your material on the working surface.
2.
Select the enlargement required with the “ T” and “ W ” keys.
3.
Adjust the focus with the “Near” and “Far” keys or “AUTO” key.
WORKING OUTSIDE THE STAGE
For showing 3-dimensional objects with the visualiser, just place them on the working
surface and adjust the “ T” or “ W” and “AUTO” keys. If the object is too big for the
stage or you want to show it from the side, just place it behind or in front of the unit
and tilt the camera by hand (please take off the close-up lens first).
ROTATE CAMERA HEAD
The camera head can not rotate vertically and horizontally, the camera inside can be
rotated horizontally by hand.
LIGHT
The arm lights are on when the power is on. Each time you press the “LAMP”
buttons, the lighting changes as below.
COLOUR AND B&W MODE SWITCH
Press “B&W” once to enter the Black & White mode; Press again to return to the
Colour mode.
SWITCH ABLE VIDEO INPUTS
Press the “S-VIDEO/VIDEO” button to switch among S-Video and Video signals.
SWITCH ABLE RGB INPUTS
Use the “CCD/PC1/PC2” button to switch among CCD and different RGB signals. Each
time the “CCD/PC1/PC2” button is pressed, it provides seamless transitions among
different sources such as Camera (CCD)COMPUTER(IN)and RGB (IN).
Notes: RGB OUT always outputs RGB IN signals.
PROJECTOR ON/STANDBY
Press the “POWER” button to turn on the visualiser’s power and press the “Ppw”
button to turn the projector power on. To turn the projector to standby after use,
press the “Ppw” button for more than 2 seconds, and then the projector enters the
stand-by mode. (On the remote control, press the “PROJECTOR POWER” button)
Note: Please connect the projector RS232 cable between the projector and the
visualiser first. If you cannot switch projector inputs by pressing this button, you need
to manually program the RS232 code into the visualiser. See the section “Controlling
Projector with Visualiser” for detailed instruction.
PROJECTOR INPUTS SELECTION
When the projector is connected to several input sources, use the “Pin” button to
switch signal inputs of the projector. (On the remote control, press the “PROJECTOR
INPUT” button)
+
B.
Click the Install Code-Writing Program button to install Code-Writing Program.
C.
Click the Install DirectX9.0 button to install Microsoft DirectX 9.0.
D.
Click the Install Capture Program button to install the program that captures
images in the AVI or Bitmap format.
E.
Click the Install USB Driver button to install the driver designed for the
visualiser and will be used by the Capture Program.
F.
After the installation is finished, then click the Exit button to exit the Software
Setup window.
G.
Shut down your computer when prompted so the changes will take effect.
H.
Use the USB cable to connect your computer to the visualiser before your
computer is restarted.
I.
Turn on the visualiser.
Remarks: DirectX9.0 is not necessary to install, it is mainly for computer print screen
function.
Please pay attention to the following:
1.
Computer hardware requirement: CPU: Pentium 4, RAM: 256M or above, USB
2.0 port, Hard disk 40G or more
2.
Operating system: Windows 2000 or above. If the operating system is
Windows 2000, should install SP4. If the operating system is Windows XP,
should install SP1.
3.
Must use the high-speed USB cable provided together with the visualiser.
4.
When connecting the visualiser to a desktop computer with the high-speed
USB cable provided together, we recommend using the USB port on the
rear of the mainframe as the USB port on the front of the computer might
have interference.
5.
You need to install the USB driver again when you change a computer’s USB
port. If this port has installed the USB2.0 driver, then there is no need to
install it again.
IMAGE REVERSION
Press the “Mir” button once to V-reverse the image and the vertically mirrored
image will be displayed. Press the “Mir” button again to exit. (On the remote
control, please press the “MIRROR” button)
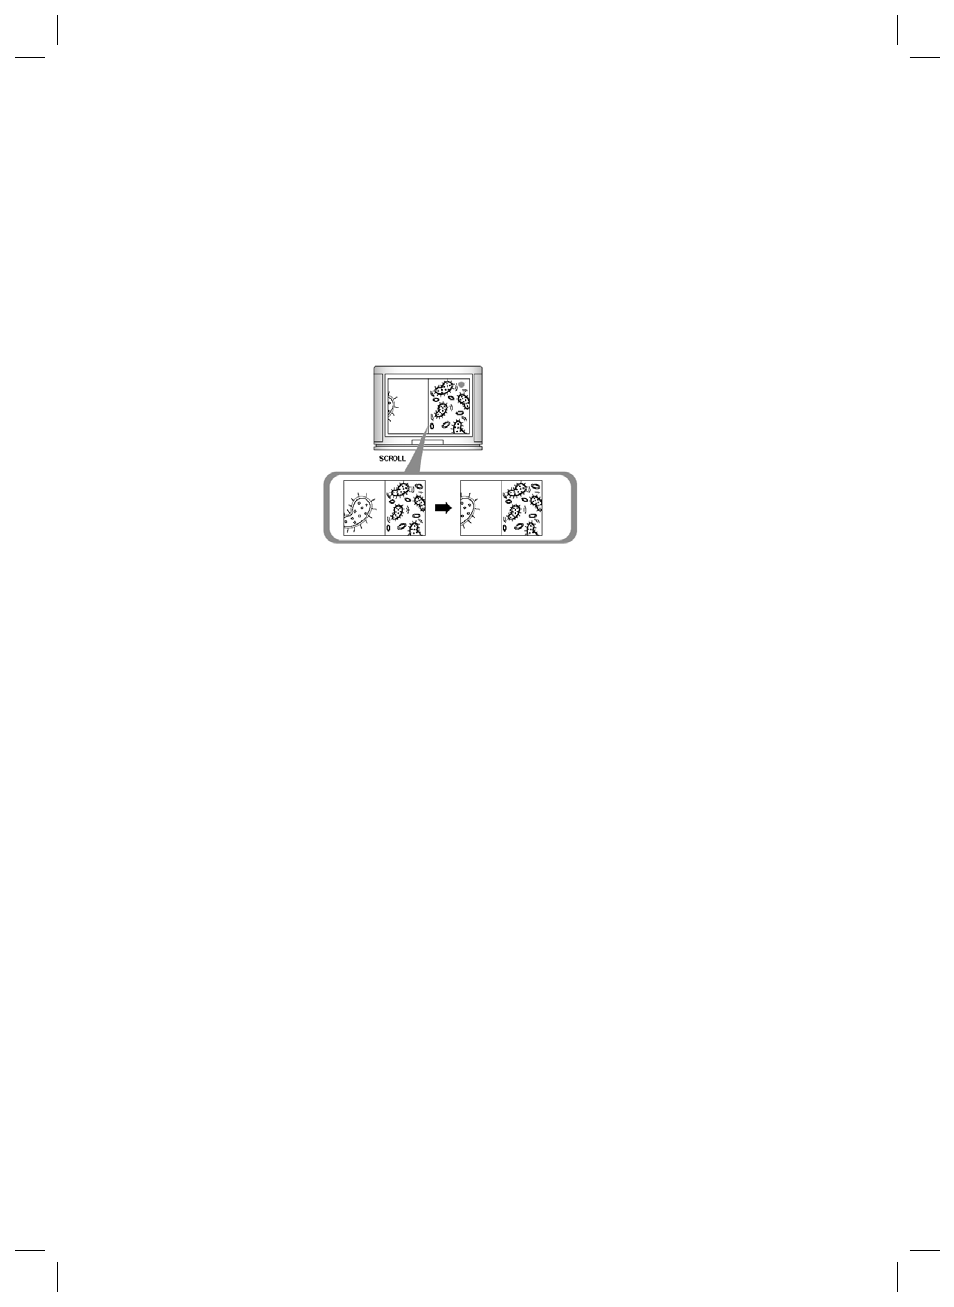
IMAGE SPLIT
Press “SPLIT”, the image will be split into two images. One is the current live
image the other is a frozen snapshot of the last image, Press the “SPLIT”
button again to exit.
Note: This function is not available on S-Video and Video output.
DYNAMIC/STATIC MODE SWITCH
To display dynamic images, Press the “D./S.” button to switch to
the Dynamic mode, the image will be clear and has no choppy strobe effect.
To display still images, press the “D. / S.” button switch to the Static mode.
Note: This function is not available on S-Video and Video output.