English – Denon AVR-1603 User Manual
Page 11
ENGLISH
11
NOTES:
— Assignment of low frequency signal range —
• The only signals produced from the subwoofer channel are LFE signals (during playback of Dolby Digital or
DTS signals) and the low frequency signal range of channels set to “SMALL” in the setup menu. The low
frequency signal range of channels set to “LARGE” are produced from those channels.
— Crossover Frequency —
• When “Subwoofer“ is set to “Yes“ at the “Speaker Configuration Setting“, set the frequency (Hz) below
which the bass sound of the various speakers is to be output from the subwoofer (the crossover frequency).
• For speakers aet to “Small“, sound with a frequency below the crossover frequency is cut, and the cut bass
sound is output from the subwoofer instead.
NOTE: For ordinary speaker systems, we recommend setting the crossover frequency to 80 Hz. When
using small speakers, however, setting the crossover frequency to high frequency may improve
frequency response for frequencies near the crossover frequency.
— Subwoofer mode —
• The subwoofer mode setting is only valid when “LARGE” is set for the front speakers and “YES” is set for
the subwoofer in the “Speaker Configuration” settings (see page 10).
If “SMALL” is set for the front speakers or “NO” is set for the subwoofer, the subwoofer mode setting does
not affect playback of low frequency signal range.
• When the “+MAIN” playback mode is selected, the low frequency signal range of channels set to “LARGE”
are produced simultaneously from those channels and the subwoofer channel.
In this playback mode, the low frequency range expand more uniformly through the room, but depending on
the size and shape of the room, interference may result in a decrease of the actual volume of the low frequency
range.
• When the “NORM” playback mode is selected, the low frequency signal range of channels set to “LARGE”
are only produced from those channels. In this playback mode there tends to be little interference of the low
frequency range in the room.
• Try playing the music or movie source and select the playback mode providing the stronger low frequency
range sound.
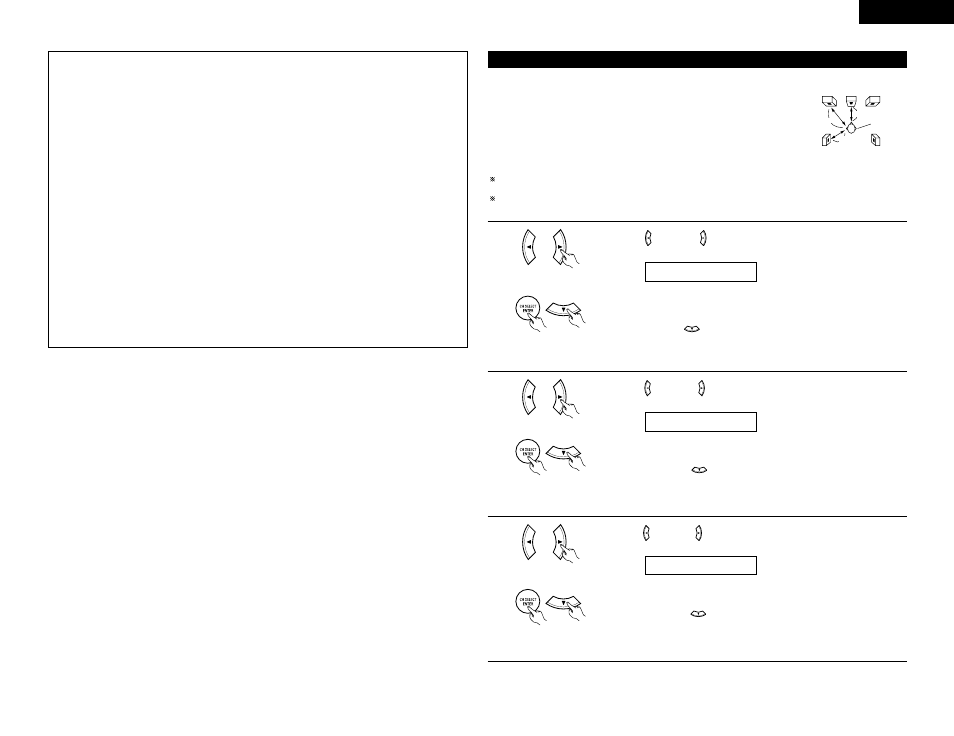
Input the distances from the listening position to the speakers and set the surround
delay time.
Preparations:
Measure the distances from the listening position to the speakers (L
1
to L
3
on the
diagram at the right).
L
1
:
Distance from center speaker to listening position
L
2
:
Distance from front speakers to listening position
L
3
:
Distance from surround speakers to listening position
CAUTION:
Set the center speaker at the same distance from the front speakers (left and right) or the subwoofer, or so
that the difference in distance (L
2
– L
1
) is 1.5 meters or less.
Set the surround speakers (left and right) at the same distance from the front speakers (left and right) or the
subwoofer, or so that the difference in distance (L
2
– L
3
) is 4.5 meters or less.
• The number changes in units of 0.1 meter each time one of the buttons is
pressed. Select the value closest to the measured distance.
(“/SW” appears only when subwoofer = yes.)
Press the ENTER or
(down) button to switch to the center speaker setting.
L
1
L
2
L
3
7 FRNT/SW 3.6m
Listening
position
Center
FL
FR
Setting the speaker distance
SL
SR
Use the
(left) and
(right) buttons to set the distance from the front
speakers and subwoofer to the listening position.
1
NOTE:
• The speaker distance can be adjusted between 0 and 18 meters in steps of 0.1 meter.
Use the
(left) and
(right) buttons to set the distance from the center
speaker to the listening position.
2
Use the
(left) and
(right) buttons to set the distance from the surround
speakers to the listening position.
3
• The number changes in units of 0.1 meter each time one of the buttons is
pressed. Select the value closest to the measured distance.
Press the ENTER or
(down) button to switch to the surround speakers
setting.
• The number changes in units of 0.1 meter each time one of the buttons is
pressed. Select the value closest to the measured distance.
Press the ENTER or
(down) button to enter the setting and switch the
DIGITAL input (COAX) setting.
8 CENTER 3.6m
9 SURR. 3.0m
NOTE:
• No setting when “None” has been selected for the center speaker.
NOTE:
• No setting when “None” has been selected for the surround speakers.