Oklahoma Sound #PRC 250 User Manual
Page 8
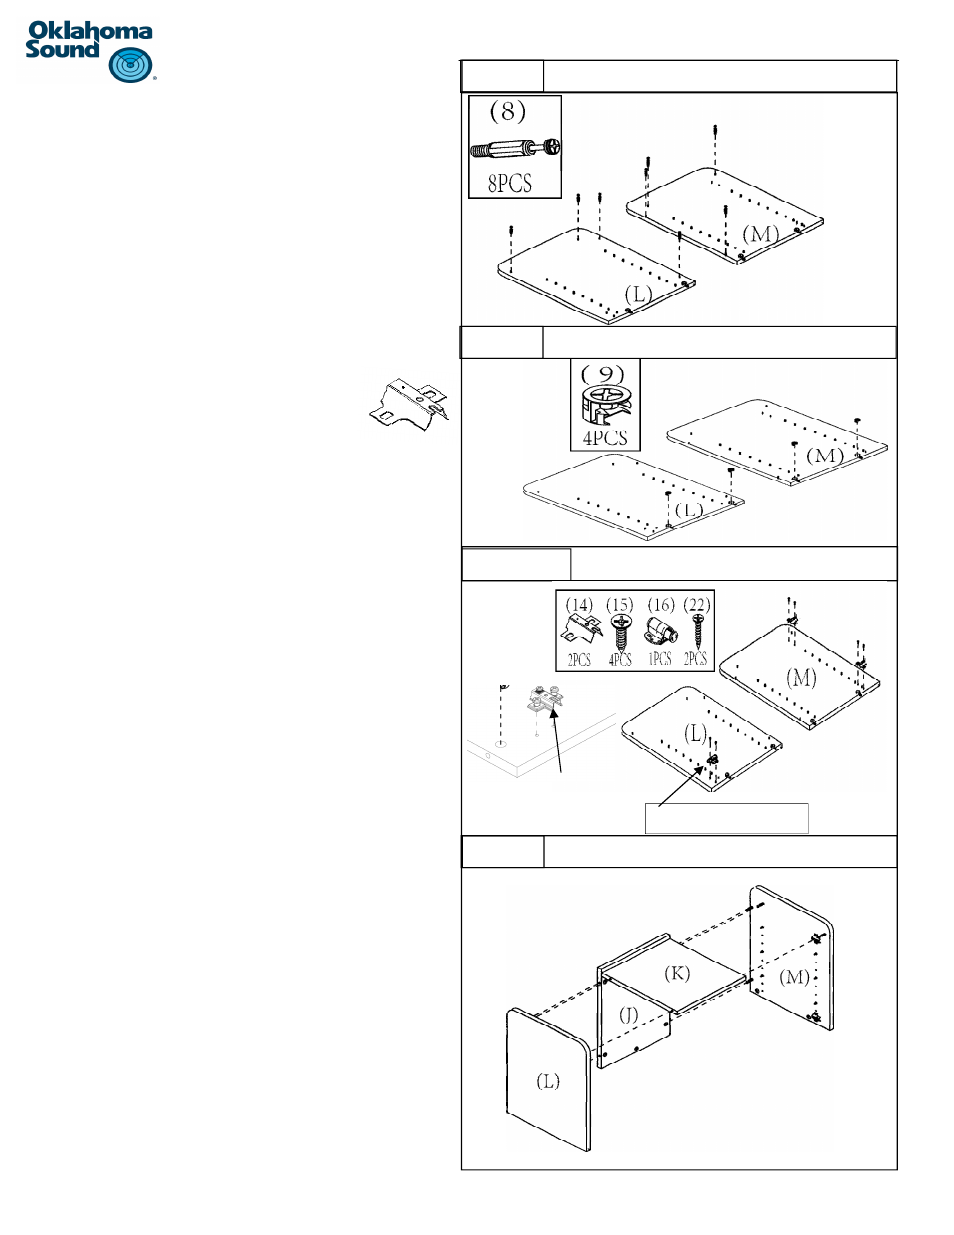
8
Step 9:
9a) IdenƟfy panels #L and #M and place them on a clean,
soŌ surface with the holes facing upwards.
Use a Phillips screwdriver to screw four cam bolts #8 into
the plasƟc inserts in panel #L and four cam bolts into the
plasƟc inserts on panel #M as shown.
9b) Insert two cam locks #9 into the pre-drilled holes at the
boƩom of panel #L and two into the holes on the boƩom
of panel #M.
There is also one extra hole on each panel for the down on
the side of panel J to be inserted into when assembling the
cabinet..
9c) IdenƟfy the two female hinges of parts #14.
Align the hole on each side of the hinge with the pre-drilled
holes on panel #M, located right above and directly below
the row of shelf support holes on the panel as shown.
Be sure that the open end of the hinge is facing the edge
of the panel as shown.
Using a Phillips screw driver, screw two screws #15,
through the holes on the side of each hinge into the holes
on the panels.
9d) IdenƟfy the door catch part #16.
Align the round holes on the side of the door catch with
the two holes on the boƩom corner of panel #L.
Be sure that the magneƟc end of the barrel is facing the
edge of the panel.
Once the holes are aligned, use a Phillips screw driver to
screw two screws #22 to aƩach the door catch to the pan-
el.
Step 10:
a) AƩach the two side panels #L and #M with the back
panel #J and top panel #K.
b) Align the four cam bolts on the face of panel #L and
#M with the four cam lock holes on the edge of panels
#J and #K, two on panel #J and two #K as shown.
c)
Once all the bolts are aligned and inserted so that pan-
el #L is flush with panels #J and #K, use a Philips
screwdriver to Ɵghten the cam locks so the panels will
lock together.
d) The dowel at the two edges of panel #J will insert into
the holes on panel #L and #M
e) Repeat the same process to aƩach panel #M to the
right side of the cabinet.
STEP 9a
STEP 9b
STEP 9c /9d
STEP 10
Open end of the hinge
facing the edge of the
panel.
MagneƟc end of barrel