CRU ToughTech Duo 3SR User Manual
Page 4
Page: 4
2.2 Connecting and Powering ToughTech Duo
a. Connect the data cable to the corresponding port on ToughTech
Duo.
b. Provide power to the ToughTech Duo. There are two possible
ways to do this.
Option 1: If the FireWire host on your computer is powered,
ToughTech Duo can use FireWire for power (QR Model only).
Option 2: Plug the included AC adapter into the DC jack on the
rear of the ToughTech Duo. Plug the other end into a grounded
electrical outlet.
c. Plug the other end of the data cable to an available port on your
computer Ensure that the green power LED indicator is active.
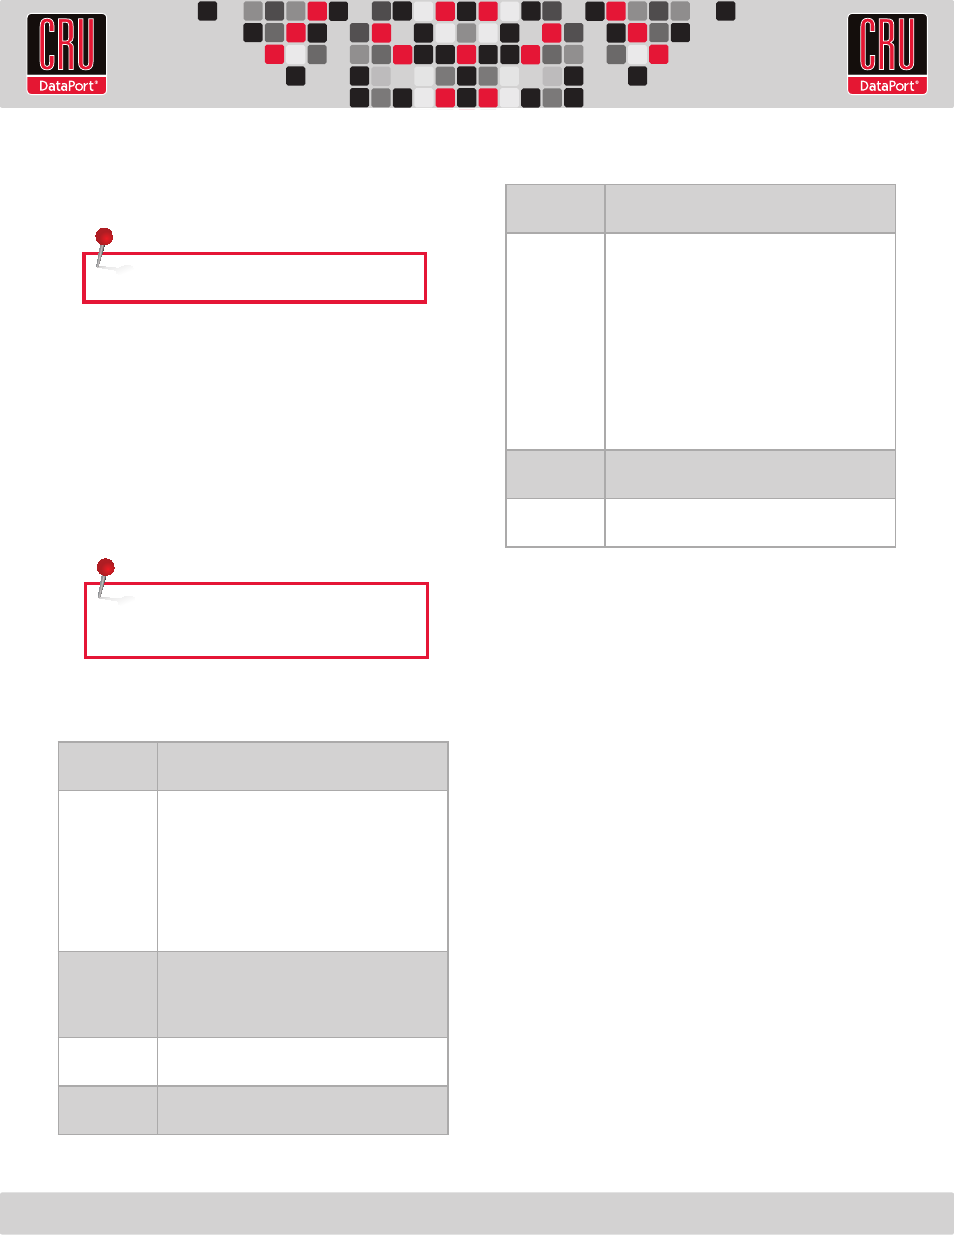
3. LED Behavior
(see section 1.2 for locations of the LEDs on the unit)
NOTE: Not all hard drives support the Drive Activity LED
functionality in the same way.
Unit Power
Glows green when the power switch in the “on”
position
System
• LED is “off” by default
• Configurable (see sections 7.3 and 7.4)
• Glows AMBER when a drive reaches
a default temperature (50 °C), or a
temperature that you set.
• Glows RED when a drive reaches a default
temperature (55 °C), or a temperature that
you set.
RAID
• LED is “off” by default
• Glows AMBER when the RAID is degraded
• Glows RED when the RAID has failed or is
invalid
Drive Power
Glows GREEN when the drive is in the unit and
receiving power
Drive Activity
Glows AMBER when the drive is being accessed,
either reading or writing from the drive.
NOTE: eSATA and USB 2.0 share the same port.
4. LCD Menu Screens
(use the Navigation Buttons to change screens)
5. Setting up the RAID
ToughTech Duo offers two options for RAID configuration as well
as single-disk mode. See section 1.3 for details on the available
options. Stop all data transfers before setting or changing RAID
types or rebuilding a degraded array. Failure to do so can result
in the loss of data. To set up or change the RAID type, disconnect
all data cables and reboot ToughTech Duo. After the unit has
initialized, the LCD will display the drives’ mode and status. You
can then reconnect to the computer.
5.1 Creating a New RAID
(Use the LCD and interface buttons to complete this step)
Follow these steps for setting up a new RAID if you did not purchase
your unit pre-configured.
a. Upon insertion of new disks, the LCD will read “Raid Error: not
a RAID set.”
b. Press “Enter” on the front interface twice.
c. The LCD screen will display “MAKE A NEW RAID?”
d. Select “YES.”
e. Select your RAID type (RAID 0 or 1)
f. The LCD screen will read “Will erase all data OK?”
Mode/Status
The RAID level used
Status of RAID: Normal or Degraded
Drive Status
• OK: Indicates that the hard drive is in use
or ready to use
• No Disk: Indicates that the hard drive was
removed or not installed
• Unused: A new drive was installed and not
added to the RAID
• Failing: Indicates the drive is
malfunctioning. Possible causes of failure
message include an inability to recognize
the drive, a compatiblity problem, or
damaged sectors.
Drive Temp
Displays temperature of the top and bottom
drives, as reported by S.M.A.R.T status
Change RAID
mode
Allows you to change the RAID level (see section
5.2)