English – Denon DN-C550R User Manual
Page 29
ENGLISH
29
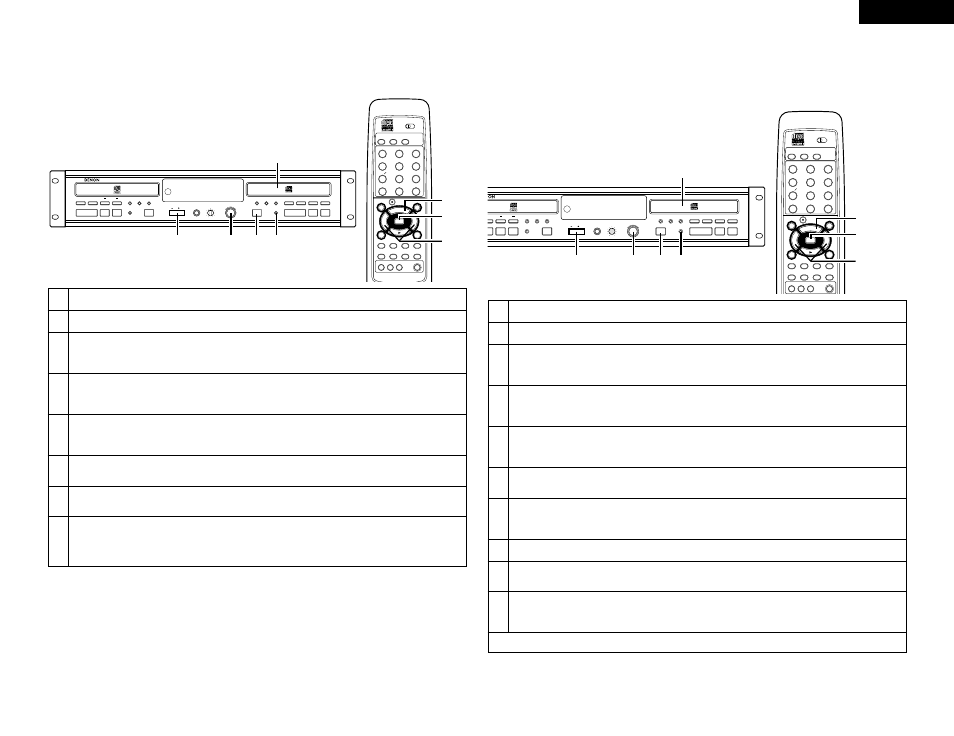
(3) Erasing one or more tracks away from the last track
★ When erasing a finalized CD-RW disc, first unfinalize the disc.
STOP
PAUSE
PLAY
2
4
3
7
8
5
6
1
9
10
+
10
REC
_
DUBBING
_
NORMAL
HIGH
RELAY
MODE
CD CD-R
ENTER
MENU
8
9
3
2
6
7
PROG/DIRECT CALL
RANDOM
DISPLAY SEL. FADER INPUT
FINALIZE
1 / ALL
A - B
CHARACTER
TIME
TITLE
B
REMOTE CONTROL UNIT RC-278
M
+
✽
–
CLEAR
CLEAR
A ! "
J ( )
D # %
G & '
P ,
Y
<
< >
V : ;
S .
[ = ]
{ ? }
OPEN / CLOSE
TIME
TIME
CLEAR
INPUT
MENU
5
OPEN /CLOSE
5
PROFESSIONAL CD RECORDER
DN-C550R
PHONES
PHONES LEVEL
MIN
MAX
POWER
ON
OFF
FINALIZE
MULTI JOG
3
1
2
3
1
2
REMOTE SENSOR
PLAY
STOP
PAUSE
HIGH
NORMAL
DUBBING
8
9
RELAY MODE
DISPLAY
SELECT
TITLE /
CHARACTER
PUSH
ENTER
8
9
PLAY
STOP
PAUSE
4
REC
-
+
2
1
3,4,5,
6,7,8
3
2
4,5,
6,8
3,4,
5,7
3
(Main unit)
(Remote control unit)
1
Switch on the power.
2
Load the CD-RW disc that is to be erased.
3
4
5
6
7
8
Press the MENU button, turn the jog dial of the main unit or press the automatic search button of the remote control,
and select the CD-R/RW edit mode.
• “CDR/RW Edit?” is displayed.
Press the enter button, turn the jog dial of the main unit or press the automatic search button of the remote control, and
select the one-track erase mode.
• “CD-RW Erase?” is displayed.
Now, press the enter button, turn the jog dial of the main unit or press the automatic search button of the remote
control, and select the one-track erase mode.
• “1Tr Erase?” is displayed.
Press the enter button.
• “**-**Tr Erase” is displayed.
Either turn the main unit's jog dial counterclockwise or press the automatic search REV button on the remote control
and select the first of the tracks you want to erase from the last track.
Press the enter button again.
• “Tr Erase” display is flashing.
• When erasing is completed, the number of tracks that remain following the erasure are displayed in a portion of the
music calendar.
(4) Registration of the tracks to which you do not wish to listen
★ Tracks to which you do not wish to listen, such as those containing recording errors, can be set so that they will be skipped
over during play.
★ When erasing a finalized CD-RW disc, first unfinalize the disc.
STOP
PAUSE
PLAY
2
4
3
7
8
5
6
1
9
10
+
10
REC
_
DUBBING
_
NORMAL
HIGH
RELAY
MODE
CD CD-R
ENTER
MENU
8
9
3
2
6
7
PROG/DIRECT CALL
RANDOM
DISPLAY SEL. FADER INPUT
FINALIZE
1 / ALL
A - B
CHARACTER
TIME
TITLE
M
+
✽
–
CLEAR
CLEAR
A ! "
A ! "
J (
( )
)
D # %
D # %
G & '
G & '
P
P
,
Y
<
< >
V
V
:
;
S
S
.
[ = ]
[ = ]
{
{ ? }
OPEN / CLOSE
TIME
TIME
CLEAR
INPUT
MENU
5
OPEN /CLOSE
5
PROFESSIONAL CD RECORDER
DN-C550R
PHONES
PHONES LEVEL
MIN
MAX
POWER
ON
OFF
FINALIZE
MULTI JOG
3
2
3
1
2
REMOTE SENSOR
STOP
PAUSE
HIGH
NORMAL
DUBBING
9
RELAY MODE
DISPLAY
SELECT
TITLE /
CHARACTER
PUSH
ENTER
8
9
PLAY
STOP
PAUSE
4
REC
-
+
2
1 3,4,5,6,
7,8,9,10
3
2
4,5,6,7,
8,9,10
3,4,5,
7,8
3
(Main unit)
(Remote control unit)
1
Switch on the power.
2
Load the CD-R/RW disc that contains tracks that you would like to skip in playback.
3
4
5
6
7
8
9
10
Press the MENU button, turn the jog dial of the main unit or press the automatic search button of the remote control,
and select the CD-R/RW edit mode.
• “CDR/RW Edit?” is displayed.
Press the enter button, turn the jog dial of the main unit or press the automatic search button of the remote control, and
select the skip track setting mode.
• “Skip Track?” is displayed.
Now, press the enter button, turn the jog dial of the main unit or press the automatic search button of the remote
control, and select the skip track setting mode.
• “Skip Set?” is displayed.
Press the enter button.
• “Skip Set --Tr” is displayed.
Turn the jog dial of the main unit or press the automatic search button of the remote control, and select the tracks you
want to skip. Press the enter button and set.
• The music calendar display of the selected track number will flash.
Repeat Step 7 to add another track.
Press the enter button during the “Skip Set --Tr” display.
• “Skip Set OK?” is displayed.
Press the enter button.
• “Now PMA Rec” is displayed and the registration is completed.
• The music calendar display of the selected track number is switched off.
• The total track number and total time displays do not change even if tracks are set to be skipped.