English – Denon DN-C550R User Manual
Page 16
ENGLISH
16
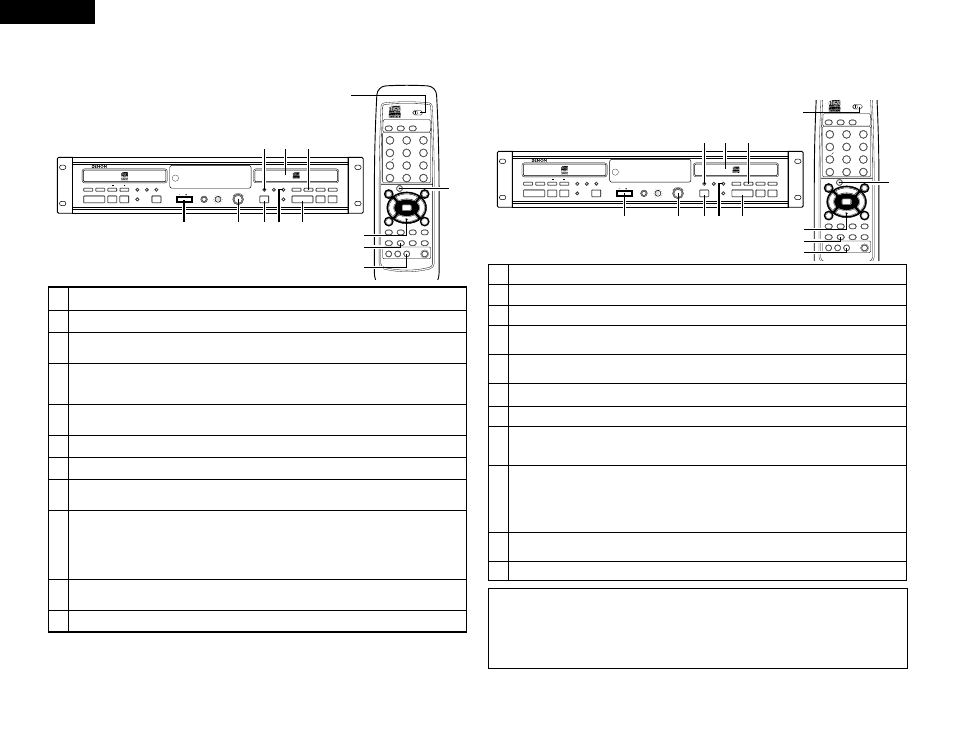
1. Manual recording
(1) Starting analog recording
STOP
PAUSE
PLAY
2
4
3
7
8
5
6
1
9
10
+
10
REC
_
DUBBING
_
NORMAL
HIGH
RELAY
MODE
CD CD-R
ENTER
MENU
8
9
3
2
6
7
PROG/DIRECT CALL
RANDOM
DISPLAY SEL. FADER INPUT
FINALIZE
1 / ALL
A - B
CHARACTER
TIME
TITLE
B
REMOTE CONTROL UNIT RC-278
M
+
✽
–
CLEAR
CLEAR
A ! "
J ( )
D # %
G & '
P ,
Y
<
< >
V : ;
S .
[ = ]
{ ? }
OPEN / CLOSE
TIME
TIME
CLEAR
INPUT
MENU
5
OPEN /CLOSE
5
PROFESSIONAL CD RECORDER
DN-C550R
PHONES
PHONES LEVEL
MIN
MAX
POWER
ON
OFF
FINALIZE
MULTI JOG
3
1
2
3
1
2
REMOTE SENSOR
PLAY
STOP
PAUSE
HIGH
NORMAL
DUBBING
8
9
RELAY MODE
DISPLAY
SELECT
TITLE /
CHARACTER
PUSH
ENTER
8
9
PLAY
STOP
PAUSE
4
REC
-
+
9
2 5 10
1
2
4
8
8
10
4
5
(Main unit)
(Remote control unit)
1
2
5
3
Turn on the power.
Load the CD-R/RW disc that is to be recorded.
Press the input switching button (INPUT) and select the analog source.
• The “ANALOG” or “ANALOG XLR” display will light.
Perform the operation of “Setup Method (2) Setting the Synchro Recording Mode ” on Page 10 and select the Synchro
off mode.
4
When using an already recorded Disc, press the TIME button to check the recordable time.
• The time display switches between the total recorded time and the recordable time each time the TIME button is
pressed.
6
7
8
9
10
11
Perform the operation of “Setup Method” on Page 10 and select on/off of the ATM function.
Start playing the selection you want to record on the CD player, cassette deck, etc.
Press the record button (
4
REC).
• The recording standby mode is set.
Adjust the recording level with the jog dial and press the enter button.
• Adjust the input level adjustment control (INPUT LEVEL) so that the “OVER” indicator does not light even when the
volume is loudest. After adjusting, set the source to be recorded to the standby mode.
✽ The recording level can be set in advance using the menu mode.
• The set recording level will be stored in memory, but this data might be lost if the unit is not connected to a power
source for 2 to 3 days.
Press the play button (
1
PLAY).
• Recording starts.
Start playing the selection you want to record on the CD player, cassette deck, etc.
(2) Starting digital recording
• This set includes a sampling rate converter.
When recording DATs or satellite broadcasts (32 kHz or 48 kHz) whose digital input signal sampling frequency is different from
that of CD (44.1 kHz), the sampling frequency is automatically converted to 44.1 kHz.
STOP
PAUSE
PLAY
2
4
3
7
8
5
6
1
9
10
+
10
REC
_
DUBBING
_
NORMAL
HIGH
RELAY
MODE
CD CD-R
ENTER
MENU
8
9
3
2
6
7
PROG/DIRECT CALL
RANDOM
DISPLAY SEL. FADER INPUT
FINALIZE
1 / ALL
A - B
CHARACTER
TIME
TITLE
B
REMOTE CONTROL UNIT RC-278
M
+
✽
–
CLEAR
CLEAR
A ! "
J ( )
D # %
G & '
P ,
Y
<
< >
V : ;
S .
[ = ]
{ ? }
OPEN / CLOSE
TIME
TIME
CLEAR
INPUT
MENU
5
OPEN /CLOSE
5
PROFESSIONAL CD RECORDER
DN-C550R
PHONES
PHONES LEVEL
MIN
MAX
POWER
ON
OFF
FINALIZE
MULTI JOG
3
1
2
3
1
2
REMOTE SENSOR
PLAY
STOP
PAUSE
HIGH
NORMAL
DUBBING
8
9
RELAY MODE
DISPLAY
SELECT
TITLE /
CHARACTER
PUSH
ENTER
8
9
PLAY
STOP
PAUSE
4
REC
-
+
9
2 5 10
1
2
4
8
8
10
4
5
1
2
4
Turn on the power.
Load the CD-R/RW disc that is to be recorded.
When using an already recorded Disc, press the TIME button to check the recordable time.
• The time display switches between the total recorded time and the recordable time each time the TIME button is pressed.
5
7
8
9
10
11
Press the input switching button (INPUT) and select the digital source (Optical or Coaxial).
• The indicator for the selected input source (“OPT” or “COAX”) lights.
Press the record button (4 REC).
• The recording standby mode is set.
• If the “D. in” indicator is flashing, check the connections to the digital input jacks.
Press the play button (1 PLAY).
• Recording starts.
Play the selection to be recorded on the CD player, etc.
NOTES:
• “CD” can be selected by pressing the input selector button, but manual recording from the set’s CD unit is only possible in the dual
mode. (Refer to “Dual mode” on Page 26, 27).
• When you do not wish to change the digital recording level, set the jog dial so that “Level 00.0dB” is displayed. The recording
will be made without changing the input signal level.
• The recording level can be adjusted over a range of –
∞
to +12 dB for analog and digital input recording. Note that the displayed
setting values may include a degree of error in terms of calculation processing.
• When the recording level is –
∞
, “Level---.-dB” is displayed and audio is not output.
(Main unit)
(Remote control unit)
Start playing the selection you want to record on the CD player, MD recorder, etc.
Adjust the recording level with the jog dial and press the enter button.
• Adjust the input level adjustment control (INPUT LEVEL) so that the “OVER” indicator does not light even when the volume is
loudest. After adjusting, set the source to be recorded to the standby mode.
✽ The recording level can be set in advance using the menu mode.
• The set recording level will be stored in memory, but this data might be lost if the unit is not connected to a power source for 2
to 3 days.
3
Perform the operation of “Setup Method (2) Setting the Synchro Recording Mode” on Page 10 and select the Synchro off mode.
6
Perform the operation of “Setup Method” on Page 10 and select on/off of the ATM function.
Select the CD-R side.
Select the CD-R side.