Recording from external devices, English – Denon DN-C550R User Manual
Page 15
ENGLISH
15
1
Load the CD you want to copy into the CD unit.
2
Load the CD-R/RW onto which you want to record into the CD-R unit.
3
Press the normal or high speed copying button (NORMAL or HIGH) to display “Scan Rec Dub”.
4
Press the enter button to set the copying mode.
• Intro scan playback starts on the CD unit.
• The “PROG” indicator lights.
5
Set the tracks you want to record.
• For tracks you want to record, press the enter button.
• For tracks you do no want to record, press the automatic search forward button.
✽ Once all the tracks have been scanned, the CD unit is set to the pause mode, “Choice OK?” is displayed.
• Check the settings on the music calendar, and if they are OK press the enter button.
• If the settings are wrong, press the stop button then repeat steps 1 to 5.
✽ “No Entry” is displayed if no tracks have been selected.
6
Press the CD or CD-R unit’s play button.
• Copying starts.
• When copying is completed, the CD-R unit is stopped.
• To stop in the middle of copying, press the stop button on the CD or CD-R unit.
STOP
PAUSE
PLAY
2
4
3
7
8
5
6
1
9
10
+
10
REC
_
DUBBING
_
NORMAL
HIGH
RELAY
MODE
CD CD-R
ENTER
MENU
8
9
3
2
6
7
PROG/DIRECT CALL
RANDOM
DISPLAY SEL. FADER INPUT
FINALIZE
1 / ALL
A - B
CHARACTER
TIME
TITLE
M
+
✽
–
CLEAR
CLEAR
A ! "
J ( )
D # %
G & '
P ,
Y
<
< >
V : ;
S .
[ = ]
{ ? }
OPEN / CLOSE
TIME
TIME
CLEAR
INPUT
MENU
5
OPEN /CLOSE
5
PROFESSIONAL CD RECORDER
DN-C550R
PHONES
PHONES LEVEL
MIN
MAX
POWER
ON
OFF
FINALIZE
MULTI JOG
3
1
2
3
1
2
REMOTE SENSOR
PLAY
STOP
PAUSE
HIGH
NORMAL
DUBBING
8
9
RELAY MODE
DISPLAY
SELECT
TITLE /
CHARACTER
PUSH
ENTER
8
9
PLAY
STOP
PAUSE
4
REC
-
+
4,5
2
6
1
6
3
1
2
5
5
5
4,5
3
6
(3) Selecting tracks to be copied while scanning CDs and copying the selected tracks
★ The intro scan playing time can be set at the setup menu (Page 12).
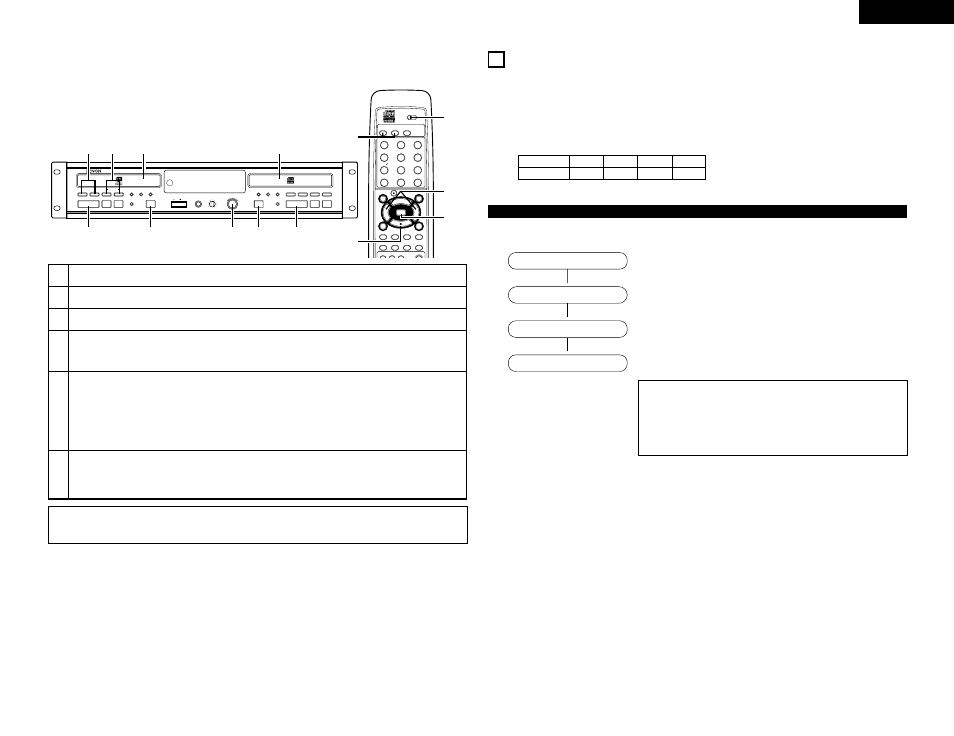
(Main unit)
(Remote control unit)
10
RECORDING FROM EXTERNAL DEVICES
• When recording on an already recorded disc, recording automatically starts from the end of the section last recorded. When
doing so, pay attention to the remaining time.
• To clear the entire content of the disc and record from the beginning, first erase the entire disc. “(2) Erasing the tracks” Page
28.
• To assure accurate recording, record with an ambient temperature of 30 °C or less.
• Recording may stop if the unit is subject to shocks during recording. If recording stops, it may no longer be possible to use the
disc normally. (“Disc Error”)
• Switch to the normal or dual mode when recording. Operation is not possible in the relay or mix mode.
Relay mode
Relay
Mix
Dual
Normal
Copying
✕
✕
❍
❍
★ Your recorder offers several recording modes.
★ Setting is possible using the method of “Setup Method” on Page 10.
Recording Modes
ª
ª
ª
• To make a synchronized recording of the complete disc or a program simply by
starting the source.
• In this mode, finalization is performed automatically after synchronized recording
of all the tracks.
• To make a synchronized recording of a single track simply by starting the source.
• To manually start a recording simply by pressing the REC button.
Disc Synchro
Make CD
1Tr Synchro
Synchro Off
NOTES:
• Analog recording is not possible in the Make CD mode.
• Use the copy mode to record HDCDs. Such discs may not be recorded
properly when recording from the exterior.
• Do not turn off the power or unplug the power cord while “Now PMA
Rec” is displayed after recording is completed. Doing so may render the
disc unusable.
Some remarks on recording:
• When Auto track is ON (default setting), track numbers will automatically be increased during recording.
• By programming the source first, a compilation can be recorded.
NOTE:
• A maximum of 30 tracks can be set to be recorded. After setting 30 tracks, “Choice OK?” is displayed and more
tracks can not be set.