Normal playback, English – Denon DN-C550R User Manual
Page 19
ENGLISH
19
4. Fade-in and fade-out recording
★ It is possible to record by gradually increasing the volume (fade-in) or decreasing it (fade-out).
(1) Fade-in recording
✽ Also refer to “Setup Method (5) Fade-in time setting” (Page 11).
1
2
Perform the procedure at “Manual recording” step 1 to 8 (Page 16).
Start playing the selection you want to record on the CD player, cassette deck, etc.
3
Press the fader button on the remote control unit.
• “Fade In” is displayed, and “FADE” flashes during the fade in operation.
• The recorded sound is gradually increased from a recording level of –
∞
to the set recording level in the set time.
(2) Fade-out recording
✽ Also refer to “Setup Method (6) Fade-out time setting” (Page 11).
1
During recording, press the fader button on the remote control unit.
• “Fade Out” is displayed, and “FADE” flashes during the fade out operation.
• The recorded sound is gradually decreased from the set recording level to a recording level of -–
∞
in the set time.
11
NORMAL PLAYBACK
1. Starting playback
First try playing the tracks in order.
STOP
PAUSE
PLAY
2
4
3
7
8
5
6
1
9
10
+
10
REC
_
DUBBING
_
NORMAL
HIGH
RELAY
MODE
CD CD-R
ENTER
MENU
8
9
3
2
6
7
PROG/DIRECT CALL
RANDOM
DISPLAY SEL. FADER INPUT
FINALIZE
1 / ALL
A - B
CHARACTER
TIME
TITLE
M
+
✽
–
CLEAR
CLEAR
A ! "
J ( )
D # %
G & '
P ,
Y
<
< >
V : ;
S .
[ = ]
{ ? }
OPEN / CLOSE
TIME
TIME
CLEAR
INPUT
MENU
5
OPEN /CLOSE
5
PROFESSIONAL CD RECORDER
DN-C550R
PHONES
PHONES LEVEL
MIN
MAX
POWER
ON
OFF
FINALIZE
MULTI JOG
3
1
2
3
1
2
REMOTE SENSOR
PLAY
STOP
PAUSE
HIGH
NORMAL
DUBBING
8
9
RELAY MODE
DISPLAY
SELECT
TITLE /
CHARACTER
PUSH
ENTER
8
9
PLAY
STOP
PAUSE
4
REC
-
+
1
2
1
2
3
3
1
1
3
2
1
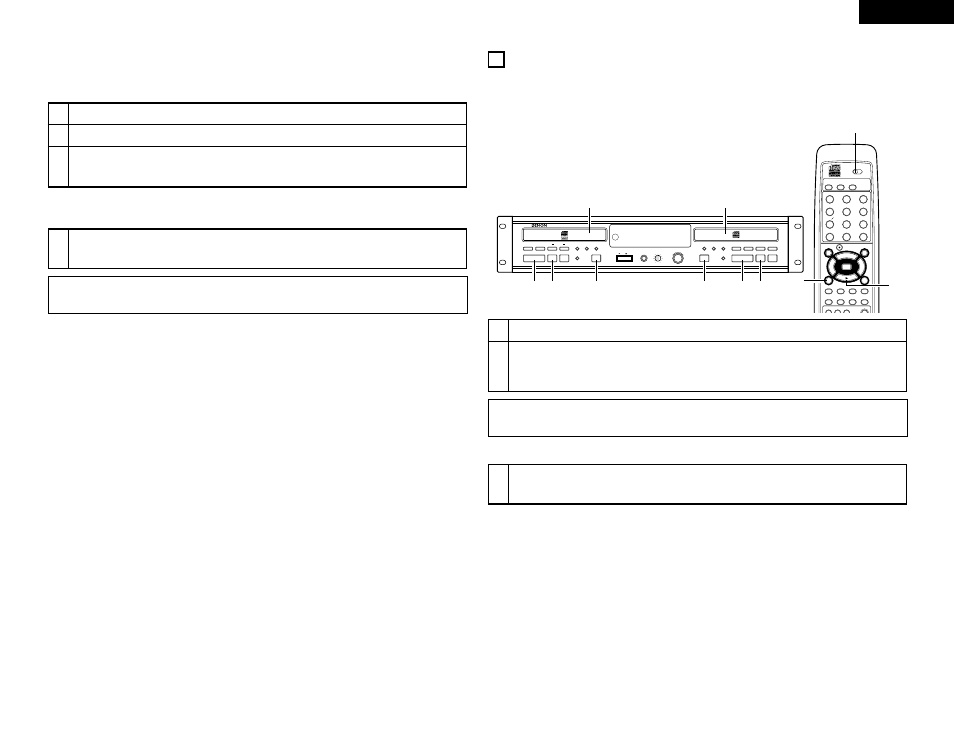
Load the disc to be played.
2
• Press the PLAY button (
1
) to start CD play.
• “
1
”lights up and the track number and track time of the track in play appear on the display.
• Press the TIME button once, twice or three times to see:
Remaining track time, total remaining time, elapsed track time.
NOTE:
• “No Disc” will be displayed at such times as when a disc is not loaded, the disc cannot be read properly due to
scratches or dirt, or the disc is loaded upside down.
2. Stopping playback
3
Press the stop button (
2
STOP).
• Playback stops.
• The stop mode is set automatically once all the tracks on the disc have been played.
(Main unit)
Select the deck to be operated.
(Remote control unit)
NOTE:
• The fade in/out recording function does not work in the synchro or copy recording modes. Record manually if you want to
use the fade in/out function.