Warning – Nexen TL50A/4-E 803017 User Manual
Page 12
12
FORM NO. L-21174-E-1209
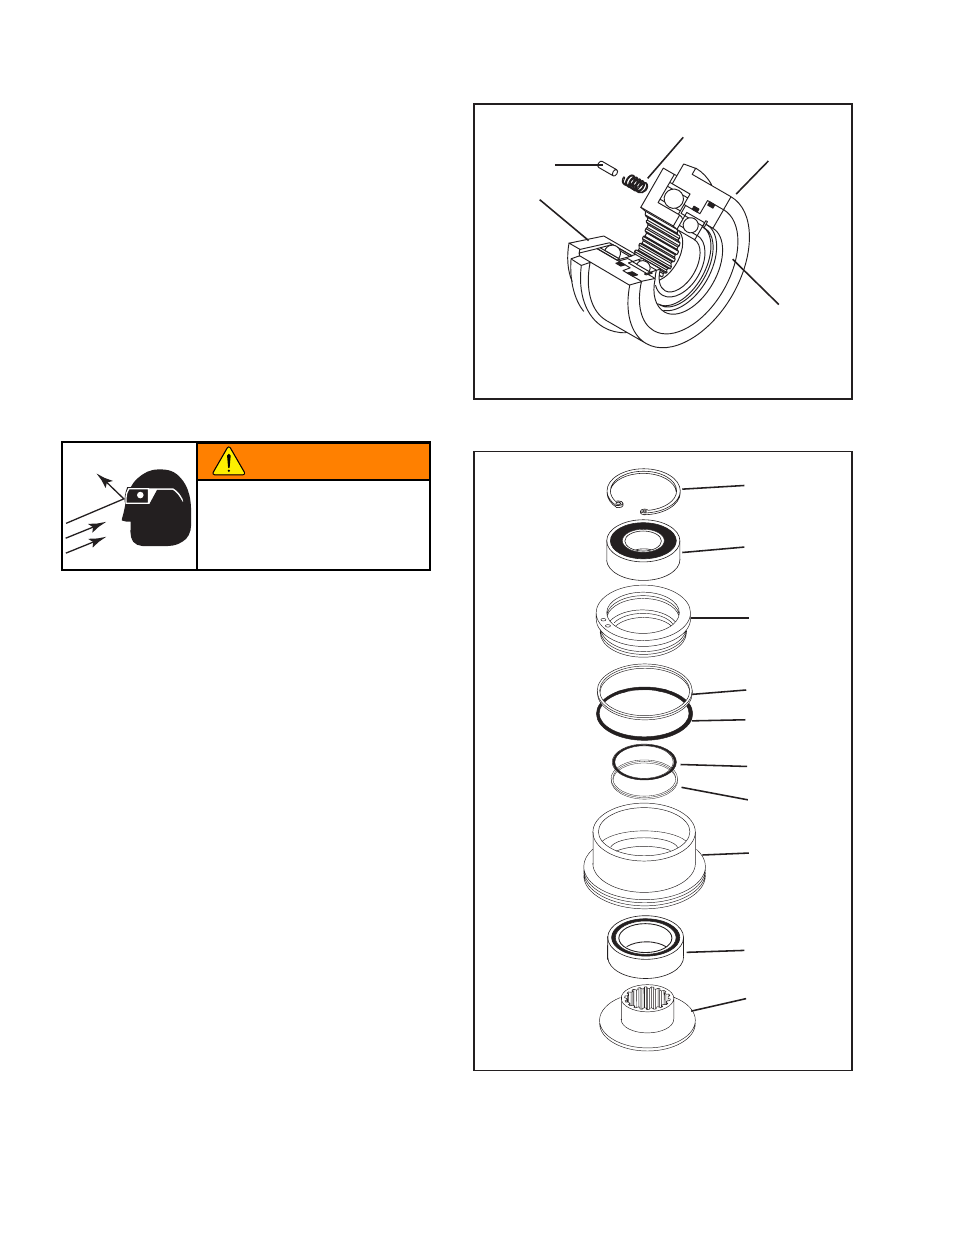
Refer to Figures 9 - 11.
1. Remove the old Compression Springs (Item 17) and
Spring Stiffener Pins (Item 16) from the Drive Ring
(Item 10).
2. Separate the Piston (Item 8) from the Cylinder (Item
9).
3. Remove old O-ring Seals (Items 12 and 13) and Back-
Up Ring Seals (Items 11 & 14).
4. Remove the Retaining Ring (Item 5) from the Piston
(Item 8) (See Figures 9 and 10).
5. Fully supporting the Piston (Item 8), press the old Ball
Bearing (Item 21) out of Piston.
16
17
10
8
9
FIGURE 9
5
21
8
11
12
13
14
9
22
10
FIGURE 10
CYLINDER/PISTON BALL BEARING AND O-RING SEALS
NOTE: Do not reuse the old ball bearings. Applying
force to the inner race to remove a ball bearing held
by the outer race causes damage to the ball bearing.
6. Clean the bearing bore of the Piston (Item 8) with fresh
solvent, making sure all old Loctite
®
residue is removed.
7. Apply an adequate amount of Loctite
®
680 to evenly
coat the outer race of the new Ball Bearing (Item 21)
and press the new Ball Bearing into the Piston (Item
8).
8. Reinstall Retaining Ring (Item 5).
9. Fully supporting the Cylinder (Item 9), press the old
Ball Bearing (Item 22) and Drive Ring (Item 10) out of
the Cylinder.
10. Using a bearing puller, remove old Ball Bearing (Item
22) from Drive Ring (Item 10).
11. Clean the bearing bore of the Cylinder (Item 9) with
fresh solvent, making sure all old Loctite
®
residue is
removed.
12. Apply an adequate amount of Loctite
®
680 to evenly
coat the outer race of the new Ball Bearing (Item 22)
and press the new Ball Bearing into the Cylinder (Item
9).
WARNING
Special attention should be exercised
when working with retaining rings.
Always wear safety goggles when
working with spring or tension loaded
fasteners or devices.
- TL60A-E 802957 TL60A-E 802976 TL60A-E 802952 TL60A-E 802941 TL60A-E 802942 TL60A-E 802945 TL40A/2-E 802959 TL40A/2-E 802983 TL40A/2-E 802953 TL40A/2-E 802926 TL50A/2-E 802936 TL30A-E 802986 TL30A-E 802912 TL30AC-E 803013 TL30A-E 802915 TL30AC-E 803015 TL30A-E 803025 TL60A/2-E 802967 TL60A/2-E 802946 TL60A/2-E 802949 TL40A-E 803018 TL40A-E 803010 TL40A-E 802960 TL40A-E 802985 TL40A-E 802922 TL40A/4P-E 803014 TL40A-E 802958 TL20A/2-E 802906 TL20A/2-E 802987 TL30A/4-E 803020 TL50A-E 913067 TL50A-E 802939 TL50A-E 803028 TL50A-E 802932 TL30A/2-E 802961 TL30A/2-E 802916 TL30A/2-E 802919 TL20A-E 802988 TL20A-E 802902 TL20A-E 802968 TL60A-E 802944 TL60A-E 802975 TL60A2P-E 803019 TL20A-E 802904 TL30A-E 802914 TL30A-E 802978 TL30A-E 803006 TL40A-E 802924 TL40A-E 802909 TL50A-E 802934 TL50A-E 802951 TL50A-E 802955 TL30A/2-E 803024 TL20A-E 802908 TL30A-E 802918 TL40A-E 802928 TL50A-E 802938 TL60A-E 802948